| Type: | TR, 80 ft (24 m) |
| FA: | Ken Roberts |
| Page Views: | 829 total · 8/month |
| Shared By: | kenr on Jul 25, 2016 |
| Admins: | Morgan Patterson, SMarsh |
Your To-Do List:
Add To-Do ·
Your Star Rating:


Use onX Backcountry to explore the terrain in 3D, view recent satellite imagery, and more. Now available in onX Backcountry Mobile apps! For more information see this post.
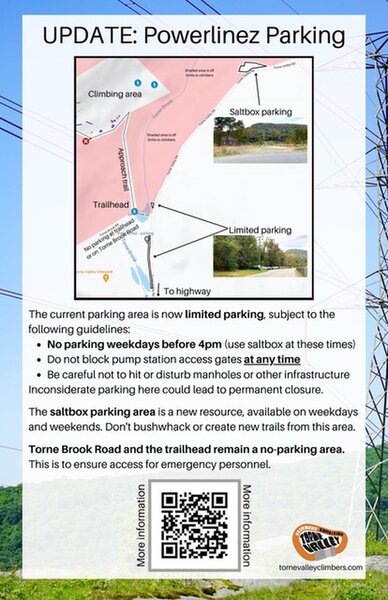
 Access Issue: As of November 2021, there are new parking arrangements. Please follow this guidance.
Details
The current parking area is now limited parking, subject to the following guidelines:
No parking weekdays before 4pm. (Use Saltbox Parking Area at these times).
Do not block pump station access gates at any time.
Be careful not to hit or disturb manholes or other infrastructure.
The Saltbox Parking Area is a new resource, available on weekdays and weekends. Don't bushwhack or create new trails from this area.
Torne Brook Road and the trailhead remain a no-parking area. This is to ensure access for emergency personnel.
Inconsiderate or illegal parking here could lead to permanent closure.
Description

Lots of interesting moves first on diagonal crack, then on slabs.
Gentle up left side of rounded ridge / rib, following obvious shallow crack. When reach a horizontal crack leading right, exit the crack to get up onto the crest of the ridge. (or could go higher before exiting the crack: more difficult).
Next traverse right on grass - dirt - rocks for ten feet of so. Then up the slab rock on left side of obvious wide crack/gully in the Dragon's head (see on this Routes photo).
warning: Loose rock is still a concern here. Belayer or other members of party should not stand anywhere near underneath the climber.
. . . (Lots of vegetation on this rock as of 2016. Be prepared when climbing to navigate around protruding trees and branches, and dealing with holds slippery with grass, lichen, moss, dirt).
Location

Left side of the rib / arete which forms the left (west) boundary of the Dragon wall slab. Just Right of a large tall healthy tree (the Giving Tree).
--> See on this routes Photo
--> or on this routes Photo
--> See on this routes Photo
--> or on this routes Photo
Protection

To set up Top-Rope, see Description of Dragon area.
Requires directional Trad protection on Top-Rope to prevent dangerous side-swing if climber falls.
Protection for Trad leading is unknown and likely inadequate.
Requires directional Trad protection on Top-Rope to prevent dangerous side-swing if climber falls.
Protection for Trad leading is unknown and likely inadequate.

 Continue with onX Maps
 Sign in with Facebook


0 Comments