Contributions to this write-up were provided by Mountain Project user Monomaniac, who helped to provide diverse outlook of the route under a unique set of mountain conditions.
Recommended Technical Gear for the Route
(Note that gear recommendations are compiled from diverse experiences of the route, under different conditions. The components of your actual rack should be based on your comfort in traveling over mixed moderate terrain, route conditions, and the overall composition of your rack.)
*(1 set) Double or Twin Ropes
*(2) Technical alpine tools, each (an adze is key for making some tent platforms; a hammer is key for re-setting any pitons and flattening your empty fuel canisters)
*(4-7) Ice Screws (13-17 cm) 6+ screws in icy years, 4+ in less-icy years
*(2-3) 24" Snow Pickets
*(2/3 set) Stoppers (BD size 4-11) some parties get away with less
*(4-5) Cams: TCU size 1, 2 BD size 0.4, 0.5, 0.75, 1.0
*(0-3) Hexes: BD size ~6-9
*(0-3) Tricams: 0.5, 1.0, 1.5
*(1) cordelette
*(4-6) double length runners with biners
*(4-6) single length runners with biners
*(0-1) v-thread tool (make sure you have a screw long enough to use this, if you carry it)
Also, dont forget:
*(1) small metal shovel
*Many sets of gloves and mitts
*Full overboots, if you like your toes.
*Micro mp3 player for the tent (a godsend if tent-bound; the AAA variety works well, and you can get FM Anchorage radio higher on the mountain)
*Some sort of first aid kit, stocked with altitude meds and knowledge of how to use them safely. Consider bringing a cheat-sheet for high-altitude sickness and medications.
*Goggles
*Sunglasses and spare sunglasses
*Repair kit (duct tape, needle and thread, zip ties)
Items you'll want to debate the merits of carrying:
*Headlamp
*Map and Compass
*Snowshoes/Skis (on-route)
*Pitons (not generally carried present-day)
*Communications
History
Bradford Washburns knowledge and photography of the region inspired many first ascents, including the Cassin Ridge. In The Mountain World, 1956-1957, Washburn taunted:
Last and probably the most difficult and dramatic of all potential routes on Mount McKinley is the great central bulge on the fabulous 10,000-foot South face of the mountain
this route may be classified as unequivocally excellent climbing from start to finish. This carrot lured Italian Riccardo Cassin, and his five climbing partners to Alaska during the summer of 1961. The team achieved an epic 4+ week ascent (and descent) of the route, starting from the East Fork of the Kahiltna.
1967 marked another important year for the Cassin Ridge, as a Japanese party had the second ascent of the Cassin. Their ascent was important not only because it was the second ascent of the route, but also because it altered the route in two ways. First, the party approached the climb via the Northeast Fork of the Kahiltna Glacier; secondly, the party avoided the more strenuous rock at the start of the climb by ascending what is now known as the Japanese Couloir. Ironically, this icy terrain had been avoided as much as possible by the first ascent party, due to the fact they were more comfortable on steep rock than on ice.
Today, the Japanese approach and couloir variation are the norm, along with climbing the route alpine style.
More of this interesting history may be found in almost all the references listed below; particularly High Alaska and Fifty Classic Climbs of North America.
Location
This route lies in Denali National Park on the South Face of Denali. It is the prominent and striking 9,000 ridge that subdivides the face and is abutted on its right flank by the East Fork of the Kahiltna Glacier and on its left by the North East Fork of the Kahiltna Glacier.
Approach
At least two common approaches to the start of the climb are possible. Flexibility in your approach plans, based on seasonal conditions, is advised
1.) NE Fork of the Kahiltana The most common and most direct approach. It assumes that you have already acclimated, elsewhere. At 7,750 depart the SE Fork of the Kahiltna Glacier, and navigate up the NE Fork of the Kahiltna Glacier. The first part of the approach is shared with those targeting the West Rib, so you may find a boot-pack. Cassin Ridge goers continue to the base of the route at 12,200, the bergschrund at the base of the Japanese Coulor. This author observed avalanches from the slopes North of the routes start.
The approach is known for its challenging route finding due to being inundated with open crevasses and snow bridges. Additionally, the steep ridges to the south are particularly avalanche prone. The crevassed approach lies largely in a terrain trap, known as the Valley of Death. Note that this name is not a misnamed alias, such as the Euro Death Knot, rather it has been aptly named for multiple incidents. Travel when temperatures are cooler and snowpack/seracs are more stable. Say a prayer, even if youre not religious. Difficulty of navigation increases and safety decreases as the season progresses.
Advantages of this approach include:
- You may acclimate somewhere besides the West Buttress
- You may recharge your batteries with unlimited good food and drink at your huge cache where the SE and NE forks of the Kahiltna merge
- If summit bid is unsuccessful, potentially no gear retrieval necessary from higher on the mountain
- Less risk of calf/crampon burn-out in icy years.
2.) Lower West Rib Descent to NE From Genet Basin, ascend the West-Rib Cutoff to join the West Rib at 15,700ft (or higher). A prominent boulder on the West Rib marks the most convenient cut-off point to join the West Rib. Once on the West Rib, descend the route to the NE Fork of the Kahiltna Glacier. Exit the rib to the NE Fork of the Kahiltna via the Chicken Couloir. Note that in many year (under ideal conditions), this descent to the base of the Cassin can be a one-day affair, with many parties taking only a couple of hours to descend from 13,000 -> 11,200.
The 2005 early season was particularly devoid of snow with visible ice on many areas of the mountain. This lead to front-pointing down most of the West Rib route, which promoted early calf burn-out for one party who authored this description. On the same descent, the similar conditions made the Chicken Couloir particularly active with rockfall kind of like playing dodge-ball. As a result, the said descent became a two-day project.
Advantages of this approach include:
- Potentially traveling free of snowshoes/skis from the time you leave the West Buttress
- Ability to retrieve and use snowshoes/skis for descent of the West Buttress if the summit bid is successful.
- Safety (in most years)
- You get the extended Tour de Denali, seeing most of three major routes
- Allows you to put in a Food/Fuel cache at 17k
THE ROUTE
This description is intended to be used in conjunction with other route descriptions, found in the literature listed below. Several useful route variations, alternate camps, climbers topos, and maps are contained there.
1. Gaining the Ridge (12,200 -> 13,000, Cassin Ledge) The Ricardo Cassin party began the route at the base of the Cassin Ridge, where by a moderate 5th class rock buttress is traveled, to gain the ridge. Additional information on this start may be found in the literature.
In 1967, a variation, known as the Japanese Couloir, was used to gain the ridge. Since that time, the Japanese Couloir variation has become a standard part of the route.
The Japanese Couloir meets the Cassin Ridge after 800 of elevation gain from its base. The Couloir may vary across or throughout the season(s) from snow to bullet-hard alpine ice, with mixed sections inter-dispersed.
Find a weakness in the bergschrund to ascend, gaining a 15 section of ~70 deg ice. This leads to lower-angled ice. Rock pro will not be available for at least 1.5 pitches. Continue up the AI3+ grade ice, belaying, if necessary. After ~4 pitches from the base, you are presented with two options:
a) Stay true to the ice line in the Couloir, ascending a short section of ice that may be as steep as WI4. This may feel more strenuous with the contributions of altitude and the weight of your pack. Above the steep section, ice conditions may deteriorate and pro for a belay may be challenging or sparse. Most climbers consider this pitch of the Japanese Couloir to be routes crux.
b) From a ways below the near-vertical ice, veer left on to the rock. Search for the path of least resistance, which has been rated at 5.6. This may be difficult, and may contribute to this section frequently being reported as more challenging than its given rating. Once vertically above the steep ice section, rejoin the original ascent line.
Continue up the couloir, which now has a slightly lower angle. Ice conditions may have morphed to crummy snow-over-rock conditions. As you approach the last 1.5 pitches of the couloir, the angle steepens slightly. Climbing may be more mixed in nature, with some sections devoid of pro. For this section, pro that is available includes rock protection placements.
Gain the ridge and head ~75 to climbers left to find Cassin Ledge.
Cassin Ledge was built up of stacked rocks by the first ascent team. It appears that Cassin Ledge could accommodate two small tents (one around the corner from the regular spot), though you may need to ro-chambeau for who gets the better spot.
Considerations - Despite its appearances, once in the couloir, there are no flat spots to rest or brew up (at least as observed in icy years)
- Conditions may vary widely (snow to bullet-hard ice) from season-to-season, within the season, and within the couloir.
- It is advised by the author to not climb the Japanese Couloir during icy seasons when light snow or flurries are falling, as this may eventually lead to spindrift avalanches. Lower in the couloir, these are thin sheets of sliding snow that are passable. Higher in the couloir, the avalanches are airborne, directly over the climbers. While neither of these posed a threat of direct force, the latter situation percolated the climbers clothing, chilling them to the bone and making for a brutally cold and slow/long ascent.
2. Rock Step + Cowboy Arête to Bergschrund (13,000, Cassin Ledge -> 14,000-14,700, Hanging Glacier) From Cassin Ledge, proceed up and traverse to climbers right around some easy mixed terrain until you arrive at the start of the rock step one rope length. Most climbers will want to belay the next pitch, at a minimum. Ascend the rock (5.6), which may be sparce on pro, depending on how much snow. Alternatively, the pitch may be started by traversing ~20 to the climbers right, descending slightly, and ascending a parallel system. This author investigated both options, and chose the first option.
Continue up and right, aiming for the highest point you can easily belay, and bring up your partner. Continue up and slightly right for approximately one rope length until you gain the Cowboy Arête, or knife-edge arête. In this section, it was interesting to see some flimsy homemade aluminum snow pickets nothing I would ever have trusted for a rappel!
Make your way up the knife-edge arête. Conditions may vary substantially seasonally or within the season. The authors found a variety of conditions on the Arête. There may be short sections of up to 70 degree ice/snow, but for the most part the climbing is easy (yet extremely exposed) on 45-50 degree terrain. Protection as one climbs the arête may vary from screws to pickets to no protection at all for a rope length or more.
After navigating the wind-sculpted cornices at the end of the arête, you are dumped into a relatively flat protected area. Some will camp here, around 14,000.
Above, you will note the ice and lower bergschrund that is mentioned before the first rock band. Proceed to the bergschrund. Historically, the bergschrund was one of the technical cruxes of the climb. According to guide books, a notch was reported to have formed prior to the 2000 climbing season around 14,300(?), which made passage much more straight forward. This notch was found to be present in 2005, and it is this authors opinion that it would not easily fill in again, without substantial movement of the bergschrund.
Some parties place a camp directly left and slightly below the notch/glacier headwall (within 100). With digging, the site could accommodate several tents. The snow is very soft/loose and the camp is relatively sheltered from the wind; however, it is also a spindrift deposition zone. It is also possible to camp near the top of the glacier, at the jumping off point for the First Rock Band, though you may need to dig a ledge for your tent.
3. Glacier and Two Rock Bands (14,000-14,700, Hanging Glacier -> 16,700, Top of Second Rock Band) Make your way up the weakness (notch) in the bergschrund (AI3+). Continue up the icy glacier over low angle ice, veering strongly to the right. Aim for the obvious weakness on the right end of the rock band. Guide book authors refer to the landmark as an M shaped rock, but I did not observe it as such. If you just look for the apparent weakness on what appears to be an easily climbable weakness on the right; it is hard to miss. An old, wooden mountain axe shaft is present where the route meets the rock; however, only my partner saw this.
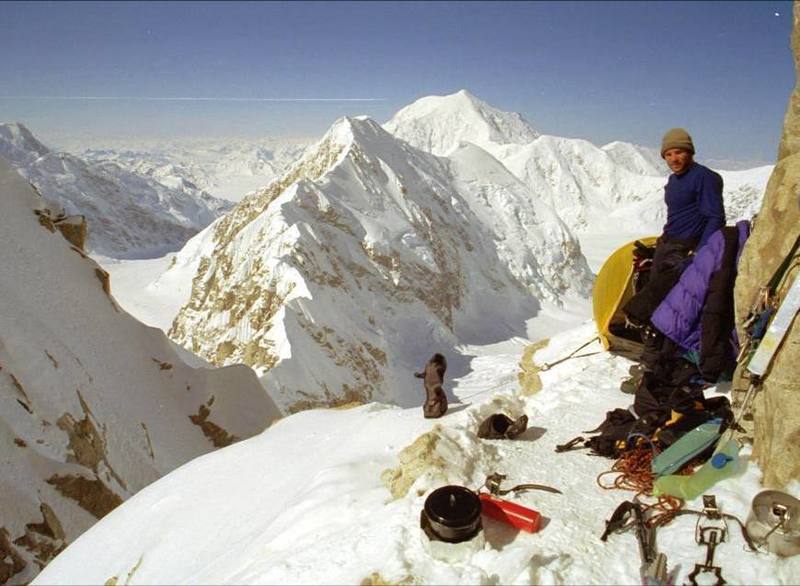
Continue up rock and mixed terrain for a rope length, and traverse back/North (parallel to the ridge) a little more. Soon, find a weakness and ascend a short distance to a large, slopey shelf, covered in ice. Traverse left on the shelf, and ascend a nice and somewhat narrow section of steeper ice and rock. Continue moving up and right. After another rope length or two of mixed rock and snow climbing, a not-so-well-known small tent platform exists on the climbers right, behind some rocks. The area looks out to the East, and is guessed to be ~15,600. This author added a camp here, as he was not feeling well. Accommodations are tight, as one corner of our Bibler Eldorado hung off into space, yet well sheltered.
Continue up 1-2 rope lengths to find a reasonably large break between the two major rock bands, where snow collects and you can traverse to the left. Traverse left, but only ~ 1/2 way across the breadth of the second rock band. If you go far left and find yourself looking up at a relatively steep chimney system, you have probably gone too far. After backtracking from the chimney system, we ascended a mid-angle rock ramp in kind of a dihedral; however, it is likely that there are multiple ways to climb this section. Continue up beautiful mixed rock terrain, aiming up and left. When in doubt, moving left may prove easier ground (we found ourselves on a run out balancy section).
Above this rock band, you will find a large low-angle shelf. Supposedly there is a rock weakness above, which represents some reasonably challenging climbing to conclude the second rock band.
Alternatively, you may bypass these by traversing far right on the shelf and find wrap around the east end of the buttress, up, and back left on snow. Ahead you will find a large low-angle snow/alpine ice shelf above the second rock band. Heading a short distance NW up the snow and alpine ice you will locate a large boulder below the final rock band. We placed a camp here, and found remnants of prior climbers including a rope, copy of Tolkens The Hobbit, and a full sized spatula (???). Chopping out a tent platform in the low angle snow and alpine ice was a lot more work than expected, at ~16,700.
4. Final Rock Band or French Variation (16,700 -> 20,320) Original Route: [Please PM me with details if you have first-hand knowledge]
French Variation: Puryear describes this as being the now part of the standard route. In 2005, we assumed this was a variation. From above the second rock band and prior mentioned camp, head slightly east and around the buttress on the snow. You will see Big Bertha glacier to the East. Proceed North/parallel along the ridge for a while and find a good sized wide couloir on the left. Navigate onto the 35-50 deg icy snow slope and ascend. Top out on the ridge proper, over some snow covered rocky terrain.
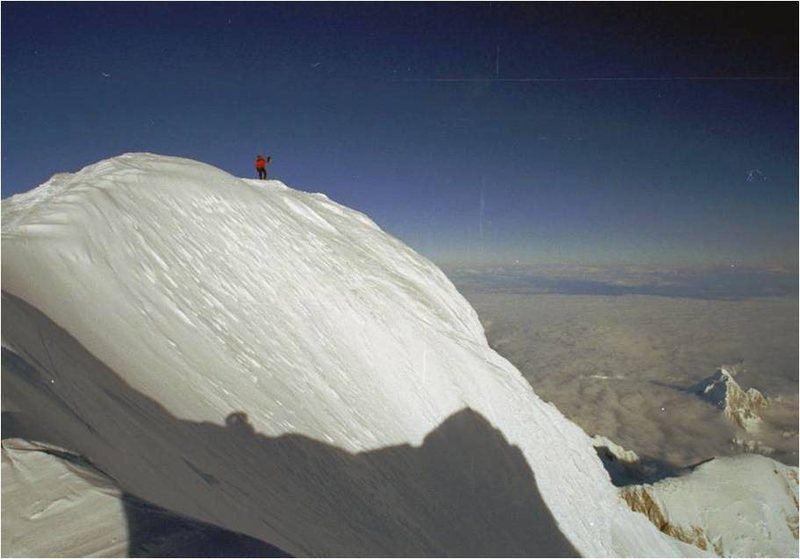
From 17,300, continue to ascend the ridge over easy snow and rock mixed terrain. The ridge will eventually broaden and you may locate deeper snow. Continue suffering by breaking trail in the direction of the summit, which is not yet in sight. At one point, you will have the opportunity to head left into a slightly upsloping, large snow field. It is bordered with exposed rock on three sides and interdispersed rocks in the center. Post hole until you are in this snow field and take one of the lines heading up the face that is now on the climbers right (North). Once atop this section, continue to climbers left, until the summit ridge is in sight. Proceed to Kahiltna Horn, joining the normal route. From here, you may go check out views from the top and descend the West Buttress. Climbers have camped at a flattish spot at 18,500 feet (in fact, the most daring helicopter rescue in the history of Denali plucked several Korean climbers from this site in the 1980s).
See other literature for further guidance on descending the West Buttress.
Route Considerations
- In drier years, expect to see a lot of gold line and pitons. The park service had a formal clean-up of fixed line in the 1996, but as of 2005 it continues to melt out from the route.
- Single versus double ropes. We took a single 9mm, but wouldnt do it again. Chances of successful descent with a single rope are slim.
- If putting in a cache, be sure and use the NPS provided customized tags on the wands you use to mark your cache. Use multiple wands, deep and high. In 2005, we lost our descent cache, as some unknowing climber moved our marked wands. Bad climber, dumb climber.
- You can pick up anchorage radio stations from at least higher on the Cassin Ridge. It may be good to find out in advance if there is a statewide weather forecast that is aired regularly.
- Many parties can make it from the base of the West Rib to the base of the Cassin Ridge without snow shoes. Time of day and season will affect your success.
- Lastly, it is rather typical for a number of parties to fly-in with the intent of climbing the route, but the number of climbers actually making it to the base of the route (let alone completing it) is far less. This is due to a number of factors, including: weather, conditions, physical or mental exhaustion, and the need for warmth, real food, and beer. One of the authors suspects many parties with bold aspirations loose interest once they arrive at 14K on the West Butt. The tedium of the endeavor, and the apparent ease and quickness of a West Butt ascent traps many would-be Cassin ascensionists. The same author met a party intent on the Cassin that eventually decided they would tag the summit via the West Butt (to take the pressure off) then do the Cassin. Of course, after climbing the West Butt, they bailed. Be prepared for the motivation sapping powers of the West Buttress!
Pertinent Resources
Be sure and check out the additional guide books and other resources, if venturing to this climb. They contain additional useful information, including route topos.
Classical Resources:
*Beckey, Fred. Mount McKinley: Icy Crown of North America. Mountaineers Books, 1993
*Coombs C, Wood M. Alaska: A Climbing Guide. The Mountaineers Books, 2001.
*Puryear, Joseph. Alaska Climbing. SuperTopo, 2006.
*Roper S, Steck A. Fifty Classic Climbs of North America. Sierra Club Books, 1979, 1996.
*Selters, Andy. Ways to the Sky: A Historical Guide to North American Mountaineering. The AAC Press, 2004.
*Twight, Mark. Justification for an Elitist Attitude. (excerpt from the book Kiss or Kill: Confessions of a Serial Climber). Mountaineers Books, 2001. (for perspective on the West Butt scene)
*Waterman, J. High Alaska: A Historical Guide to Denali, Mount Foraker & Mount Hunter. The AAC Press, 1988, 1996.
*American Alpine Journal
Internet Resources:
*NA Classics (Trip Reports and References)
*Summit Post - Cassin Ridge Write-Up (written by my Cassin partner, Jason Carter)
*Summit Post - Riccardo Cassin History
*SuperTopo (Puryears Cassin Ridge guide currently free for download)
*Allen Sanderson's Trip Report
*Nick Sweeney's 2022 Trip Report
Future Advancements, Corrections, Additions
Please PM me with any future advancements to the route, corrections to this description, or worthy additions. I am glad to update the description accordingly, instead of just having a bunch of comments posted below.


 Access Issue: Register with the NP Mountaineering Headquarters in Talkeetna, AK before climbing in the park!
Details
Access Issue: Register with the NP Mountaineering Headquarters in Talkeetna, AK before climbing in the park!
Details


 Continue with onX Maps
 Sign in with Facebook


Morrison, CO
It's certainly possible to get lost on the ridge (especially between the first and 2nd rock bands). Good route-finding skills are mandatory. Jun 11, 2007
Boulder, CO
Unfortunately, it was an irregular year, in that there had not been much recent snow. We basically had to front point down much of the lower west rib. When we reached the chicken couloir, it was littered with boulders and rocks that were letting loose in a very non-traditional manner for that couloir. So, it was a bit scary having bowling balls come down this couloir as we were down climbing. In future 'dry and icy' years, you might experience similar conditions, so do take this into consideration.
We only had 4 screws in addition to a small rock rack and a couple of pickets. A couple more screws would have been welcome during our icy year... the Japanese coulior was ice from bottom to top -- unlike some pictures I've seen where it is a snow climb. As of 2005, the easy cut-through at the glacier (above the cowboy arete) was still open.
Awesome climb. Sep 12, 2007
On the road to perdition
terragalleria.com/mountain/…
Probably the most interesting part is that of the vast majority of folks who come to Denali planning on doing the Cassin Ridge never get on it. Sep 25, 2007
Delaware, OH
Boulder, CO
Hmmm... I think mainly persistence through the course of the trip -- as going up and down the mountain several times can take its toll. Perhaps a bit of patience, in case you get hit by bad weather. Mar 21, 2009
reno
The cassin ridge in very high resolution. Sep 1, 2010
Melba Idaho
Thanks a ton to Jeff for this effort.
photomountains.com/content/…
Cassin Ridge High Res photomountains.com/content/… Nov 11, 2014
Golden, CO
Here's a video my climbing partner Nate K. put together. The Denali stuff starts around minute 5:
youtube.com/watch?time_cont… Aug 1, 2017
Seattle, WA
Full TR here: cascadeclimbers.com/forum/t…
Tracks here: peakbagger.com/climber/asce… Jun 16, 2018
Golden, CO
jasonantin.com/kit-lists/20… Nov 23, 2018
Spokane, WA
For those interested, here is my Denali story: spokalpine.com/2022/07/08/d… Jun 16, 2022
Chile
None of the climbing is particularly difficult , good pro. Definitely didn’t use pickets we brought 2 for the cowboy arete , but it doesn’t hold any pro. Used it on the hanging glacier to bypass the crevasse. That’s all.
Only brought 1 rope. I would
Perhaps consider a 50 or 40m, mostly simulclimbed all the route for the exception of a few technical sections that we built belay stations .
Main hazard is weather , move fast . Jun 12, 2023