
 Continue with onX Maps
 Sign in with Facebook


Tying a Figure 8 on a Bight Such That It Requires Minimal Dressing


|
|
Edit: The following is both incorrect and poorly worded. Please see my updated comment further down the thread. Thanks for the help and feedback, y'all! The common ways that the F8 on a bight is taught require much dressing. I was interested in figuring out how to tie it correctly the first time, so I took two differently colored ropes and figured it out. There are two problems that can occur that require dressing the knot, the first is that one loop is improperly above or below another one, and the other is that the strands become twisted. The way I will illustrate to tie it fixes both. But first let's examine what these problems look like so we know what we're looking for. 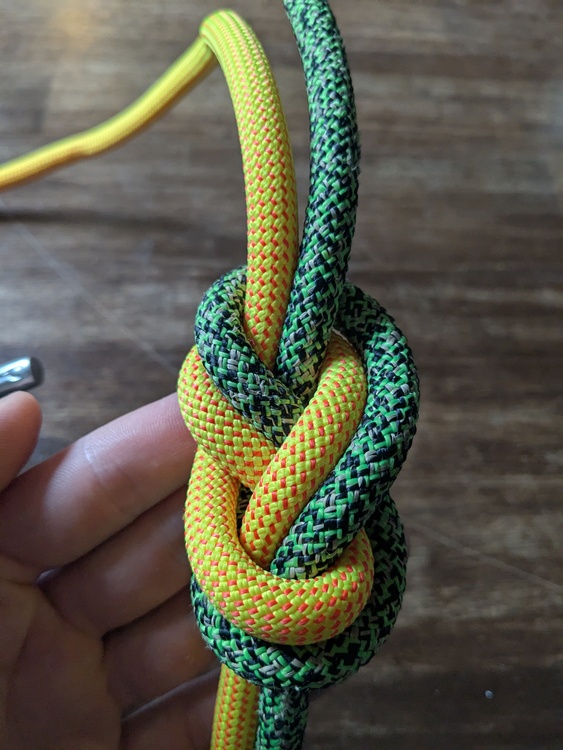 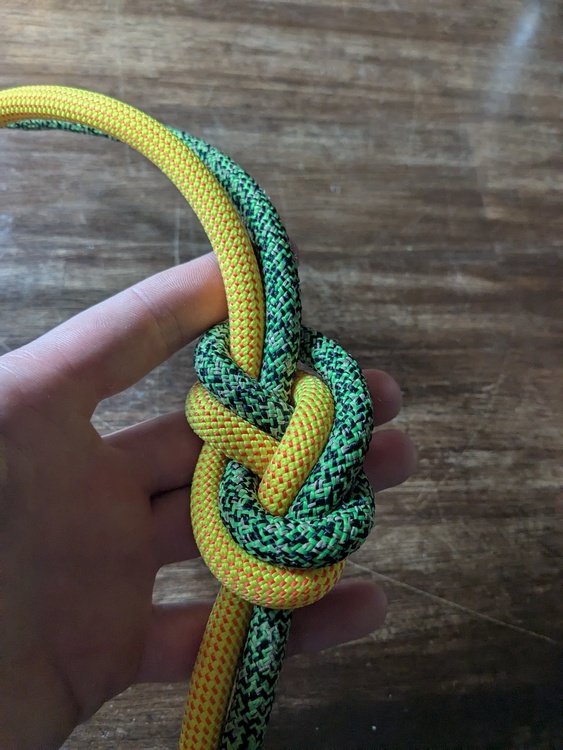 Above: See how the green rope forms loops that are above the loops in the yellow rope? This is correct. 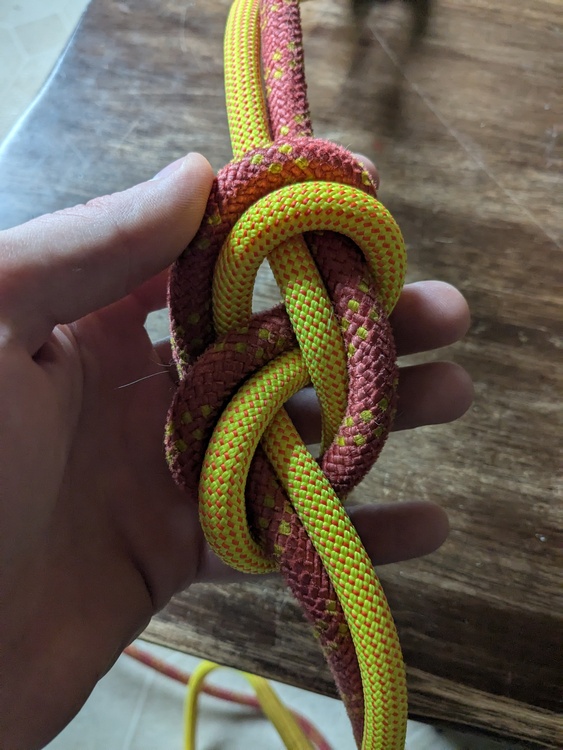 Above: See how the red rope is on the left on the bottom and on the right on the top? It crosses over the yellow rope at the bottom loop and crosses over, making them not parallel and definitely improperly dressed. Super easy fix, but you can also just tie it right. 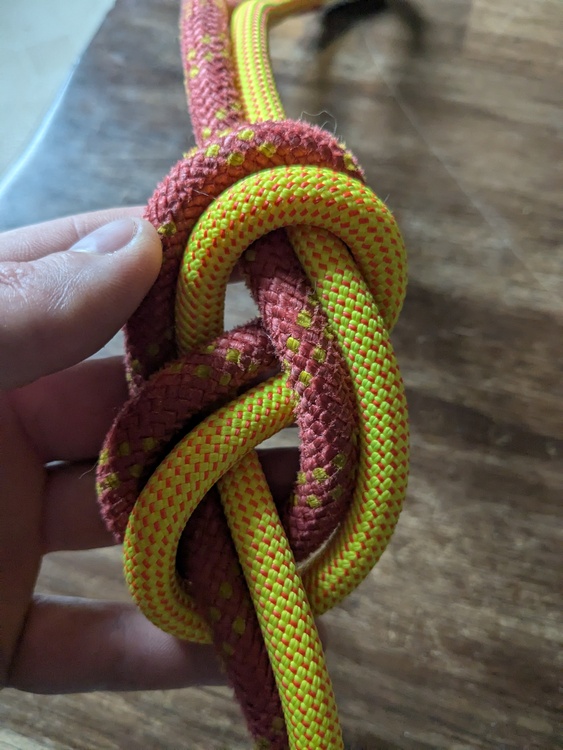 Above: a properly tied Fig 8. So here's how it works. When you're tying the figure 8 around your finger (which makes it much easier) it's easy to do this: 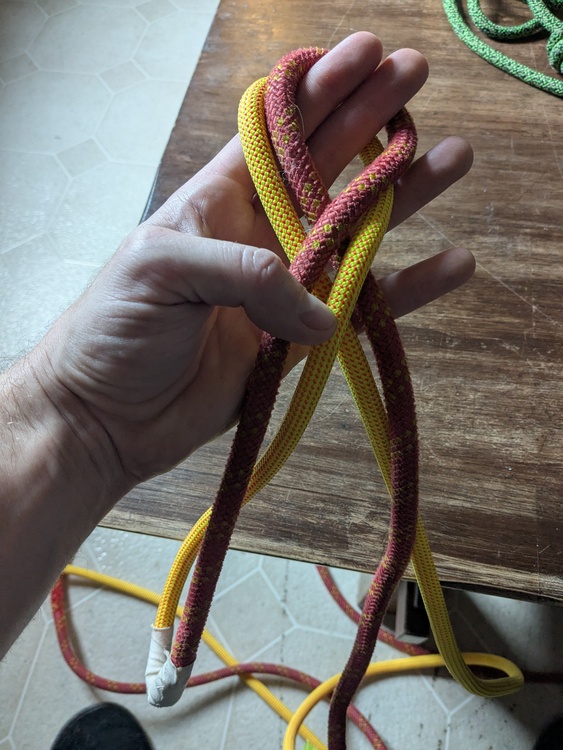 Above is wrong and will create the problem we saw in our first image where one loop is above and below the other. Notice how on the right side of the loop it crosses over and above the yellow strand-- this is the cause of our problem. When the knot is tied this red strand will be the lower or inside strand, and we do not want the red strand going above the yellow strand here. Instead we want this: 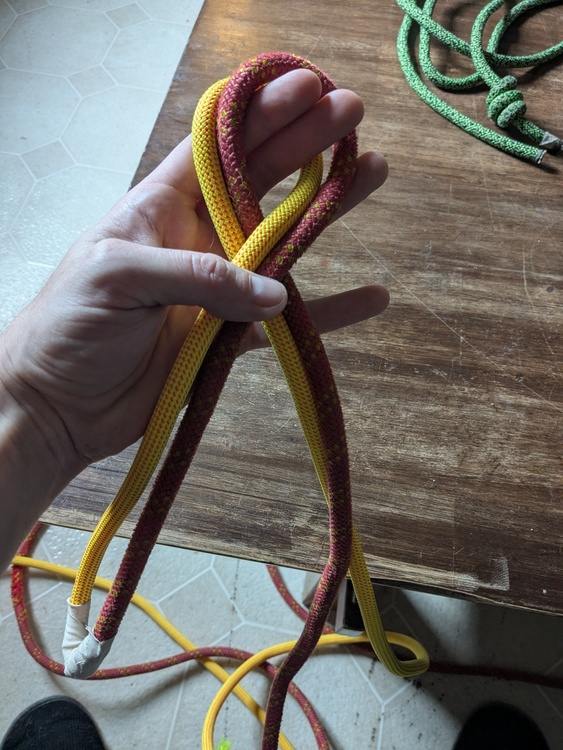 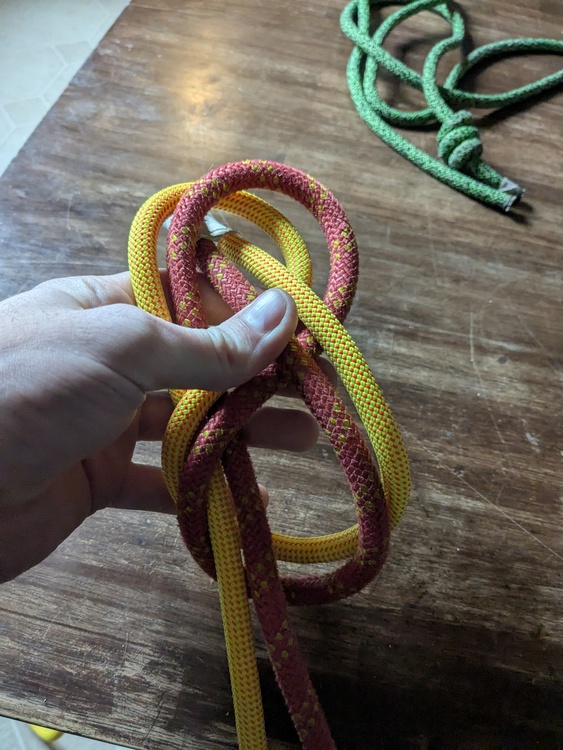 Above: Look at the bottom left side of the knot and you will see that the yellow strand is on the inside of the knot. The way we are putting the bight through the top loops of the knot the yellow strand is now moved to the outside. If tied this way it's a very simple fix, but we could also just tie it like this: 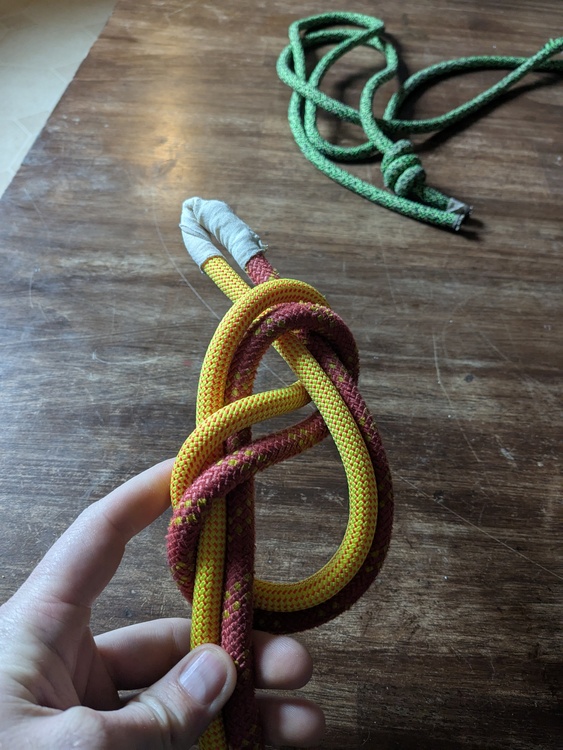 Above: the yellow strand remains on the inside and will not require any fixing once the knot is tied. I also made a shitty video as that might help clarify the concepts. (Edit: this incorrect video has been deleted) |

|
 |
|
|
Kids these days when faced with reading for a whole 90 seconds straight: Math Bert wrote: |
|
|
Ricky, I always used "parallel highways." They shall not cross. Simple as that. |

|
Ricky Harline wrote: This is not properly |
|
|
James - wrote: Agreed, if you mean not properly dressed. For any beginners reading this- these are all correctly tied. They’re not all correctly dressed (by my count none of them are properly dressed). This is an important distinction. Tied incorrectly is dangerous, dressed incorrectly is inconvenient. Though, we use a figure 8 follow through/bight in part because they have a solid chance of not failing even when mistakenly tied incorrectly. https://www.alpinesavvy.com/blog/a-better-way-to-tie-the-figure-8?format=amp Credit: Alpine Savvy 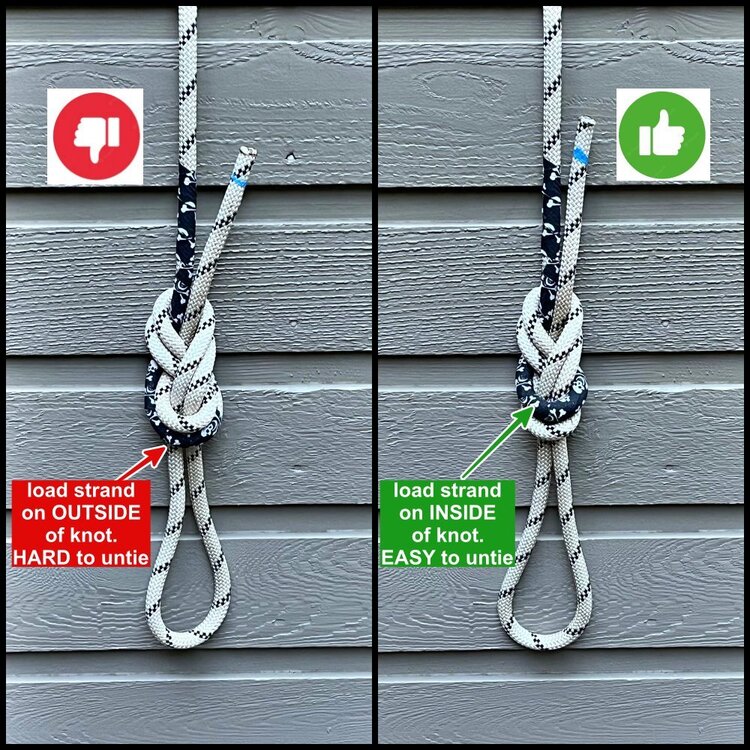 |
|
|
Ricky Harline wrote: Dude, there's no way you're not one of those kids, or one of the kids that can only focus on the one thing |
|
|
Interesting about the improperly dressed. Will review that, thanks guys! @James: so the red rope at the bottom of the knot is on the left, it should be on the right? @ PWZ: I read lots of books most people consider very boring |
|
|
At both the top and bottom of the knot, the red rope should pass behind the yellow to end up on the right, yellow on the left. |
|
|
I'm going to echo the comments that speaking of some of the illustrated variations as "wrong" is very misleading. I'm pretty sure that testing of improperly dressed figure-eights shows no difference in strength (and of course all of them are beyond good enough), This means that getting the strands properly parallel and without twists is a cosmetic endeavor not related to the safety of the knot. I'm sympathetic to that; I like knots properly dressed too. But those who do not insist on perfection in this regard have just as good a knot as those who do. That said, if the issue is checking that a knot is properly tied, having a well-dressed knot will make that process easier. |
|
|
Ricky started this thread wanting to tie a dressed knot, so I think it's fine to help him do that. It has also been my experience that properly dressed figure 8s are easier to untie. |
|
|
I will edit and update the verbiage and also the photos. In a bizarre set of circumstances (for me) I am working the next two days, but I will implement y'all's feedback. Couldn't find any info on tying it such that you don't have to fuck with it a lot after, figured others might appreciate learning the same. Appreciate you guys! |
|
|
[Edit - my post below is about a rewoven figure 8, not an 8-on-a-bight, so consider ignoring my post] The hard is easy YouTube channel has several videos about this, like this one ; the mnemonic being "start hard (move the first strand over), finish easy (retrace the knot)". I suspect it's easier to untie this way but we're approaching anecdote at that point. |
|
|
Jay DePun wrote: I haven't watched that video since it came out, but I remember it focusing on the figure-8 follow through which is generally easier to tie dressed on the first go. On the bight, what Ricky is thinking through, is pretty hard to tie dressed on the first go. |
|
|
None of the knots in Ricky’s OP are tied “on a bight.” And none are properly dressed. None of the problems he mentions would exist if the knots were properly dressed. I guess that he’s using the ends of two different ropes for the purpose of illustrating how to tie “on a bight.” The lefthand knot in Andy’s pics isn’t properly dressed, either, although each is tied “on a bight,” and he’s correct regarding which orientation is better. A properly dressed figure-8 is less likely to become untied. If whatever figure-8 isn’t tied snugly, it is more likely to come apart (become untied). I pull hard on each of the four strands emerging from the knot. And this is after I’ve tied a well-dressed knot. The results of any knot failure would be obviously catastrophic. Edit: Mr Hicks is correct, below: |
|
|
Dressed: 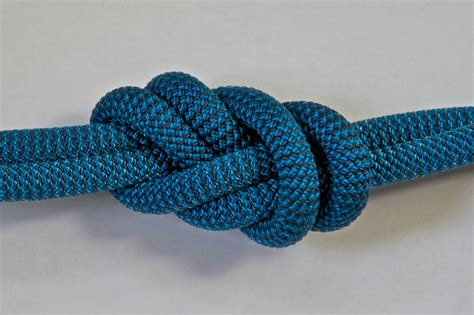 |
|
|
Here are the updated instructions that actually teach how to tie a figure 8 on a bight such that it is dressed correctly upon tying and does not require any dressing or fixing to have a properly dressed knot. Also I incorporated all of y'all's feedback. We will be using a simulated bight with two differently colored ropes to clarify the concepts: 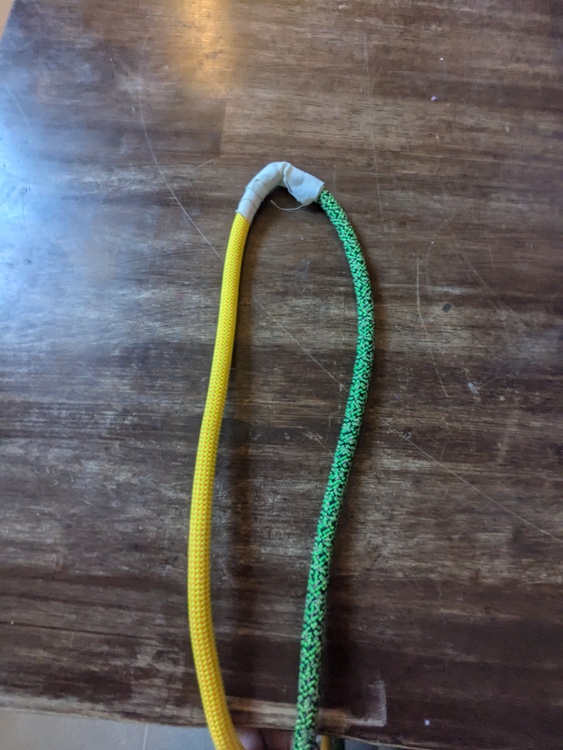 There are three critical steps to this process. These instructions are truncated as y'all know the basic steps to tying a F8. Step 1: Make a bight as normal. Your left strand (here in yellow) is going to become the inside or bottom loop at the top of the knot. Place it in front of the right strand (here in green) 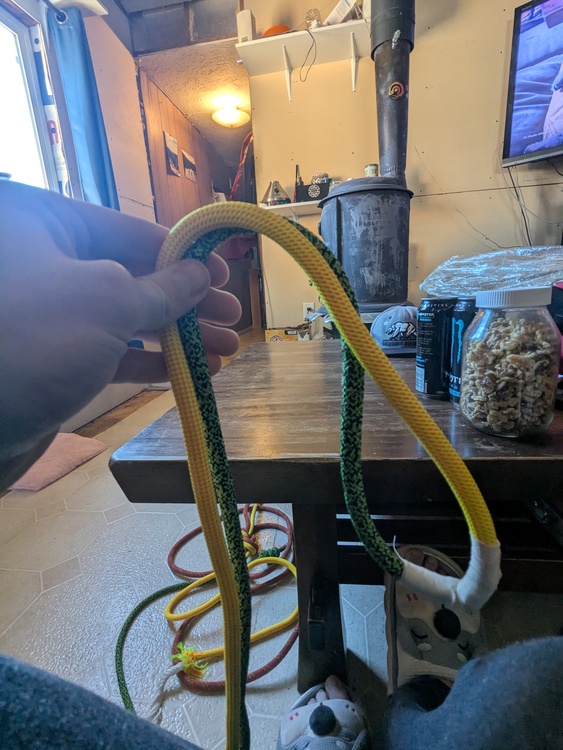 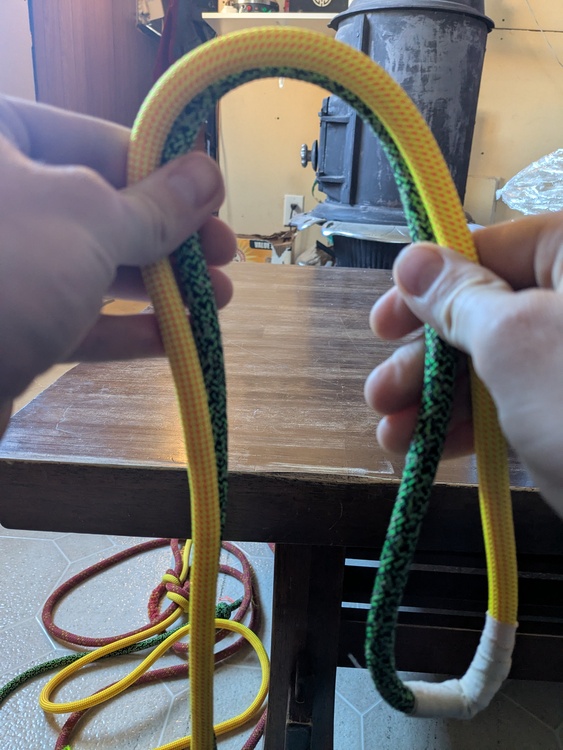 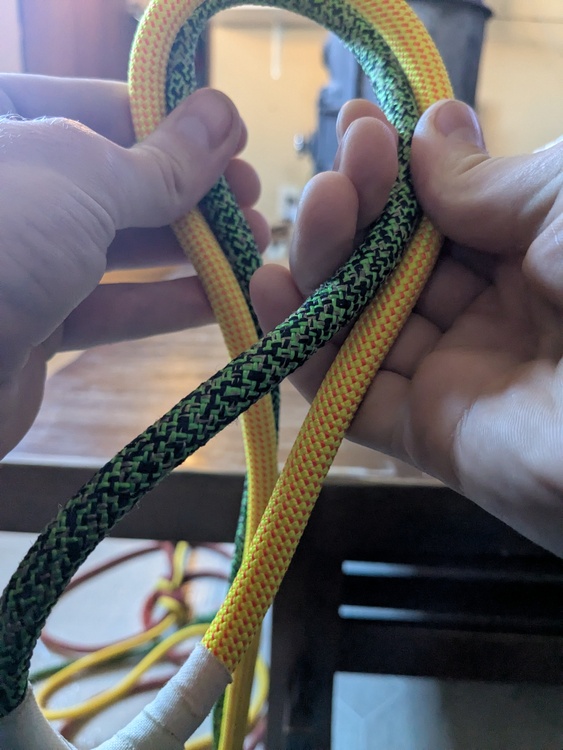 Step 3: After wrapping the bight behind knot as normal and while supporting the strands with our left hand we will impart a half twist with the right hand in the other direction. See how at the very bottom of the knot is the yellow strand? We want that bottom yellow strand to become the inside strand in the knot. 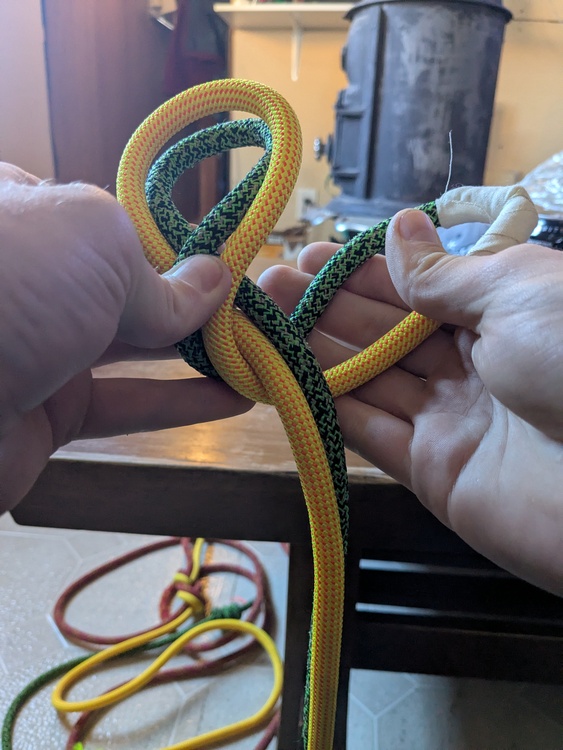 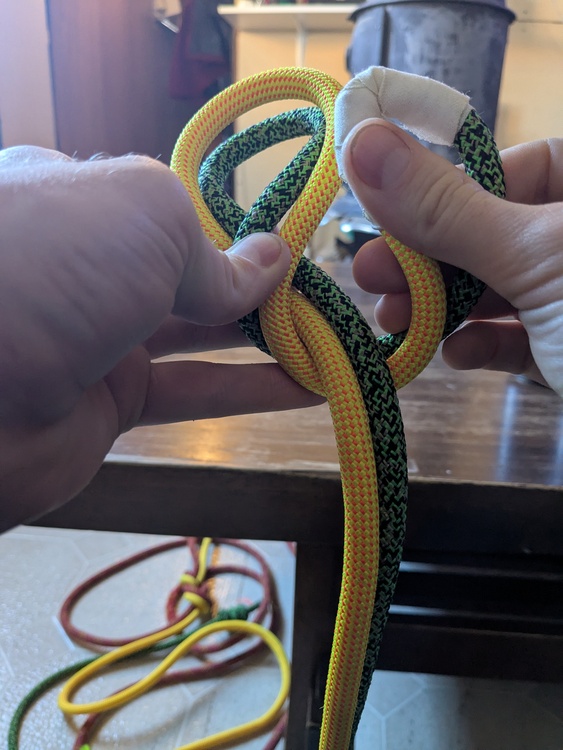 Step 4: Then simply push the bight through the eye of the knot: 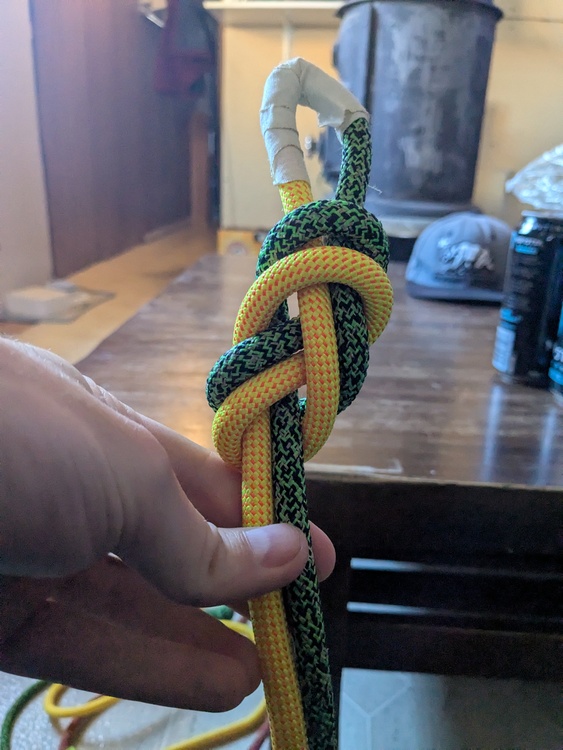 The other side: 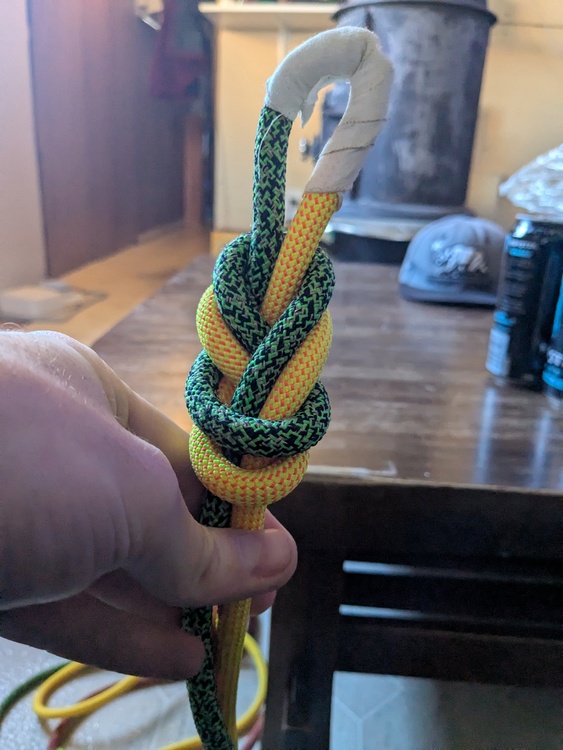 Here is a video I made that may be clearer as knots are easier to understand in video than photos. Here are some examples with the differently colored ropes to demonstrate some common problems: Where as a properly dressed figure 8 with two differently colored ropes will have one strand always above the other (in our examples here green is on top and yellow is below in both the upper and lower loops of the knot), it is easy to tie it such that one is on the outside and one is on the inside: 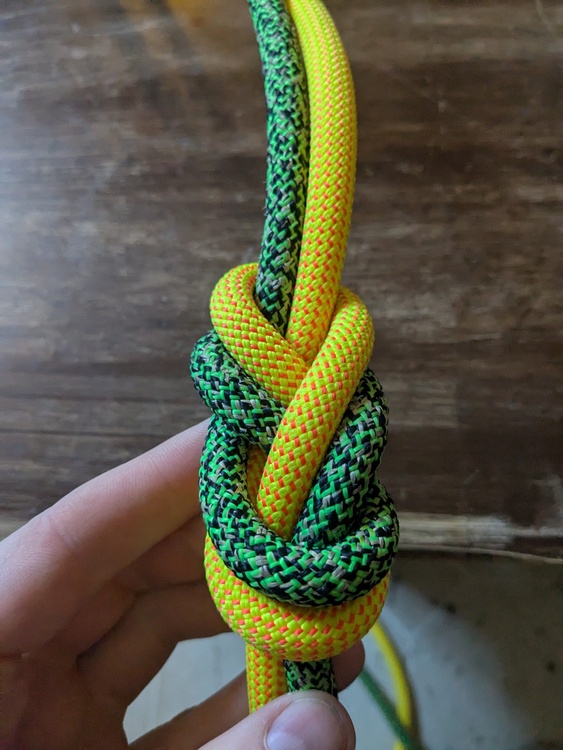 Another common issue (and the one I had) is having a half twist in the strands: 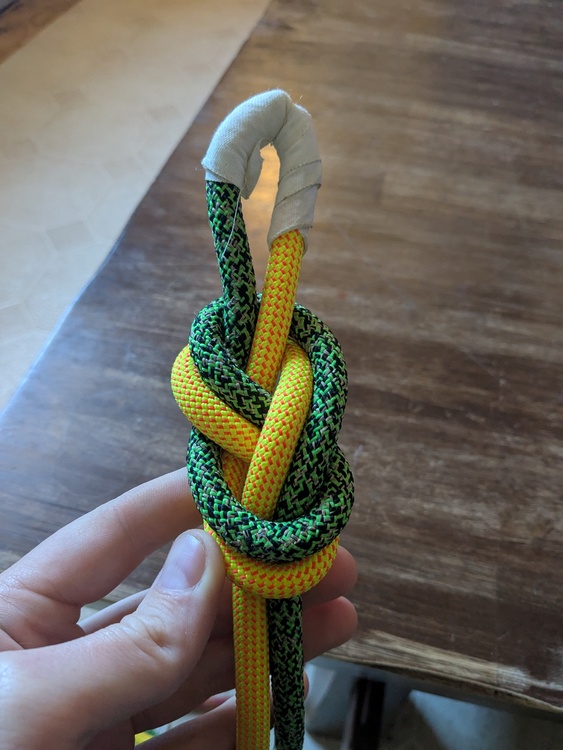 This is an easier fix and simply requires on the bottom half of the knot taking the green strand above and left of the yellow strand. But with these simple steps you will be able to tie it such that it is dressed correctly the first time. |
|
|
rgold wrote: One person's "proper" is another's rolling-eyes silliness. I.p., the 1st image of a Fig.8 Eye Knot in the OP --IF LOADING Green rope, eye being top/away-- probably is both stronger than most others shown here, AND not-so-hard to untie. Note that the pair of "wrong"/"right" in Andy's image aren't DRESSED the same and have the same loading (black strand); what I presume folks mean to point to is his right-side image loading the black strand --gets "interior" loading-- vs. loading the white strand --"exterior" loading. The latter will result in a knot that assumes about a 45deg. angle to the axis of tension, the former will be aligned w/axis, and with its exterior turn around the eye legs left standing out away from the loaded twin strand --telltale sign. The Ricky Harline image singled-out by James gives another symmetric dressing of the Fig.8, one that Dave Merchant's Life-on-a-Line recommends (though curiously his treatment of the eye knot vs. the ends joint differs) as being strong. Note that this and the OP's have the loaded main strand crunching around THREE diameters --the twin strand and the two eye legs. And please note that, given proper presentation of some "well-dressed/proper" form, there might then be a narrow denotation of knots but the "undressed"/"not properly dressed" discriptors apply to a vast range of geometries, hardly able to be generalized. *kN* |
|
|
Ricky Harline wrote: I didn’t know there was a way to tie a figure 8 on a bight besides this method. What’s the incorrect or improperly dressed way? |
|
|
Isaac Gray wrote: I rarely see people tie a F8 whether on a bight or retrace without requiring redressing. Due to being a massive punter I do tend to climb with less experienced climbers, though. It seems intuitive to have the left strand become the back strand. This isn't a big deal, but it will require dressing after tying. 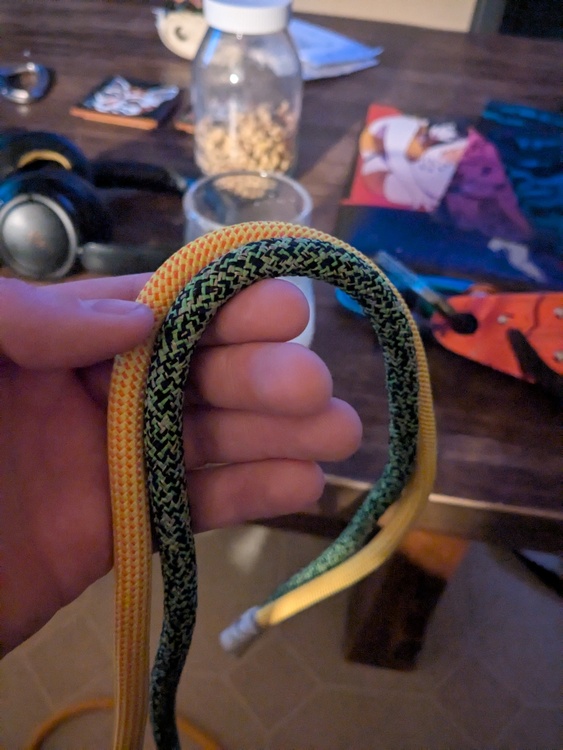 This will require no additional dressing: 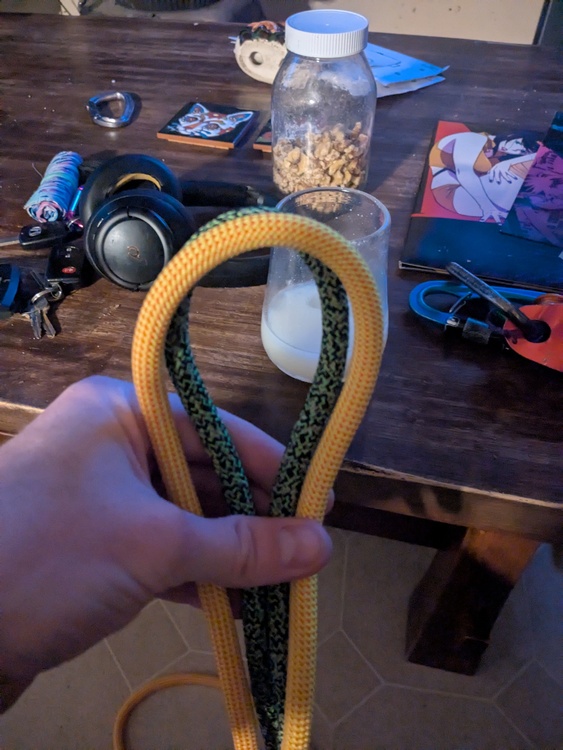 Many people won't put a half twist in the rope on the top or bottom of the knot. Not doing it on the top looks like this: 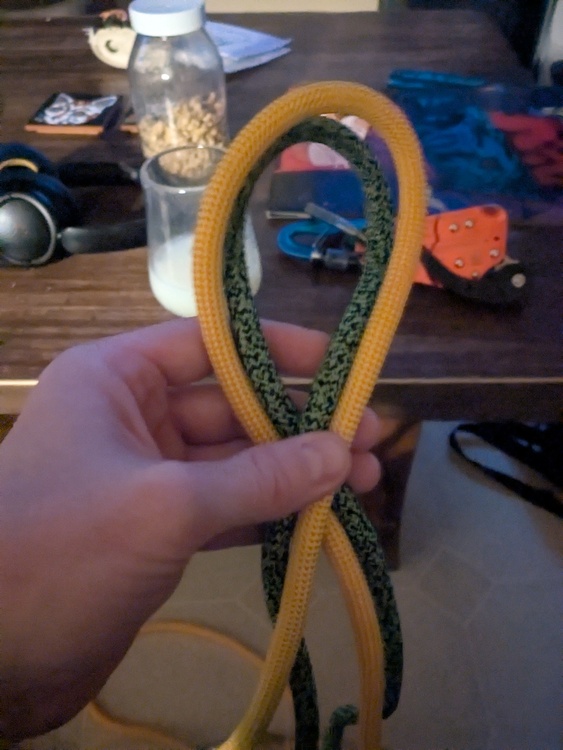 Where as it's better if it looks like this: 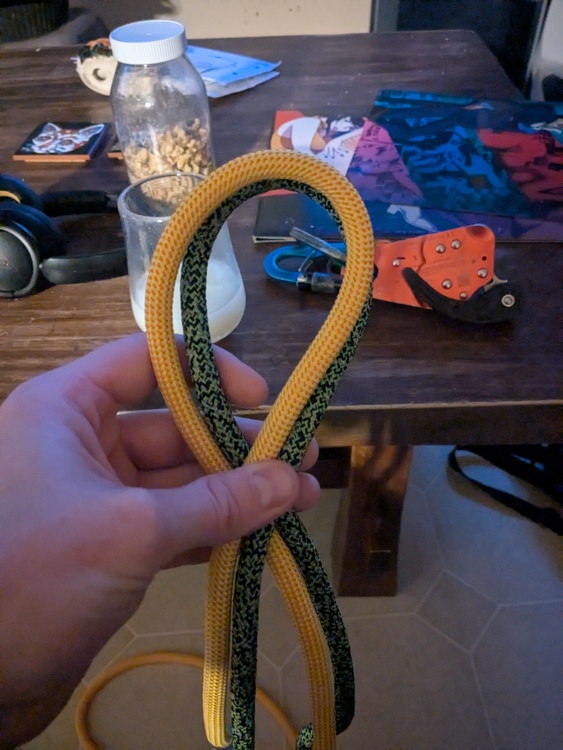 If you skip the half twist you end up with this:  Whereas the yellow is sandwiched in between the green, it should go yellow green, yellow green. All of these problems can be fixed after tying, but it seems worth it to me to figure out how to tie it properly the first go around. Will save lots of time in the long run I reckon. Consider yourself lucky that you tie it correctly intuitively. It certainly was not intuitive to me to figure it out. |
|
|
Huh? |


