Mountain Project Logo

Taper Bolt Removal & Replacement - Wilderness Style

Original Post
matt hoffman · · Yosemite · Joined Jun 2016 · Points: 567

I’m starting a new thread to provide an easy instruction guide and an update to my previous post. My hope is that this how-to guide will be what shows up when someone is wondering how to do this in the future. 

OK so to set the scene, this specific situation a bit complicated due to the following factors:

  1. There are six ⅜” plated steel taper bolts placed by John Bachar in ~1990(?) which I want to replace

  2. This is in a designated Wilderness area in a National Park (Yosemite)

    1. No power tools are allowed

  3. The route is famous and historic (Peace, Medlicott Dome)

    1. No mistakes can be made

  4. The pitch in question is the third pitch of the route (5.7, 5.10, 5.13)

    1. I don’t want to bring any extra crap with me

    2. I want simple, light, low profile hand tools

Bolt Construction

Taper bolts consist of three parts:

  • A plated steel stud (with hex head or eye head) which has a male tapered threaded end

  • A zamak 3 (zinc alloy) sleeve, split down the axis, which has a tapered threaded conical cavity which serves as the female end, threading onto the tapered male stud

  • A very thin gauge steel open ring which keeps the two halves of the sleeve together

How they work

  • Appropriate size/depth hole is drilled

  • Stud with sleeve threaded on is pounded into the hole

  • When almost (but not completely) pounded in, begin tightening the stud

    • The sleeve halves will bind with friction against the rock inside of the hole

    • Tightening the conical stud into the sleeve(s) will cause their expansion against the rock

    • Tighten to 40 ft-lb (requiring considerably more force than a normal person with a wrench can generate)

  • You can unscrew the stud any time, but this will leave the sleeve embedded in the hole

My technique - pilot hole > tap > pull (100% success rate so far)

Tools:

  • Hammer

  • Adjustable tap wrench

  • 5/16” titanium nitride coated metal cutting drill bit with an angle grinded square bottom end (to fit my tap wrench) (maybe more than one bit if you are removing many sleeves)

  • ⅜” spiral flute tap bit (maybe other types of tap bits would work, this is what I had from other rebolting needs)

  • Hurley Jr puller tool (maybe others would work if they have the same function, this is the only puller I’ve ever used)

  • ⅜” threaded rod, at least 4-5” long

  • Adjustable wrench

  • Optional: pick tool(s)

Process:

  1. Remove/unscrew stud

    1. For these eye bolts I was able to slip the peen of my hammer into the eye hole and use my hammer as a lever to unscrew the studs

      1. Because I could do this with pretty minimal effort, it was clear they were torqued nowhere near the 40 ft-lb spec (as I had guessed)

  2. Using the 5/16” titanium nitride coated metal cutting drill in my tap wrench, drill a pilot hole through the already existing conical hole in the sleeve

    1. Zamak 3 is a pretty soft material, and is pretty easy to drill through by hand with even a pretty small tap wrench

      1. This process will dull your drill bit. I did 6 with one bit and I think that was about the maximum. It was not drilling very well by the end and required a lot of force to keep biting into the sleeve.

    2. You will know you’ve gone through when you can feel the drilling get a bit gritty as the tip of the bit spins against the rock in the back of the hole

  3. Using the ⅜” spiral flute tap bit, tap threads into the new 5/16” cylindrical hole in the sleeve

    1. This is pretty easy and feels pretty satisfying

  4. Using your blow tube, blow the metal shavings out of the hole

  5. Thread your ⅜” threaded rod into the female end of the Hurley Jr puller tool

  6. Thread the ⅜” threaded rod (now with one end in the Hurley Jr) into the now threaded sleeve inside of the hole

  7. Using your adjustable wrench, first make sure the threaded rod is as deep into the sleeve as possible, then begin activating the pulling function of the Hurley Jr

    1. Get that sleeve outta there!

  8. Using your blow tube, blow the metal shavings out of the hole

  9. If you did everything correctly, the sleeve should be all gone and you can check the depth of the hole and evaluate the need to drill deeper, etc. for your new bolt!

    1. If there is more crap in there, go back to step 2 or 3 and proceed

      1. If it’s just a tiny bit, you might be able to get it out with a little pick tool or just mash it into the bottom (if you have extra hole space)

Techniques that didn’t work for removing the sleeve

  • Drilling out with a hand drill and hammer drill bit

    • The sleeve is soft and will just want to bind up the hammer drill bit

    • Eventually you can mash the sleeve into the bottom of the hole, but after much difficulty, and is the hole with this obstruction deep enough for the new bolt?

    • If you KEEP hammer drilling and blow tubing you can eventually pulverize the sleeve and drill through it, but this takes like 45 minutes or more of consistent hammering – not worth it

  • Drilling out with an equivalently sized metal cutting drill bit (Ex: ⅜” drill bit in a ⅜” hole)

    • This actually worked for me in one test at home, but failed in the next 4 tests

    • The most likely outcome is that the sleeve loses adhesion to the rock in the hole and begins spinning freely, but not quite free enough to be drawn out of the hole on the drill bit

      • Now you have to try to smash it into the bottom of the hole or hand hammer drill through it

  • Tapping the sleeve with a spiral flute tap or other tap without drilling a pilot hole

    • Because the hole in the sleeve gets smaller as you go down (it's conical) and eventually closes at the bottom of the sleeve, the tap will eventually bind up as you progress into the sleeve

    • This causes the spinning sleeve scenario mentioned above, which leads to hand hammer drilling through the sleeve

Photos!!

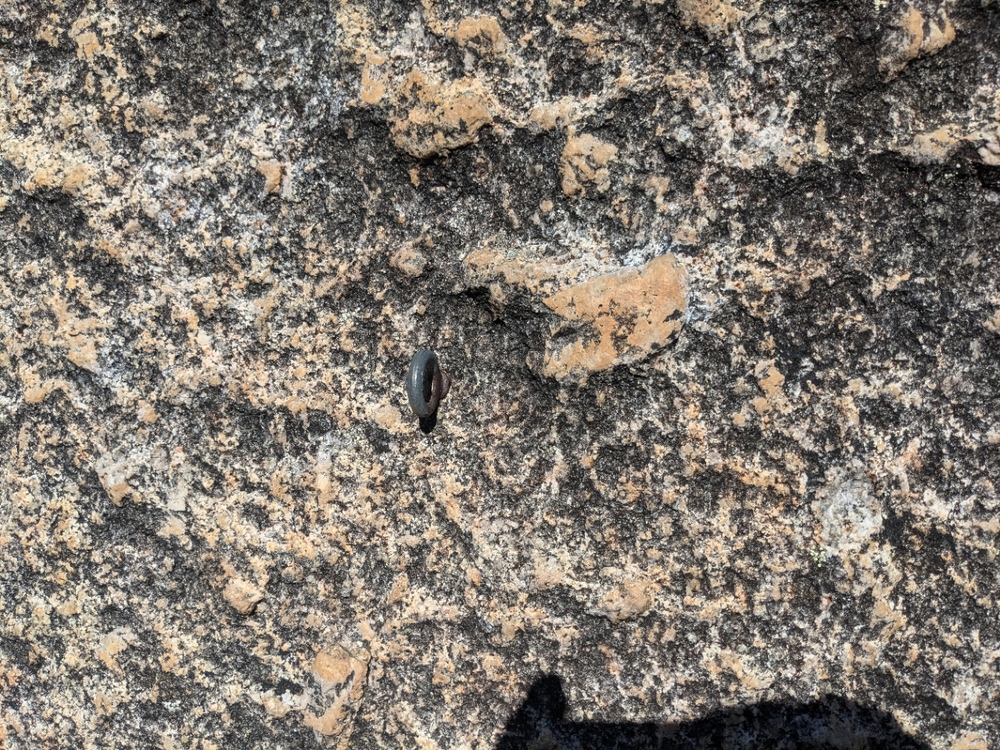
Photo 1: taper bolt in the wall

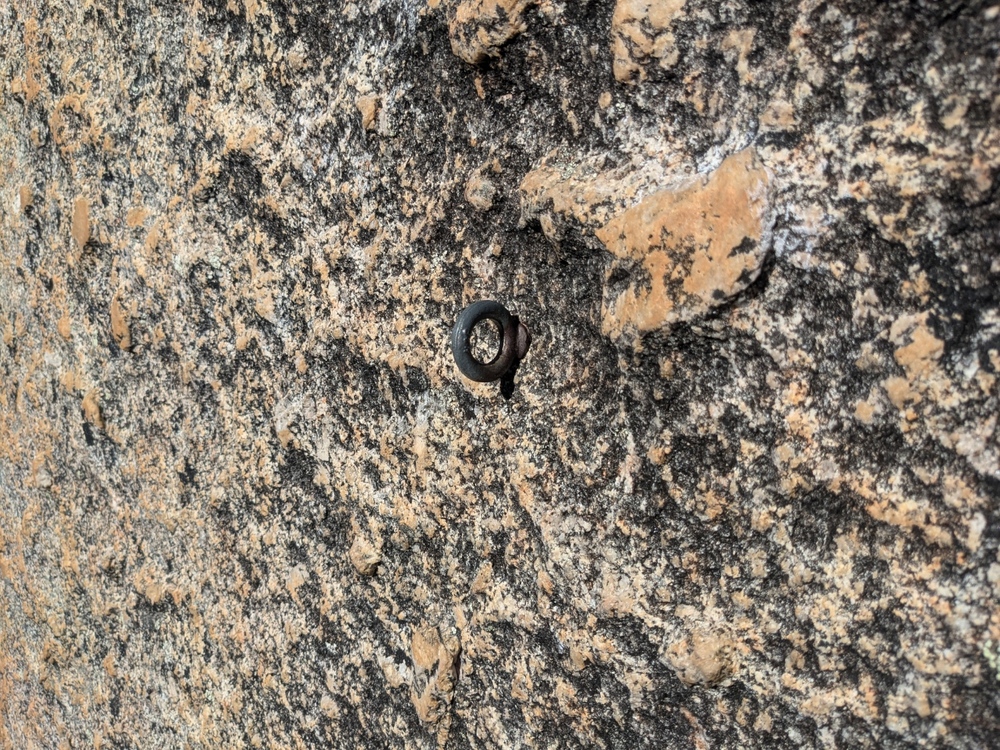
Photo 2: taper bolt in the wall 2

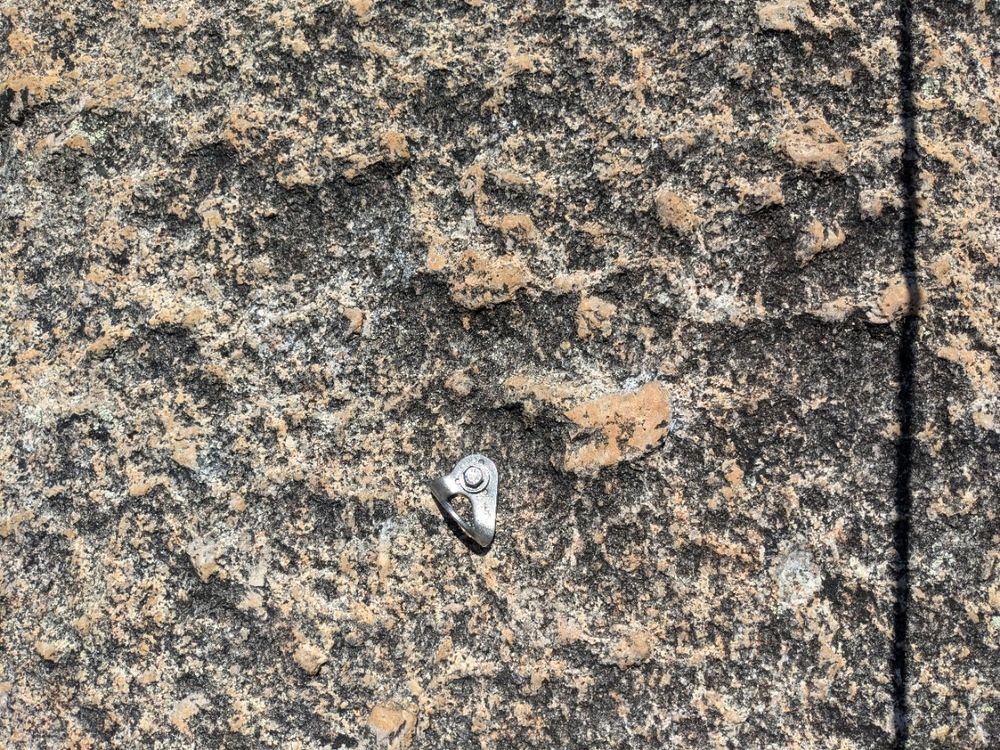
Photo 3: new bolt replacing taper bolt from photos 1 and 2

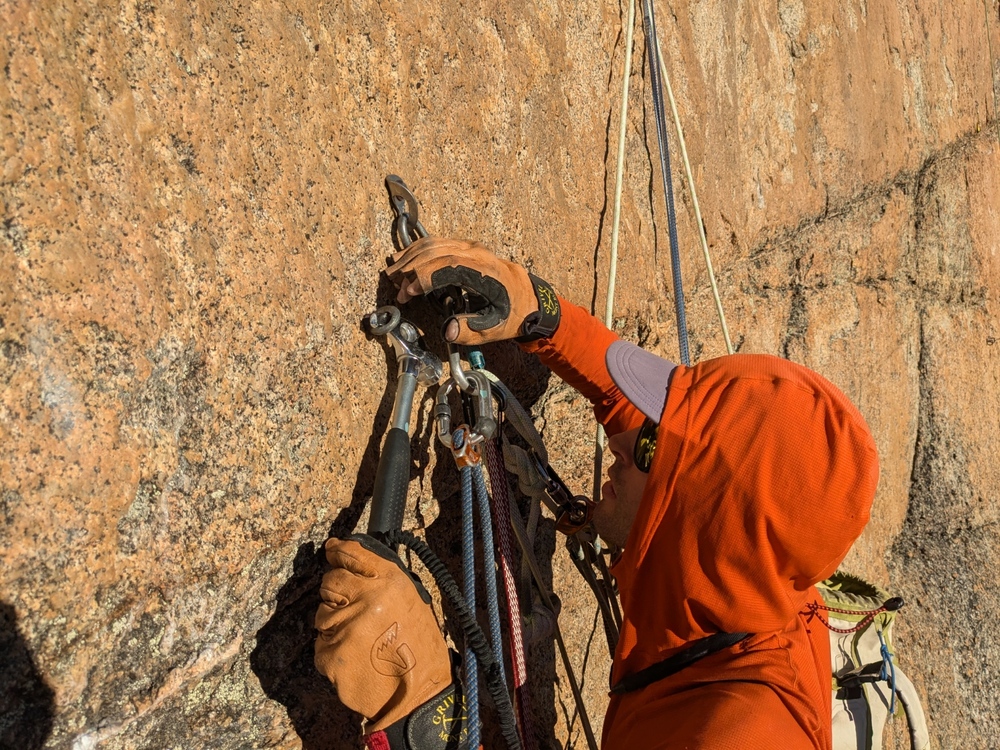
Photo 4: Jake unscrewing taper bolt with peen of hammer

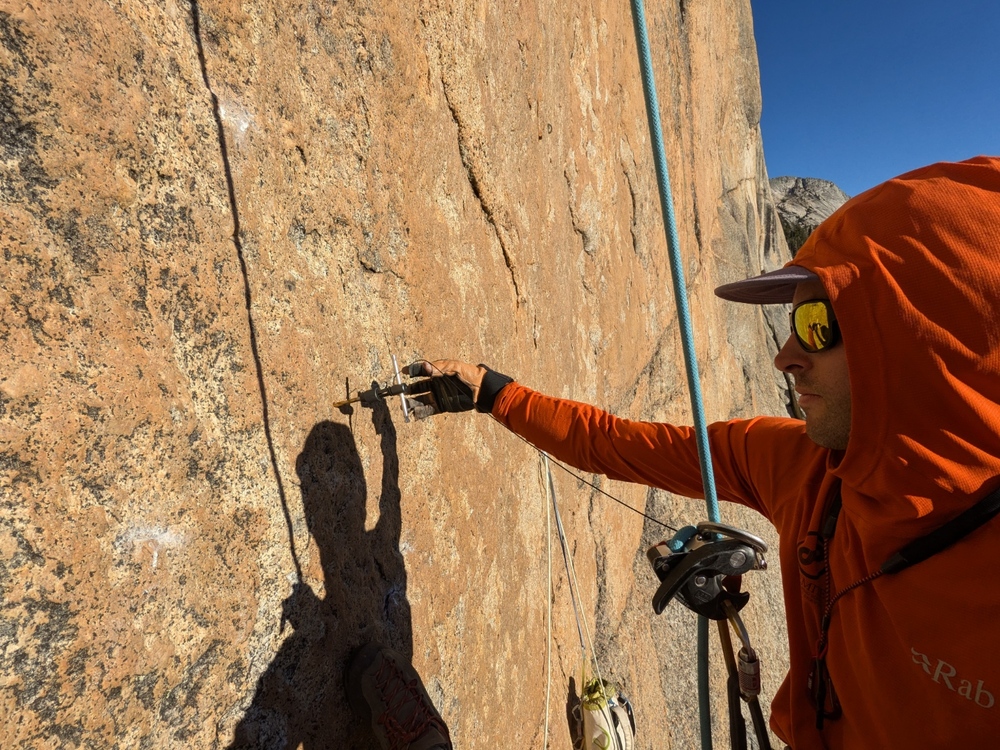
Photo 5: Jake drilling pilot hole in sleeve with 5/16" titanium nitride bit in tap wrench

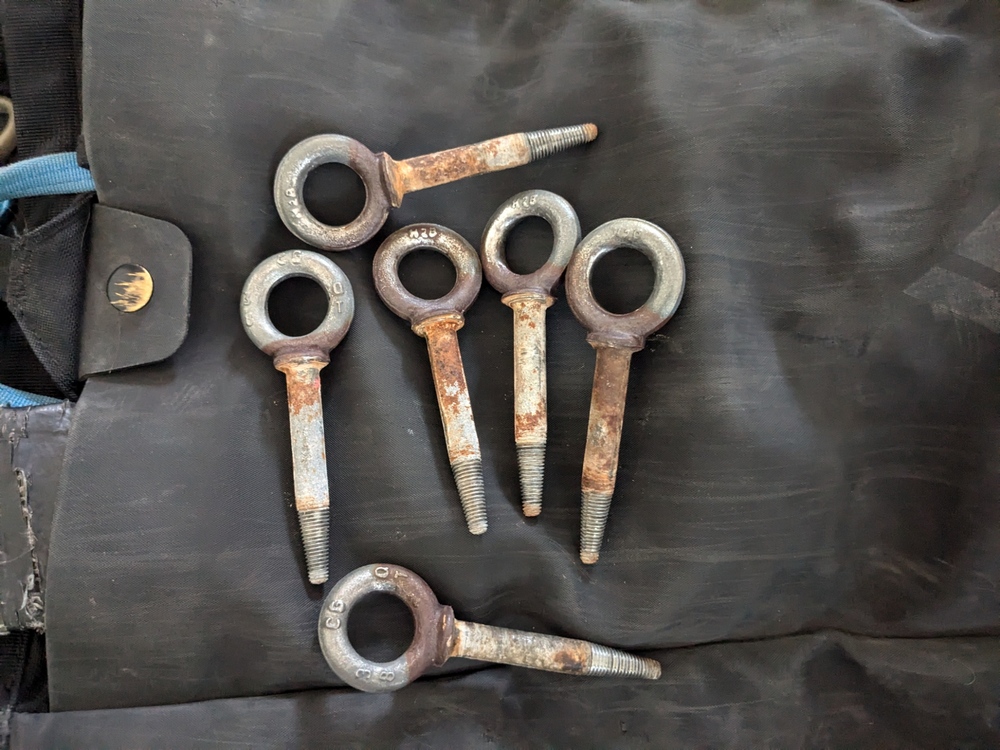
Photo 6: the six bolts we replaced

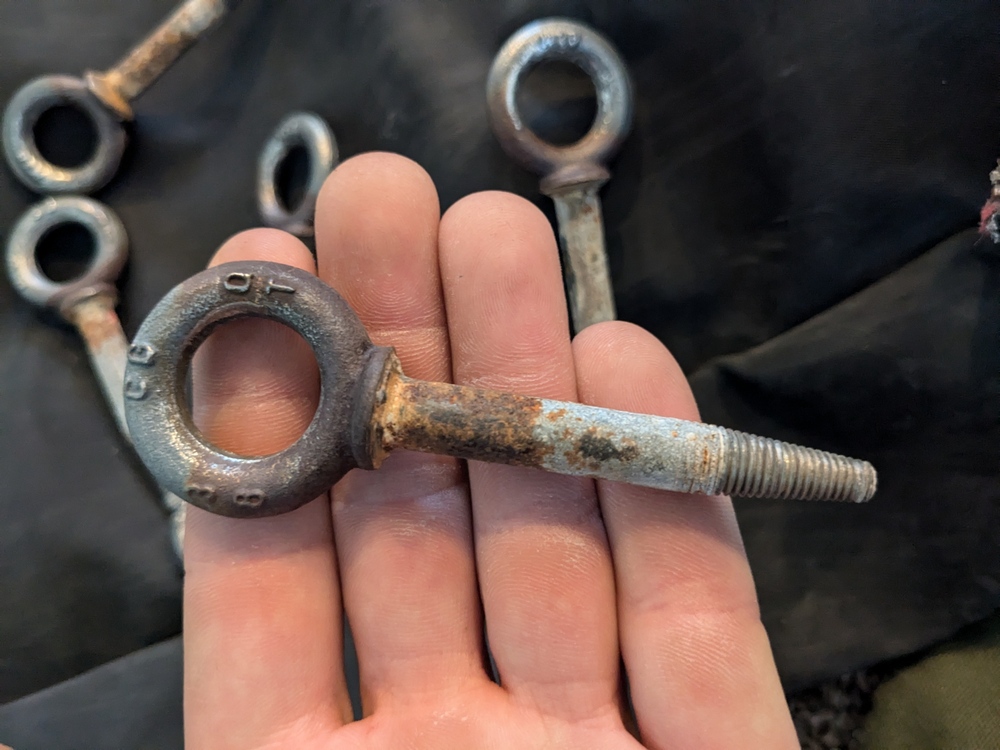
Photo 7: close up of one of the taper bolt studs

Photo 8: close up of one of the taper bolt studs


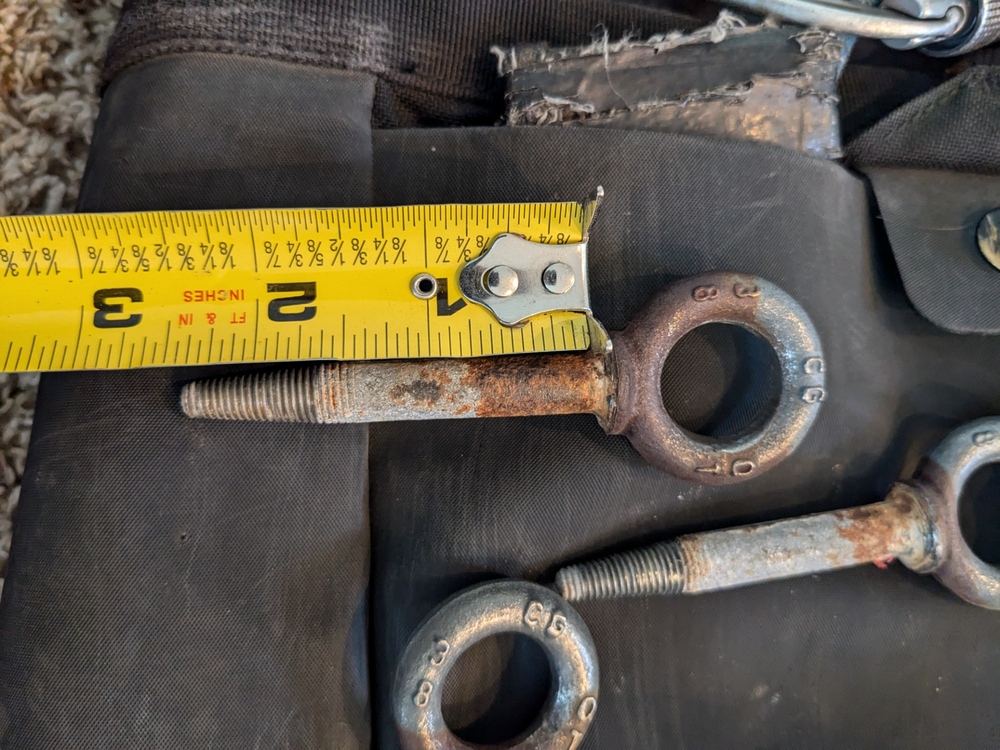
Photo 9: ~2.5" long, the clean threads to the right are the section of the bolt that was embedded in the sleeve

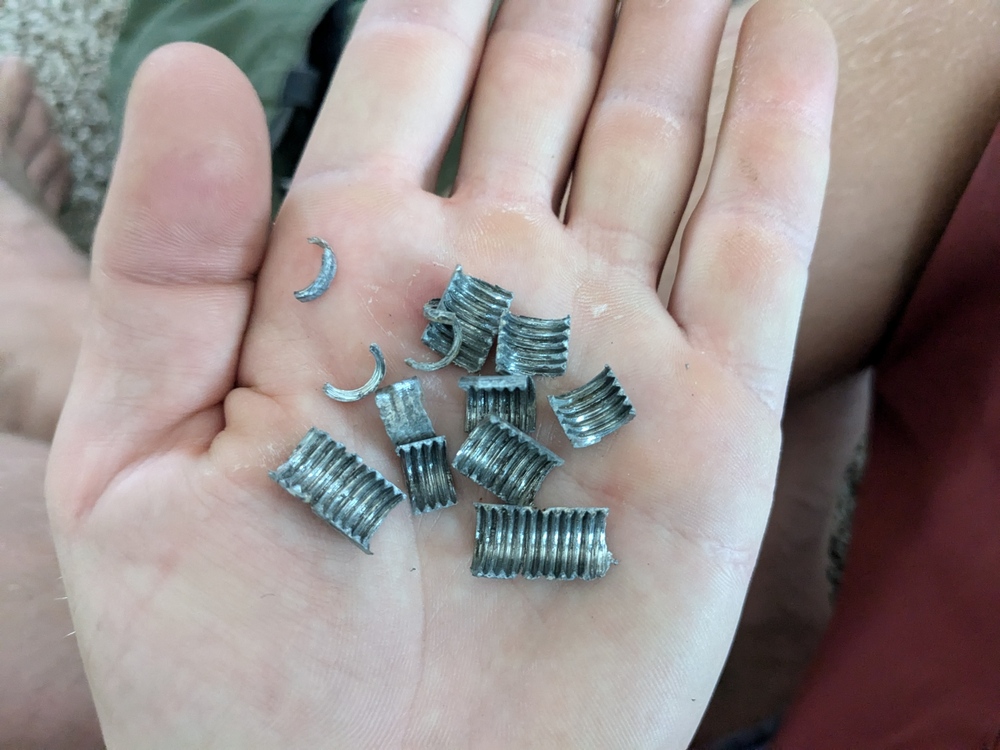
Photo 10: Bits of sleeve after removal (pilot hole drilled, tapped, and pulled)

Photo 11: the 5/16" titanium nitride bit I used

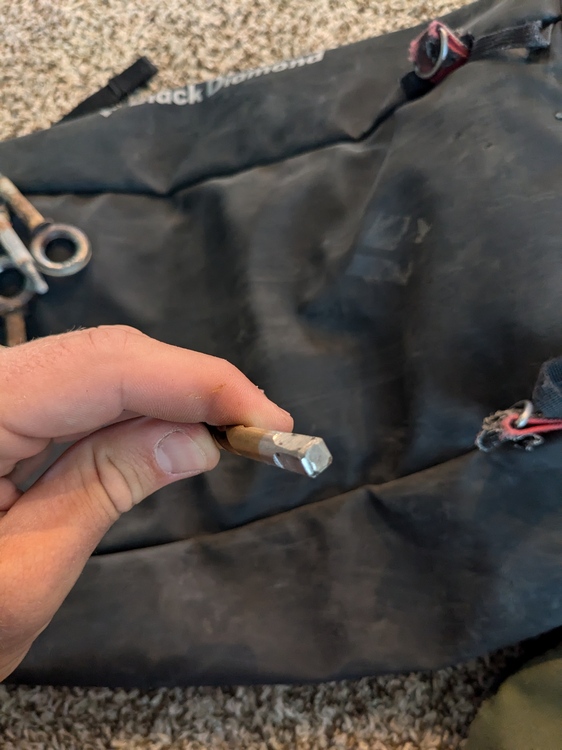
Photo 12: It was pretty easy to grind the end square using an angle grinder. Tap wrenches will not hold circular or hex shank drill bits, they will slip.

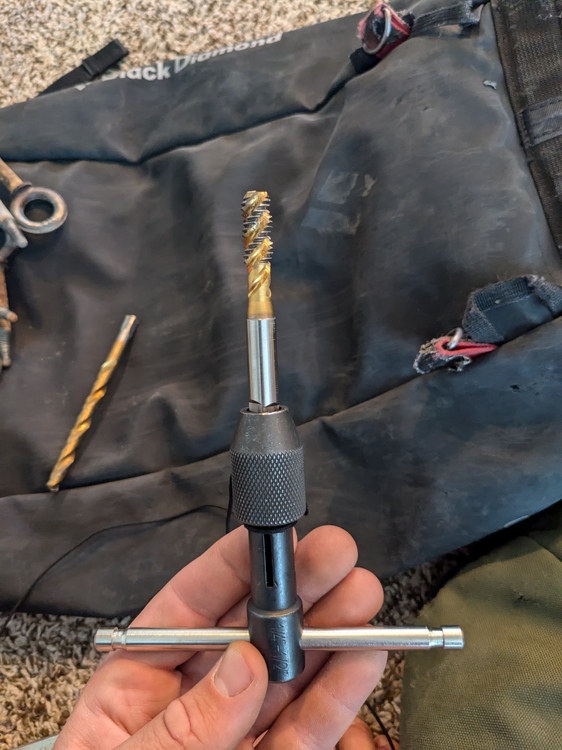
Photo 13: tap wrench with 3/8" spiral flute tap

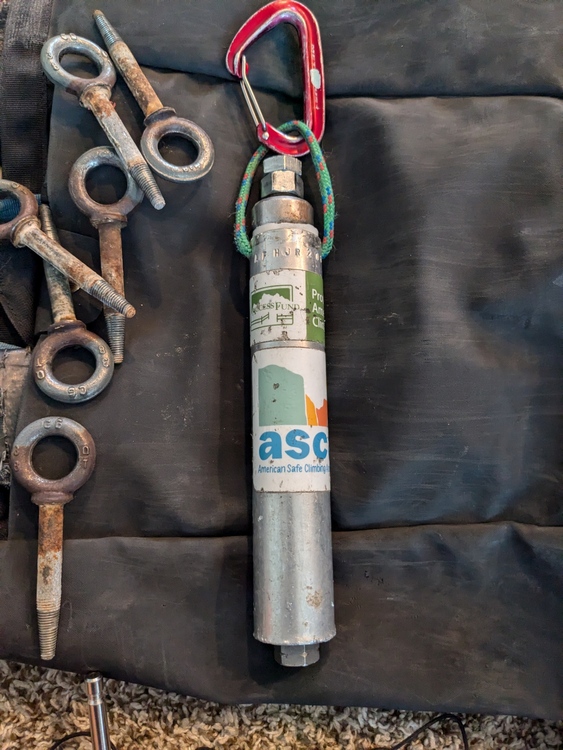
Photo 14: Hurley Jr -- Thanks Access Fund and ASCA!

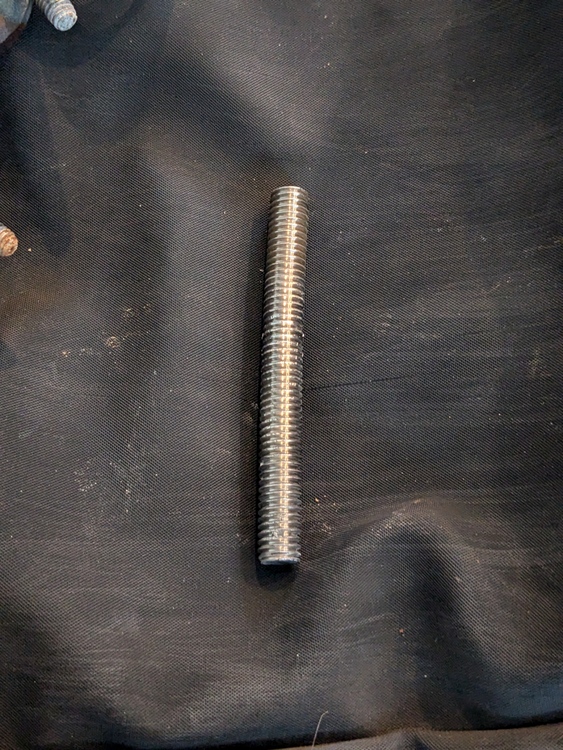
Photo 15: ~4.5" long 3/8" ss threaded rod I've been using for a while. It's a little bent but still works well.

Original thread about this route and these bolts:
https://www.mountainproject.com/forum/topic/126515987/bolt-identification

Gregger Man · · Broomfield, CO · Joined Aug 2004 · Points: 1,834

Excellent work!

Greg Barnes · · Unknown Hometown · Joined Apr 2006 · Points: 2,197

NICE!! Really well done, and thanks for the detailed, precise guide for future reference!

Jon Cheifitz · · Superior/Lafayette, Co · Joined Jun 2008 · Points: 90

Fantastic indeed. Nice work and nice details for the community here. 

timothy fisher · · CHARLOTTE · Joined Nov 2017 · Points: 30

Great job! I hope someone can treat these guys to dinner and drinks. They sure deserve it!

Mr Rogers · · Pollock Pines and Bay area CA · Joined Aug 2010 · Points: 72

Nice. Excellent guide.

Greg Barnes · · Unknown Hometown · Joined Apr 2006 · Points: 2,197

Oh yeah, we should probably have the 1/4" Taper bolt replacement Wilderness edition, it's super simple:

1. Unscrew bolt.

2. Drill like expanding any 1/4" bolt hole. The rock keeps the bit from diving too far into the sleeve so it just gets chipped away along with the rock surrounding it. 

3. Place new bolt.

Hand drilled through the sleeve like this around 20 times total (mostly granite, but one or two in Red Rocks too), never had an issue. But try not to inhale the dust (I thought it was lead), a blow pump (instead of a blow tube) is probably a good idea (good idea for any rock or particulate dust, along with a dust mask...but don't know many who use masks, we'll probably pay for that later on...).

I used tuning forks on a bunch, and managed to get one out with the sleeve, but in my opinion it's not worth the risk of the tuning fork scarring the rock when nearly every one I tried just ripped the bolt out of the sleeve.

Andy Bennett · · Scarizona · Joined Mar 2006 · Points: 716

Does anyons (paging Greg B here I suppose) know if USE Diamond taper bolts have a lead or zamac insert? Having been warned that they're lead, I've been slightly terrified every time I drill these out and try to keep the dust and particles out of my lungs. 

Undocked Piggies · · People's Republic of West M… · Joined Dec 2016 · Points: 931

Nice work, Matt! Thanks for your professionalism. All the sports doggers and the beautiful, inanimate magma of Medlicott Dome appreciates it. 

Guideline #1: Don't be a jerk.

Fixed Hardware: Bolts & Anchors
Post a Reply to "Taper Bolt Removal & Replacement - Wilderness S…"

Log In to Reply
Welcome

Join the Community! It's FREE

Already have an account? Login to close this notice.