
 Continue with onX Maps
 Sign in with Facebook


Home Moonboard/Woodie Questions


|
|
Hey all, building a home Moonboard in my garage with the DIY kit; My ceiling is exactly 10'4" so luckily this isn't another thread on how to modify the thing to fit. Planning on framing out the whole thing with 2 x 6s and attaching the top of the board to the ceilings joists, which run perpendicular to the top of the board and then I'll attach the frame for the kickboard to the studs in the back wall. I'm thinking of using joist hangers to attach the frame to the kickboard. I've read and watched as much as I can but I have a few burning questions I'm really hoping the community can help me with: 1. Is a 12ft 2 x 6 going to be long enough after the mitering the bottom to interface with the kickbaord? I'll gain 1.5 inches back on the top of the frame but I'm not sure thats enough. 2. Does anyone know what angle to make those miter cuts at for a 40 degree wall? 40 degree cuts? 3. Can anyone recommend a specific joist hanger- the only one at Lowes that would accommodate the angle of the stud had holes that only accepted nails, which seems less good than one that can take screws? Maybe nails are fine? Maybe you all have a better way to attach the frames together. 4. The DIY kit comes with 6 4x4' panels; what I wish I could do is frame it such that the seams have a stud running between them but on some of the panels the bolt holes are right on the edge. Moon recommends bracing the seams with plywood strips, anyone have a better idea or tried this themself? ...thinking 6 stud config. at asymmetric ~19" centers 5. Lastly, I still haven't quite nailed the order of operations here but maybe the following: Attach frame to the ceiling and wall, attach the panels and then put the LEDs up? That sound reasonable or would you attach the panels and LEDs on the ground first... seems like you'd need to rig a pulley or have some very strong friends to do it that way or risk getting squashed. Thanks a bunch!
|
|
|
Here's the hanger I was looking at for attaching the frame of the wall to the kickboard:  |

|
The website makes it sound overly complicated - you need to simply have:
Here's a crappy image but it makes the point. I should have showed the kickplate being an additional 3/4" wide, and sticking out from under the studs. The plywood then rests on this 3/4" lip. 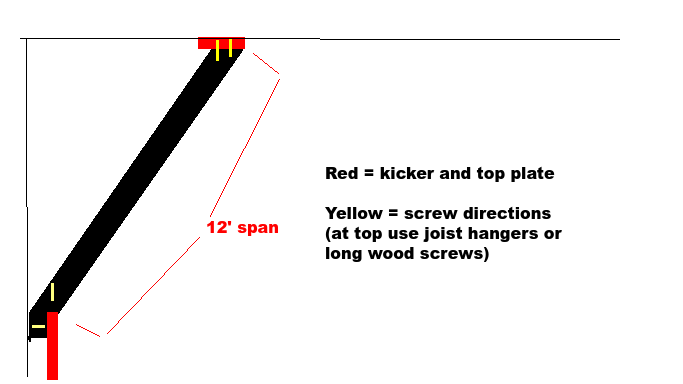 |
|
|
Blake answered many of your questions, but I have some input on cutting the 40 degree angles. There are many ways to mark the angle on the 2x6, but in the end the short side will be cut 4 5/8" up from the corner. Actually 4.615" which is .01" less than 4 5/8". Tan 40 x 5.5 = 4.615. Just lay these out and make the cut with a circular saw or even a hand saw, no compound angles are involved. I don't see any easy solutions for using 12' 2x6s. Keep in mind that the LED strings will likely have to pass through your 2x6s in several places as I don't think that the wires are long enough to hop over. I think that this is part of the reason that Moon suggests the plywood scabs on the joints of the panels. |
|
|
You could get away with buying 12'ers for your studs if you padded down your ceiling by screwing on a stack of maybe 4 8' long 2x6 for the top plate. But that's going to cost you whatever you pay for 3 additional 8'ers, vs maybe a similar cost from buying and cutting the extra 3+' off the ends of the 16'ers that you really just want to be about 12'4". |

|
Answers to some of your specific questions: 2. The top cut needs to be 50 degrees because 50 + 40 (angle of the board referenced to vertical) = 90 (angle between vertical and the ceiling). The bottom cut needs to be 40 degrees in the opposite direction if its connecting to the back wall since the angle between the wall and vertical is 0. These cuts aren't too bad freehand, but if you are using a circular saw its worth the money (probably ~$10) to get a speed square to help lay out the cut. 3. We used regular 90 degree joist hangers. You can cut the board so that it comes into the the hanger snuggly (just make a right angle cut to your first cut). 3.b. Nails are actually typically stronger than screws in sheer strain, which is why they are usually used with joist hangers. They also make special screws that are specifically meant to be used with joist hangers. If I were you I would just get those. 4. Plywood strips work well as a way to make sure that all the plywood seams are flush. They are less good at keeping the wall from flexing, but a little bit of flex isn't a big deal. Its actually very common even on commercial gym walls. 5. I haven't installed LEDs, but yes its a good idea to install the frame first then the panels. The plywood weighs a lot an is hard to maneuver so its nice to not deal with it when you're doing the framing. |
|
|
You all are awesome. This is really helpful stuff. Hopefully it helps some other folks out as well. @blakeherrington, unfortunately (or fortunately in terms of my time) I sprung for the whole Moon DIY kit, so the panels came with the shipment and are six. I'll report back with photos for other intrepid builders once I'm finished. |
|
|
Andrew Giniat wrote: You could try intentionally running 2 of your studs along the 2 interior vertical seems for even spacing and stability. Then for what would probably be a single column of holds that would fall along your seam/stud that has the T-nut holes, I think you'd be totally fine just using long wood screws to screw the holds straight into stud and not use a t-nut. Buy a ten pack of these cone washer things:  I also think at least 80% of the MB holds don't need any additional set screw in order to not spin. It's just a few that are very long and get tons of leverage. Just add those as needed. |
|
|
blakeherrington wrote: That is a great and clever solution! Thanks |
|
|
Andrew, You can use 12' joists for your wall, you need to not miter the bottom of the joists and just do a full 40 degree cut on your kicker joists. Your top header needs to be a 2x8 and with the bevel cut its going to be a bit over 2" long so your long to short length is going to be 142" for your joists. Four 2x6 joists is plenty of support for a 8' wide wall. I think I centered the middle joists at 28.25" from the edges of the board but check your layout first. I do know that Moon had the wrong spacing listed on their build guide. Don't install a centered joist if you are getting the panels shipped to you. The lone stars wont solve the problem of LED's. You just need to "stitch" the panels together with a 1x4 or plywood strip, just screw in from the back with 1 1/4" flathead screws ( Kreg course pocket screws work great). FYI I have built 8 system walls over the last 2 years so have a lot of experience with them. You have to take the LED strands into account and every system requires special consideration. |
|
|
Kevin Stricker wrote: Good catch Kevin! |
|
|
Use these to fasten all your Simpson Strong-Tie joist hangars 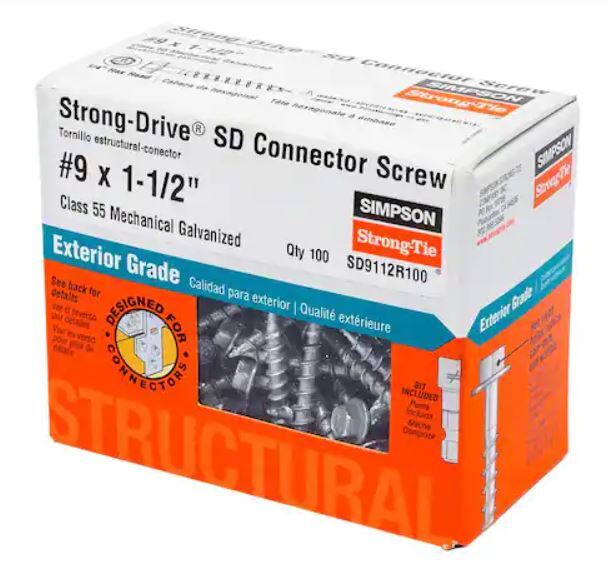 |
|
|
Kevin Stricker wrote: I was wondering how I'd ever be able to screw the plywood strips in from the front- I really didn't consider screwing them on from the back. |
|
|
Kevin Stricker wrote: Kevin - can you describe the cuts on the header and its orientation? Your system sounds awesome though. (but probably requires a table saw or some really good work with a hand held circular accurately angled and run straight) |
|
|
The bevel cut I am describing would be done with a table saw or skill saw (ideally with a rip fence). You rip the length of the header at the 40 degree bevel. Now you can line up your joists directly to this cut. Because we are cutting that 2x8 header at a bevel the cut is greater than the thickness of the 2x (it’s actually 2.33”) and you would subtract this length from your overall wall length (144”) to get a joist length. |
|
|
Kevin Stricker wrote: A 2x8 actually measures 1.5" x 7.5". I get 1.5" / Cos 40 = 1.96" |
|
|
Here's a question for any of the engineers in the room: If we assume 2 x 3.5" #14 screws per joist attaching the top of the wall to the ceiling, what's our safety margin for not getting 'mouse-trapped' by the board? ...160lb climber + ~300lbs of wood and holds, lots of dynamic forces. This little calculator: https://www.engineeringtoolbox.com/wood-screws-allowable-withdrawal-load-d_1815.html gives us a withdrawal force per screw of 279 lbs, do we see a proportional increase in strength with each screw, i.e. 8 screws x 279 lbs = 2232? |
|
|
Not an engineer, but 49 years in the building trades. Also without knowing the actual construction of the structure it's a bit dangerous to analyze safety margins. That said, the weight of the lumber and holds will be distributed fairly evenly and roughly half of that weight is going to the floor. The dynamic load is more local and complicated but I think the short answer is 'plenty good enough'. Ceiling joist on 2' centers should allow you to get into 5 or 6 joists. Are the ceiling joists also floor joists for a story above, the bottom members of trusses, or what? |
|
|
Victor Creazzi wrote: Thanks, Victor. Yeah, they're also floor joists; no idea what type of lumbar they are. |
|
|
Andrew Giniat wrote: That's good. The calculated floor load far exceeds anything your wall will put on them. |
|
|
Andrew Giniat wrote: Thinking about this a little more, I'd probably use lags here. |


