Mountain Project Logo

I want to use some retired climbing rope for art

Original Post
Mehgnn Bentley · · Central Oregon · Joined Sep 2023 · Points: 0

I want to make an art project using some retired rope, does anyone have advice on how to cut it into pieces at home without fraying? 

Sparkington TheThird · · Kansas City · Joined Jul 2020 · Points: 5

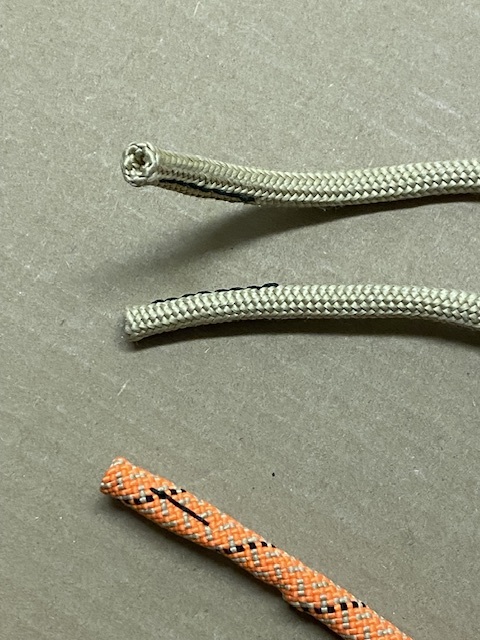
Wrap the part you want to cut tightly with electrical tape.

Cut through the middle of the tape, so both cut ends have tape wrapped around them.

Use a lighter or soldering iron to melt the end fibers together on both halfs. Pay special attention to the fibers of the mantle/sheath.

Andy R · · MA · Joined Jan 2016 · Points: 45
Sparkington TheThird wrote:

Wrap the part you want to cut tightly with electrical tape.

Cut through the middle of the tape, so both cut ends have tape wrapped around them.

Use a lighter or soldering iron to melt the end fibers together on both halfs. Pay special attention to the fibers of the mantle/sheath.

This is a great method, I like to use nonstretchy athletic tape to wrap before the cut, then it can easily soak sharpie ink to mark the lengths of rope. (ink wont rub off)

beck will · · Somewhere in Utah · Joined Jun 2017 · Points: 10

For anyone who makes rope art — whether wall hangings or rugs — do you attach the rope pieces to some kind of under layer?  By what method?  I’ve been curious about this for a while, but haven’t actually given it a try.

Ryan Lynch · · Los Angeles, CA · Joined Aug 2017 · Points: 0

If you have a lot of cuts to make... Dremel type rotary tool with a large cut-off disk, running at >15k RPM. Tape the spot you want to cut, tightly, with masking tape -- and then as the disk cuts, it instantly melts the fibers with friction heating. Pull the tape off, and you get a perfect, clean cut every time. If you want a more durable end, flame the cut ends for a few seconds to let them melt deeper.

I like to clamp the Dremel to a bench/table, and hold the rope pieces in my hands. I also use work gloves & safety glasses, anytime the Dremel gets switched on.

When it's worth the time, I sometimes use CA glue rather than just heat to fuse the ends:

 • Coat a ~1" section of rope, all the way around, with any kind of CA glue -- Gorilla, Super, Krazy, and LocTite all work.

 • Wrap the glued 1" section *tight* with self-sealing silicone tape. This forces the glue to soak onto the sheath fibers, and CA glue doesn't adhere to silicone tape.

 • Let it dry for an hour (maybe more in dry climates), and then cut it in the middle of the tape with the Dremel method, and remove the tape.

CA glued ends are more durable than melted ends, and they get nicely tapered by constriction of the tape.

If you want even more durability -- heat shrink tubing over the ends. Comes in all sorts of fun colors, and marine-grade tubing is also lined with a hot-melt adhesive that cements really well onto nylon & dyneema, with or without CA glue... I use the same colors on my rope ends as I do for the nail polish dots on my carabiners.

Mehgnn Bentley · · Central Oregon · Joined Sep 2023 · Points: 0
beck will wrote:

For anyone who makes rope art — whether wall hangings or rugs — do you attach the rope pieces to some kind of under layer?  By what method?  I’ve been curious about this for a while, but haven’t actually given it a try.

I used cardboard layering for my backdrop piece then glued the rope to it 

Kevin Piarulli · · Redmond, OR · Joined Nov 2013 · Points: 2,108

https://www.amazon.com/Hot-Knife-Electric-Rope-Cutter/dp/B0C813NDY8/ref=asc_df_B0C813NDY8/?tag=hyprod-20&linkCode=df0&hvadid=663361396684&hvpos=&hvnetw=g&hvrand=7617357433497238866&hvpone=&hvptwo=&hvqmt=&hvdev=m&hvdvcmdl=&hvlocint=&hvlocphy=9033176&hvtargid=pla-2187957662105&psc=1&mcid=0d825c7276d83d4683bd8a43a52f2754

After years of trimming ropes with tape and a lighter I finally got one of these. I feel like it would be essential for cutting ropes neatly for art projects.

Incidentally, if you need retired ropes in Central Oregon I periodically have old ones to give away

M M · · Maine · Joined Oct 2020 · Points: 2

Torch a (butter) knife over a gas burner or torch and see how it works. 

Mehgnn Bentley · · Central Oregon · Joined Sep 2023 · Points: 0
Kevin Piarulli wrote:

https://www.amazon.com/Hot-Knife-Electric-Rope-Cutter/dp/B0C813NDY8/ref=asc_df_B0C813NDY8/?tag=hyprod-20&linkCode=df0&hvadid=663361396684&hvpos=&hvnetw=g&hvrand=7617357433497238866&hvpone=&hvptwo=&hvqmt=&hvdev=m&hvdvcmdl=&hvlocint=&hvlocphy=9033176&hvtargid=pla-2187957662105&psc=1&mcid=0d825c7276d83d4683bd8a43a52f2754

After years of trimming ropes with tape and a lighter I finally got one of these. I feel like it would be essential for cutting ropes neatly for art projects.

Incidentally, if you need retired ropes in Central Oregon I periodically have old ones to give away

Actually that would be rad, message me?

Mrhiking Horizon · · Unknown Hometown · Joined Dec 2023 · Points: 0
  • Heavy-duty scissors: Invest in a good pair of sharp scissors meant for thicker materials like rope. A clean cut will minimize fraying.
  • Utility knife: Use a sharp utility knife with a fresh blade for a controlled cut. Make sure to score the rope gently before applying full pressure.
  • Hot knife: This specialized tool melts the rope ends as it cuts, preventing fraying altogether. It's a great option for thick or synthetic ropes, but handle it with caution due to the heat.
  • Support the rope: Place the rope on a cutting board or other stable surface to prevent it from moving while cutting.
  • Cut at an angle: Instead of a straight cut, angle the blade slightly to create a wedge shape. This reduces the surface area exposed to fraying.
  • Seal the ends: Once cut, use a flame (carefully!) or a fray check liquid to melt the rope ends and prevent further unraveling.
  • Tape it up: For extra precaution, wrap the rope section you're about to cut with masking tape. This will help stabilize the fibers and minimize fraying.
  • Wet the rope: Slightly dampen the rope before cutting. This can make it easier to handle and reduce dust.
  • Practice makes perfect: If you're using a new tool or technique, test it out on a scrap piece of rope first to get the hang of it.
Brocky · · Unknown Hometown · Joined Jun 2016 · Points: 0

Tape and cut, ceramic knives are nice, take some of the core out, and pull the cover inside itself to get a finished end.  Some pieces of wooden dowel could be used to keep two ends together.

Li Hu · · Different places · Joined Jul 2022 · Points: 55
Mehgnn Bentley wrote:

I want to make an art project using some retired rope, does anyone have advice on how to cut it into pieces at home without fraying? 

A bit overkill for nylon ropes: https://rali-shop.com/rali-cut.html

The rope sits in the slots, and cuts very cleanly without burning nor melting. Very clean cut.

I used it for this type of cord: https://sterlingrope.com/6-mm-xtec/

Then finished the ends with JB Weld Epoxy.

Ryan Lynch · · Los Angeles, CA · Joined Aug 2017 · Points: 0
Li Hu wrote:

A bit overkill for nylon ropes: https://rali-shop.com/rali-cut.html

The rope sits in the slots, and cuts very cleanly without burning nor melting. Very clean cut.

I used it for this type of cord: https://sterlingrope.com/6-mm-xtec/

Then finished the ends with JB Weld Epoxy.

I have to try that epoxy finish, sometime... Bet that's durable as hell.

It's been tricky to find something that works well for the long haul -- gym ropes especially, when I'm able to climb nearly everyday.

Thanks for the idea.

Guideline #1: Don't be a jerk.

Climbing Gear Discussion
Post a Reply to "I want to use some retired climbing rope for art"

Log In to Reply
Welcome

Join the Community! It's FREE

Already have an account? Login to close this notice.