
 Continue with onX Maps
 Sign in with Facebook


Learning how to resole climbing shoes
|
|
For anyone interested I wrote a piece on resoling shoes for the first time. Learned a lot and realize now how much work goes into it, but not a ton of resources online on how to do it which was the tricky part. So just thought I'd share it here, any advice on what I could have done better would be appreciated https://simianrepublic.com/my-first-diy-climbing-shoe-resole-and-what-i-learned/ |
|
|
Cool write up. Any more pics of the rand replacement? I've always wanted to try this. |
|
|
Really nice job and write up. I made a pair of half lasts for my shoes figuring that I would only be doing rand repairs on the front of the shoes. I haven't tried the lasts yet as I made them well ahead of needing them. I figured I should make the lasts while the shoes had a really good fit to my feet. |
|
|
Do you think it would be possible to 3d print a last? Love the video! I think the amount of people willing to make a last, and then the ones even capable of doing so are very very few and far between. Yours look amazing!!! Such a skill to be able to shape that by eye. |
|
|
Steven Gonzalez wrote: Unfortunately no. Repairing the rands kind of gave me the most anxiety so I kind of had tunnel vision for this part and didn't document it all that well. However, I did film some clips of the process which is in the video I put up. You should definitely try it out, it's not hard at all, just a little finicky and nervous the first time. Also, I recycled the rands off another pair of old Five Tens that I blew a hole into. If you have any questions let me know! |
|
|
Victor Creazzi wrote: Half lasts should be all you need for a half sole in my opinion, majority of climbing shoes don't need a full resole as I see it. Just use the half last and stuff the rest of the shoe with newspaper. Honestly not a bad idea too since you'll be able to resole different sizes of the same shoe as well. A complete last is nice to look at though... |
|
|
panda bear wrote: Yeah, your lasts are much cooler looking than mine. I made my half lasts with 2 layers of 1/2" baltic birch plywood. I shaped the bottom piece then bonded to the top piece to it before shaping it. It was much easier than I expected, and it seemed like doing it that way made the fitting much simpler. I was prepared to build up any areas that I over sanded with body putty but I ended up only using it to bond the layers together. Where did you get your rand material? |
|
|
Jeremy McCormick wrote: Thank you for the kind words, I definitely spent way too much time on the lasts though and the video doesn't show the mistakes I made on them, although I address them in the article. Namely, sanding too much off the heels which I then fixed with duct tape and getting both lasts to be as close to identical as possible. I think 3D printing lasts would be a terrific idea. Definitely saves on time and mirroring the lasts would be a breeze. There are a couple resole videos I've watched where they were able to make a 3D printed last, and it looked great. |
|
|
Victor Creazzi wrote: Very interesting, mind sharing a picture of them? And I recycled some rand rubber off an old pair of Five Ten Aleons. Although, I'm looking to buy some resole rubber and randing rubber from Unparallel soon |
|
|
Half lasts.  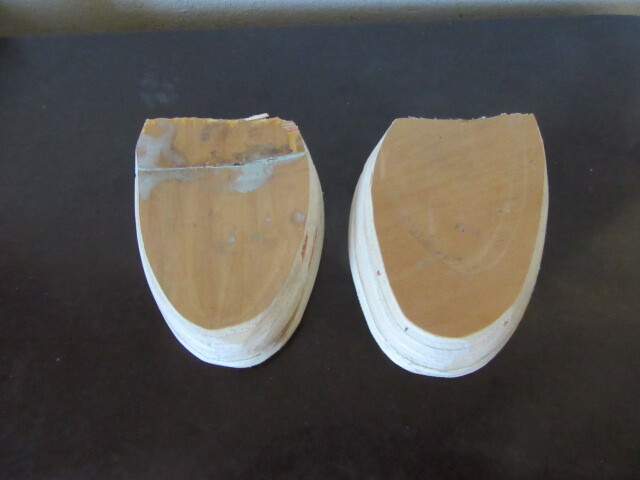 |
|
|
Nice! Ive resoled a few shoes at this point and my main takeaways are
Acquiring rubber was the most difficult part, most places won't sell to you unless you have an LLC.
|
|
|
James M wrote: Great tips James, how did you build a press? I'm trying to think of a way of making one myself As for getting the rubber I agree |

|
panda bear wrote: Panda, I built a manual vacuum press for regluing delaminating soles (5.10 approach shoes bought new 6-7 years ago, but falling apart due to aging synthetic midsoles) https://www.instructables.com/make-a-manual-vacuum-pump-for-under-%2420-by-convert/ if I was going to do this more often, I would use an electric pump instead: https://www.instructables.com/convert-a-tire-inflator-type-air-compressor-into-a/ |
|
|
The commercial presses that I see on the you tube videos look more like they could be built with a hot water bottle. Positive pressure may be easier to implement and one could possibly go over 1 atmosphere of pressure. I've used arced pieces of steel plate inside and outside of the shoe and c clamps which is nice for leaving the clamps on over night or longer. I'm thinking of adding 1/2" rubber under the outer piece to help get pressure up around the outer edges. |
|
|
Panda, I was thinking that the wrapping with bicycle tubes was a good idea. Were you not happy with that? Maybe not enough pressure? It's probably better for putting pressure on the edges. Maybe a combination of the tubes and clamping plates would be good. |
|
|
Terry E wrote: Thank you for the tip Terry, this looks like a great idea. I would probably make the electric pump |
|
|
Victor Creazzi wrote: Clamping plates with the tubes sound like a good idea I should have tried that. And the tubes worked well enough for the job but yes I want something with more pressure, and it's difficult to tell if the pressure was spread out evenly too |
|
|
rock climbing wrote: Haha they are very much like clown shoes, I outlined the lasts based on the Mocc's sole and yeah that's how they turned out And great tips on using the grinder I'll bear them in mind the next time |
|
|
panda bear wrote: I hope you post some photos and results, if you end up trying out a vacuum press. I stuffed the shoes tightly with paper before putting them in the vacuum bags and pressing them. |
|
|
panda bear wrote: This idea worked really well. 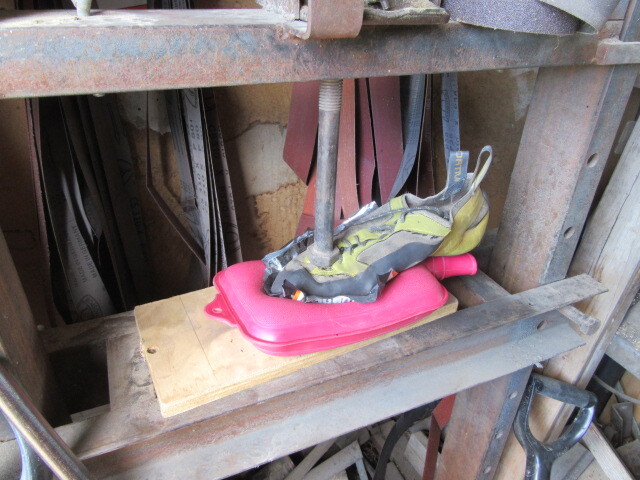 |
|
|
What grit sandpaper do you use? |


