
 Continue with onX Maps
 Sign in with Facebook


DIY Heads/Swages

|
Is anyone making heads/swages using a hydraulic crimper like this one? I've made a handful of #2 copper and alumiheads as well as some rivet hangers and they work great but just wanted to make sure I'm not missing anything. Seems like this tool would give better results/compression than a manual bolt cutter type swaging tool like this one. |
|
|
You are not missing anything so long as the crimp passes a go/no go gauge check. |
|
|
Kristoffer Wickstrom wrote: Cool thanks yeah that's what I thought. There's this old Rc.com/supertopo thread with tons of info on diy heads/swaged goods. Figured it would be good to copy the contents of that and put it here while supertopo still has that info online. Mountain Project won't let me copy/paste all of the contents but here are the highlights with some of the specs and info for different sized heads/goods. Pre-cut cable lengths for single-cable circleheads: Head Size/Oval Sleeve Size/Sleeve and Cable Diameter/Cable Configuration/Cable Strength: Double heads have more holding power than single heads, due to the greater surface area of contact between metal and rock, but are not used that often, especially in the larger sizes. A double #3 alumihead might be used at a belay or in the middle of a long string of junk with big whipper potential. A double #4 head is pretty much overkill and your arms will feel like they are ready to fall off by the time you finish placing one. Double #1s can be quite handy for super-thin seams – the ‘secret ticket.’ To make a double head, follow the same steps as you would for a single head except thread two sleeves instead of one (obviously…). The loop of cable doesn’t need to be as snug as it does for a single head because a small gap (1/16” or more depending on size of head) needs to be left between the two sleeves as the second sleeve is crimped. The gap is left so that the sleeves barely touch each other when crimped. If a gap is not left, the crimped sleeves will exert stress on the cable and weaken it; I have seen double heads break between the two sleeves because they were not made properly. To increase the strength of a double #1 head (and sometimes a #2), it is best to use the double-cable design. Follow the same steps as you would for making a rivet hanger (see below), except use a longer length of cable (+/-10” for #1; +/-11” for #2) and thread two loose sleeves before crimping the third sleeve that connects the two ends of the cable. Adjust the cable in the two loose sleeves such that the third crimped sleeve is properly located. Pull the loop of cable semi-tight and then crimp the two sleeves, starting with the end sleeve. Remember to leave a gap!! The ‘double double’ should look like a giant teardrop when finished. Rivet hangers are similar to circleheads in manufacturing process. Pre-cut the cable lengths (see chart below for cable lengths). Use an aluminum sleeve for the loose sleeve and a copper sleeve for joining the ends of the cable. Thread one end of the cable through both sides in the aluminum sleeve such that it forms a tight loop (not tight like a head) and the end of the cable sticks out about an inch. Join the two ends of the cable with a copper sleeve. Cinch hangers are a little bit different than standard rivet hangers. Use copper sleeves – important!! Start with the cable on the spool and make a loop as you would for the clip-in loop of a head. Because of the way that cinch hangers work, you will need to crimp the remaining edge of the sleeve after the sleeve has been normally crimped, to keep it smooth. If little slivers of copper squish out from the sleeve (between the ‘teeth’ in the jaws) then you will need to rotate the sleeve and crimp the slivers smooth. A few quick half-crimps will usually work. This step is not for strength but to remove the edge of the sleeve that would otherwise be jammed against the adjacent cable during cinching. This edge could weaken the cable. Next, cut the cable. Lengths will vary, depending on how big you make the clip-in loops and cable size. For a #2 cinch hanger, 8” of cable from the edge of the sleeve should be about right. Make a few hangers and you’ll figure out what works; the cinch loop should open enough to fit over a 3/4" dia washer. See “Cable” notes below. A Funkness Device, as we now call it (PC modification of the original Yosemite term…), is a length of #4 cable with a clip-in loop at either end and is used to clean pitons and heads (in conjunction with a hammer). They are easy to make – simply make a clip-in loop at either end using copper sleeves. I recommend using a length of clear vinyl tubing to make the Funkness deluxe. Thread the end of the cable through the tubing before making the second clip-in loop and be sure to keep everything snug (i.e. no gaps between tubing and crimped sleeve). When finished, the Funkness should be about 21” in length, though some may prefer shorter. To properly rig your Funkness Device, you will need two designated cleaner-biners; duct-tape the biners to the cable loops such that they do not rotate (i.e. tape the piss out of ‘em). Tools and Materials: |

|
Russel, lots of great info in that copperhead post. Make sure to site the original author who provided all of the goods (they will probably appreciate it). |
|
|
Brian R wrote: The copperhead how-to post, that Russell copy and pasted from Supertopo, was written by Bryan Law, aka "Minerals". |
|
|
Terry E wrote: Thanks for citing that. I didn't know who wrote it so I linked the original post. Just trying to preserve the data while supertopo is still online. |
|
|
Make sure you use the correct type of ovals for the tool head or die that you are crimping with I.e. Nico-Press sleeves with a Nico-Press tool and Loco-Loc with Loco Loc. And of cours, the correct Go-Nogo gauge. I personally prefer the 7x19 cable for most things, because of the handling characteristics. remember that what we do is outside of the design specifications for swages and swaged cable. As Kristoffer and I discussed in another thread, "we are doing it wrong, but there is a right way to do it wrong." Also, I recommend getting a good pair of purpose built wire rope cutters like the Felco C7. They make it so much easier. For background, I am a professional and certified entertainment industry rigger, both stage and arena. I do a LOT of cable swages. |
|
|
Terry E wrote: Thank you, just wanted to make sure that Bryan Law gets sited as the author (this time around) as he deserves the credit, especially for such a comprehensive how to make copperheads/aluminum heads. Hands down the best resource on the topic, at least as far as I’d ever found. |
|
|
Not unfortunately (imho, heads were an unfortunate invention), there is very little use for heads these days (on El Cap specifically). |
|
|
Russell Houghten wrote: I have a nicopress I would be willing to part with, dm me if interested, I am fairly retired from walls in general and definitely from harder aid stuff. |
|
|
abandon moderation wrote: Ask and ye shall receive    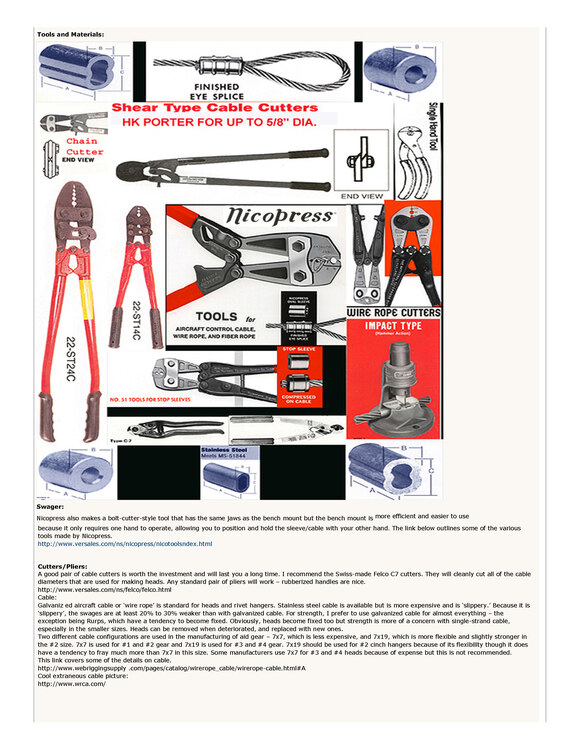 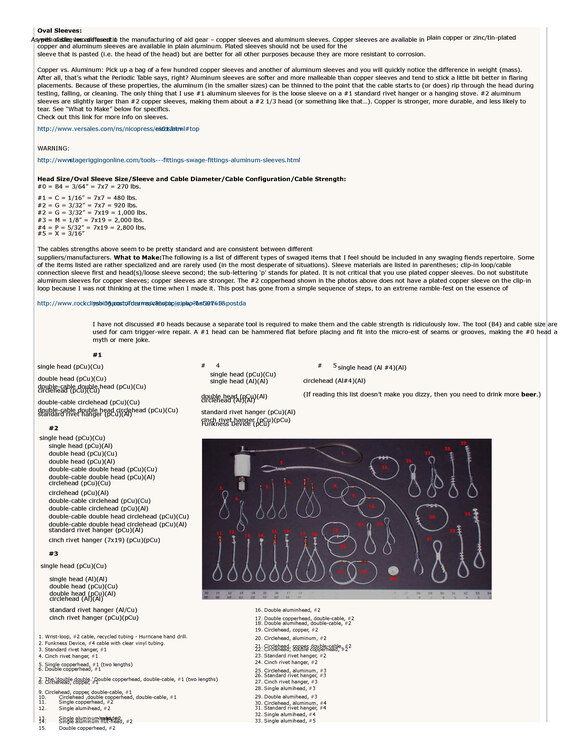    |


