
 Continue with onX Maps
 Sign in with Facebook


Alternative ways to deploy rappel rope: looking for more info

|
I've been reading and re-reading "Down" by Andy Kirkpatrick, which is a book about descending for climbers. Highly recommend the book for a variety of reasons. However, one section that intrigued me but I wish he had included more detail/illustrations for is the section on alternatives to throwing your rope for deploying the rappel rope. Seems like a crucial skill for rappelling when there are lots of trees/wind/low angle stuff. Here is the section that I'm talking about: 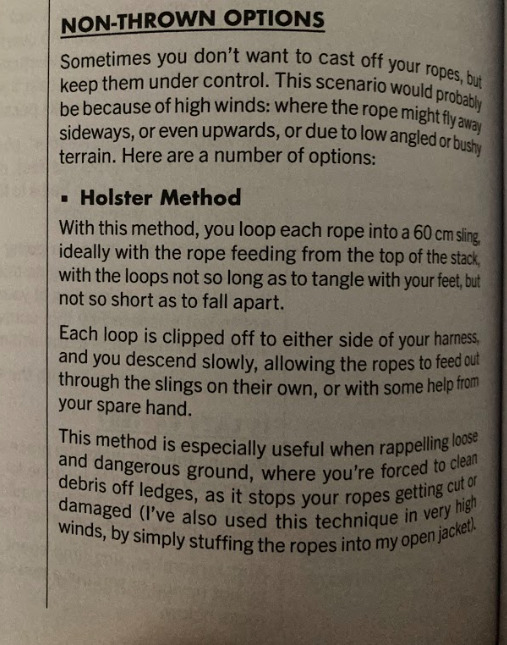 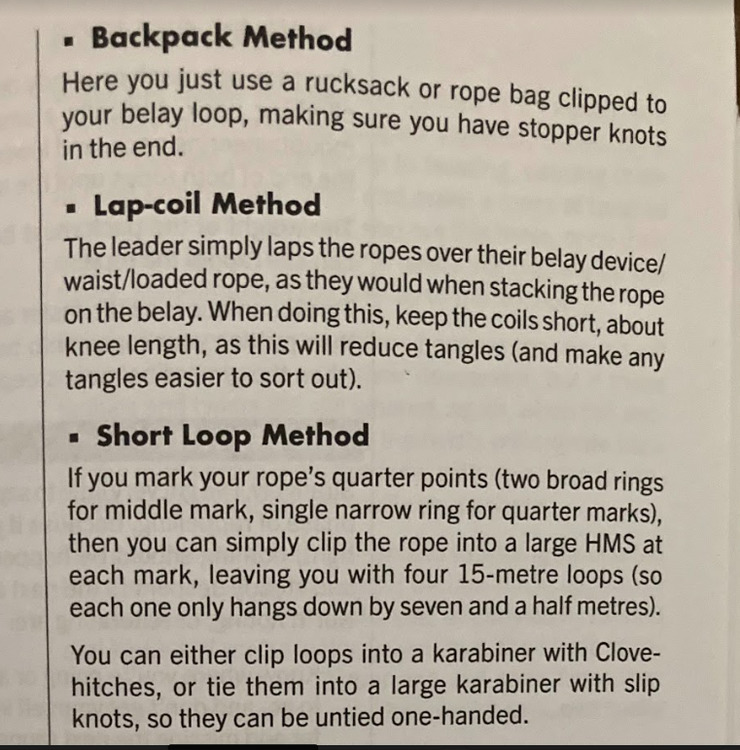 Anyway, if anyone has any videos/ other resources that explain how to execute some of these without making a huge mess of things, I'd be super appreciative. I'm especially interested in the "backpack method." Must say I'm a bit skeptical of the lap coil and short loop methods; seems like extra things could go wrong compared to the other methods listed here. Also, go buy "Down." |
|
|
I do the backpack method a lot, especially when I'm rappelling down loose stuff and trundling rocks on my way down (like when route developing) so I don't knock rocks down onto the rope and coreshot it (ask me how I know). I use a carabiner and attach my bag either to my right leg loop or maybe a gear loop and neatly stuff the rope in the bag with the ends going in first. As you rappel, rope feeds out of the bag. This is the cleanest, quickest, and simplest method. I've done the holster method when I don't have a bag. It works, but it's more annoying and prone to tangles. The key step when stacking the rope on the holster sling is to make your first holstered loop (the one with the rope ends) super long and each successive loop less long. |

|
I like the backpack method, haven't tried that before. The holster/saddlebag is a classic but tends to get tangled up. Another option is to coil it over your neck as if you were coiling the rope at the end of the day. Quick, less comfortable, and lets you feed out slack in big armfuls. |
|
|
I've also seen someone rapping with the rope coiled and stuffed between their back and backpack panel, or maybe it was looped around their backpack straps. They seemed like a beginner though, does anyone have experience with that? |
|
|
This is the "holster method". I learned it as the saddlebag. Unlike this video, I do each side of the rope independently on either side of me, but same idea. |
|
|
A few times a year I find myself taking (newish climber) friends on a lap of royal arches. Coiling is mandatory on at least two of the raps, and helpful on several. In general, I will almost always carry one rope and let it spool off my arm. As Big Red mentioned, simply coil the rope over your neck (starting at the tail), then transfer it onto the corresponding forearm, and allow it to spool off as you rap. You may have to stop or slow to occasionally toss a spool or three, but this slowdown is waaaaay faster than undoing a fustercluck of rope, or knocking a rock on a party below. If you have to do this with both ropes, obviously it's more time sitting at the rap station, but still less time and much safer than the alternative, halfway down the rap. The last double rope rap on RA (right before you split the ropes and walk down the gully) is a perfect example of where you have the L strand coiled and cradled on L forearm and R strand coiled and cradled on R forearm. Might sound complicated but just go smooth (and slower) and it will be much faster than the alternative. Also, you have a partner... make them do the coiling and/or hold the coil until you are loaded on device and ready to come off tether, then take the coil at the last minute. Additional benefit is that one rope will not twist around the other. On larger walls with 150-200ft raps, I always coil the incoming strand, and spool it off, usually all the way to 25ft before the next station, in order to eliminate the tendency of one rope to pigtail around the other rope, creating a (somewhat) hopeless fustercluck of ropes that you are now dealing with, dangling in between stations. Hope you used an autolock ATC device, haha. I've tried the saddlebag method and don't find it to work as well as just over the forearm. Definitely nice to be able to dump one of the ropes once you clear any obstacles and are now in a more vertical plane, and then, as mentioned, the second strand can be dumped with 20-25ft to station, so that you can get your tether ready at 10ft to go, since you never want to stop moving but rather should have tether in hand 5ft prior to station and smoothly clip in as you pass the station, so that the hot device never actually stops feeding rope (that's how you get slick spots on the rope, from people stopping to tether in with a hot device). |
|
|
If the terrain below is featured enough that tossing the ropes will make a tangled mess, simply lower the first person down. |
|
|
Agree. We’ve lowered someone a time or two. The described holster method with graduated loop lengths always seemed to result in tangles with scant free brake strand to spare. But maybe I just wasn’t careful enough with loop lengths. Rope stacked in a backpack is great, especially for dealing with a really skinny tag line, keeping it from tangling with itself and / or the main rope. Never tried the short-loop or lap-coil methods. |
|
|
About the short-loop method (marking your rope’s quarter points) … About a year before Down was published (last?), this MP thread was active: Idea to prevent folks from rapping off the end of their ropes. In it are several references to off-center marks leading folks to mis-center their ropes on those marks leading to uneven ends and so rap accidents. Seems quarter marks would have the same weakness unless one Never deviated from using Andy’s “short-loop” method. |
|
|
Though there's often ways to point to a multitude of "root" causes, I think laziness seems to be the primary method by which to mistake a quarter mark for center. I mark most of my ropes with a single 1.5" hash at 1/4 and 3/4, and 3 1/5" hashes, each about 2" apart, at the center. Assuming I keep them up (I do, remarking the rope about every 100 pitches or so), it'd be pretty damn tough for me to mistake a single hash for three hash marks. Also, tying an overhand on a bight and clipping it to my harness does two things, puts a knot in the rope and allows me to have the end at hand for quick threading at the next station. If it starts twisting, that won't be a problem until partway down the rap, at which time I can unclip the overhand and just let it drop to untwist itself. (apologies for the thread drift...) |
|
|
Christian Hesch wrote: Sure, because you know what sort of marks you made. But MY mid marks are the same as your 1/4 marks. I suggest I never rap on your rope. |
|
|
In my opinion, this is a "pick one & stick with it" sort of thing. I see it as 2 "types" of methods - tossings methods & controlled methods (e.g. actively managing coils on the way down). Most of the time, I'll toss the rope. Easier & faster.... if there are no "complications". I like having a controlled method for when I'm not looking for a fast way to rap, I'm looking for a slow and steady, non-messy way to manage the rope, and minimize chances of delays from fucking around messed ropes.
I find it also requires a more attentive rap, it's not a coil to use if thinking you'll zip down the ropes. I rap at a slower pace, pay more attention if there's a step/roof that could jumble the coils as I go over. I watch how the coil feeds as well. If the coils are all ~ identical, the worst tangle I can really get is a coil wrapping around the very next one. The solution to which is just to stop, pull the single coil & put it on the correct side of the feeding coil, and keep going. I see it as a trade-off I'm sometimes willing to make. I'm guaranteed a slower rap (than tossing), but if I take the time to do it well I know this wrap will take precisely the same time, 99 times out of 100. It's not a chance thing whether or not you'll get tangles with this methods; it depends how conscienscious you are when executing. |
|
|
I’m a huge fan of the “holster method” and use it whenever the terrain is telling me tossing the rope is a bad idea. I also learned it as saddlebags. Typically I’ll start descending with half the rope on each side clipped in to its own “saddlebag” 60 cm sling… after I descend always and get pass a bulk of the junk or tricky terrain I’ll usually unclip the saddlebags and let the ends of the rope fall free.
|
|
|
Elijah S wrote: +1 High Plains Drifter wrote: Assuming you now have enough feedback to know what to do for the various techniques, you could try each on low angle terrain that barely warrants a rappel (e.g., an easy slabby scramble). Maybe spend a day getting the various rope deployments dialed, pick and choose what seems most promising, then maybe move to a more challenging terrain. And, if not done, read up on dealing with a stuck rope during a pull. :) |
|
|
Gunkiemike wrote: Why would anyone ever make their 1/4 & 3/4 marks the same as the middle mark? I def suggest you never rap my rope, if that's how you do things. OP, to distill this thread a bit, see Franck's post, that covers just about everything. One last thing I haven't seen emphasized is how, when you're close enough to an edge to toss the rope, one might really want to consider coiling (from the end) about 35ft of rope, then allow 15-20ft to pile below them (as long as it's safe and won't carry rocks with it), then toss the 35ft coil over the edge. Now feed the rest of the rope down, instead of tossing the entire coil (which will either hit someone below or likely tangle), and you should end up with a nice straight run of rope. |
|
|
Christian Hesch wrote: You missed my point. I don't mark the quarters, just the middle. With a single black mark. I see no value in marking quarters, just potential for confusion. |
|
|
Gunkiemike wrote: ISTR that there was an accident (in the Gunks?) involving a not-middle mark. |
|
|
I do use and like the backpack method on complicated terrain (trees, bushes, big boulders). This technique may come from canyonning where it is pretty much used for every rappels on one strand. |


