
 Continue with onX Maps
 Sign in with Facebook


Best way to make crack machine adjustable?
|
|
Hello crack addicts, I’m wondering about the best way to make a crack machine with adjustable width, about 10’ long. I have made a smaller machine that has boards joined with nuts and bolts; I can adjust this by loosening the nuts and sliding the boards. Only problem is, this process is a pain, and with a 10’ machine there would be even more nuts to loosen. Does anyone have a convenient way of making the crack adjustable? Let me know if so. Thank you! |
|
|
 one thing that might be an issue is torque if the hand screw clamps were directly attached to the wood. Hmm… what do you guys think? |
|
|
Yes that’s how I made one time the through bolts def get in the way while your climbing. I used two side by side at the beginning and end and one in the middle for a total of five through bolts.it works.... but I don’t think it’s the best. If you wanted something long term I think you could come up with a better system. |
|
|
|

|
I had one crack side on dowels (thick as a broom handle) so it could slide toward the other side. It was held in position by stacking masonite full-size shims behind it. So I could move the crack in 1/8-1/4 inch increments. |
|
|
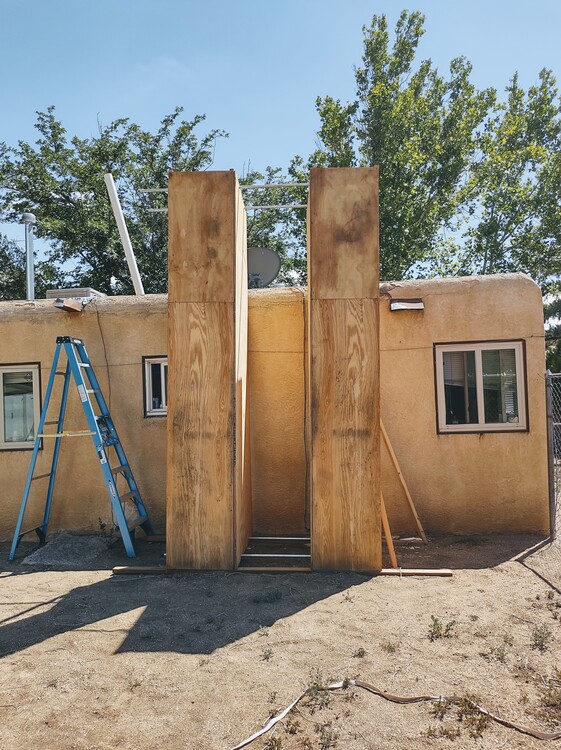
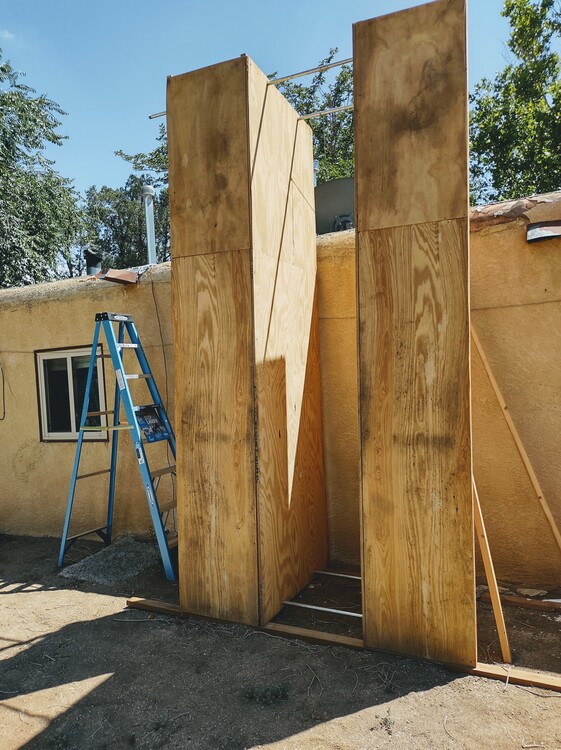
I have one I framed up in the backyard, it is 12' tall and 4' deep with 2' of face outside the crack on each side. It can open up to 5' and slim down to .5". I will upload pics tomorrow. One of the crack sides is mounted to a wooden frame and the other side is connected to it with 4x 1" diameter 7' long ections of steel pipe which conveniently accept standard barbel shaft locks. I lock the free crack side in place with 8 barbel shaft locks. It is pretty cool but it's so damn heavy and tall it's impossible to adjust without 3 people, one moving the bottom, one moving the top and one to spot it and help. Let me know if you have any ideas to improve it, current plan is to tear it down, and make it only 2' deep and 8' high to reduce weight and make it easier to adjust but I'd love to do something with a rail and tracks or something more clever... |
|
|
Luke Andraka wrote: Linear rails, rack and pinion or acme screw to move, locking clamps to hold it in place. If this was for a gym, I’d design up a super awesome one that is really user friendly… Might have to talk to the local gym now that I think of it |
|
|
  |
|
|
Holy moly. |
|
|
Luke! That thing is a leviathan! Love it! Here's what I would do to revise yours so one person can easily adjust it: 1) Keep it 12 feet tall: I have one which is 10 feet tall, and I really wish it were just a bit taller. 8 feet means you'll be able to touch the top with your feet on the ground (lame). 3 feet is probably enough depth for just about any technique (except for some squeeze chimney stuff), but since you've already built it 4 feet deep, I would keep it that way (for sheer awesomeness). 2) Add wheels to the movable side which run in tracks: use 4 wheels like this:  The, use a router to cut shallow tracks into the base rails for the wheels to ride in. Better would be to mount extruded aluminum channels to the wood rails which would reduce rolling friction a lot. You want these rails to be pretty rigid, I would probably use 4x4s or even 4x6s depending on how solid the underlying soil is. If the rails can flex/sag, you'll get binding/jamming at the top rails. 3) You may find that now, one person can move the thing if you apply the force at just the right spot. If it's still to hard to adjust by yourself, move on to step 4 4) Hand cranked, coupled threaded rods at top and bottom. This is probably the way the Crack Generator 3000 from the video works. The threaded rods at the top are linked together with a long bicycle chain, and go through a captive nut on the movable side. For threaded rods, ACME rods would be best, but the giant ones from home depot would probably work too. It's basically a giant version of a twin-screw vise: 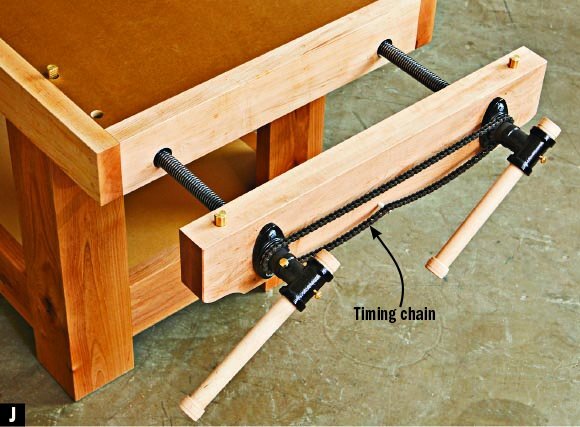 For style points, use a third sprocket at chest height for the hand crank, and adjust the size of the various chainrings/sprockets to get the ratios/speed/effort correct. Keep your current method to lock it in place. 5) Paint it. Use tar/fence post paint on the bottom rails so it doesn't rot, and latex paint on the rest. Splinters suck When I get my next place, I'm building something similar, but wall- mounted on rails. |
|
|
Sam thank you for the stoke! That is just what I needed to hear right now haha I love your idea, I had been looking at heavy duty cabinet rails but they are expensive, I never thought about wheels with my own track routed into the wood that seems really nice. I will have to raise the other side of the crack as well so that the two side are the same hight with the wheels added. I would love to do it without the threaded rods and chain and sprockets as I imagine a chain that big and threaded rods could get expensive but I think there will be too much friction between the metal rods and the wood holes. Maybe if I have the top on some kind of roller as well I could get away with no chain and crank. Ive got a 16' roof crack that I painted with latex paint with ultra fine anti slip grip mix made for decks which feels great even bare hands bare feet. I imagine I will paint this once I get it set up. Thanks for the help! |
|
|
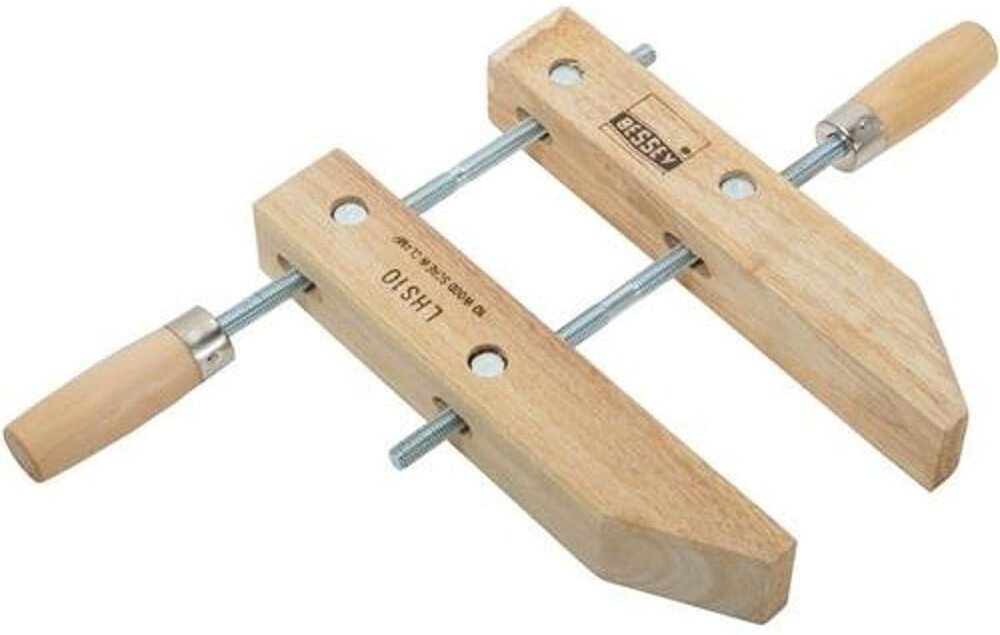
Heywood L wrote: Quite literally my crack "hangboard" was made by attaching boards to two of these wood hand screw clamps. Works great, though these days I never adjust it away from paddle hands. To be honest, I think a better system is to have like 10 boards separated by wood blocks of different sizes, so that there are different sized gaps in between the boards. That way you don't have to ever adjust, you just stick your hand in the crack that's the width you want. If you want to make it adjustable, spend that effort making the overhanging-ness adjustable. |
|
|
David K wrote: could you post a picture? I think I'm going to try to make one this weekend. Im curious what your method is for attaching it to a doorway or similar area. and any suggestions would be welcome. |
|
|
Heywood L wrote: Unfortunately I can't post a picture because I'm on the road and the crack hangboard is in my storage unit currently. I have one of those doorway pull up bars, and I hang the crack hangboard from with 6mm cord strung through holes drilled through the boards. EDIT: This isn't mine, but mine isn't very different from THIS. |
|
|
A random, more philosophical rambling about this: If you want to make a cool training tool, this is great. If you actually want to get stronger, I'm not so sure it's that great. Adjusting it is a bit slow and annoying, and you'll never adjust it to be exactly the same width twice without measuring it, which is even more slow and annoying. In my experience, slow and annoying means I won't do it. Over the past few years, all my training plans have gotten simpler, and I've stuck to them better, and I've progressed more quickly. There's a reason this crack hangboard is in my storage unit right now. If I were re-making my crack hangboard, I'd have four hangboards which weren't adjustable: just two pieces of plywood with wood spacers in between to create the crack size you want. You could even do more of a box with with three boards creating and two cracks on each. Swapping out the hangboards is probably easier than adjusting them, and you can get the sizes exactly the same every time, which makes your tracking of progress more accurate. The sizes I'd choose are: thin hand (almost not hands), rattly hands (almost not hands), big fist (you should have to use the thumb to widen the fist), and a hand-fist stack. The reason for these four is basically elimination: I don't think this crack hangboard concept really works for finger cracks because those depend so much on little features in the crack, and you can't get your elbows in the right position on the hangboard anyway. Good hands and good fists you don't need to train, because if you're training the others, those will be easy. I'll also give the disclaimer that I'm maybe not properly justifying my decision to include hand stacks because I suck at that and I maybe don't have the experience to say that they're useful to train. |
|
|
Here's a crack machine I made with my engineering students at Purdue Polytechnic: https://www.reddit.com/r/climbing/comments/mymsmq/purdue_crack_machine/ |
|
|
Here’s one that I’m selling locally, but it’s an implementation of the crack hangboard linked above. mountainproject.com/forum/t… |
|
|
Made one years ago with 2 large wooden beams. At the top and bottom they were held together with a ready rod, with machine nuts on the inside and the outside of the crack. One could, by moving the nuts, adjust the width of the crack although the minimum size was the width of the 2 1/2" machine nuts against each other. |

|


