
 Continue with onX Maps
 Sign in with Facebook


Crack Machine Design


|
I'd like to build a freestanding crack machine with several sizes in a spare room with a 9' ceiling. I'm thinking it will be around 25 degrees (4' horizontal with about 8.5' vertical), and I'd like it to be mostly wood (I don't want bolts all along the length of the boards). I'm no carpenter and I'm trying to keep things relatively simple. My main concerns are flexing and sufficient depth, and I'm wondering if doubling up 2x12's with a plywood backing and framing (at the top and bottom) would be enough to keep the cracks from flexing. Should I plan to add spacing blocks every 3 ft. or do you all think the doubled up and framed 2x12's would be sufficient? I've looked through a lot of old posts on this topic, but a lot of the more detailed posts seem to be in supertopo threads with broken links. Any advice would be appreciated. Thanks! |
|
|
I'm not a carpenter either, but maybe some I-Beam style construction could help with the flexing. i.e., instead of doubling 2x12s, run 2x6's (or even 2x4's?) on the outside at a right angle (using angle brackets). |
|
|
I like that idea mbk, but I'd still like to double up the 2x12s if I can get away with it since it would save space and allow for a wider range of sizes. If nobody has expertise on this then maybe I'll just have to do some experiments to find out. If anyone has advice on adding some width to the spots where I attach the support beams on the sides, then I'd like to hear that as well. Is it okay to just build a plywood box around some scrap 2x4 pieces and screw it onto the side of the frame? Or do I need to bolt it to the frame? |
|
|
It sounds like you want to build something like this:  All the pillars are 2x6 frames sheeted on the open sides with 3/4" plywood. I bolted it together to make it disassembleable, but screwing things together would work just as well and be loads easier to build. A backing runs across the back of the wall, which adds a ton of stiffness. The cracks are 9' long and they do not noticeably flex, and there are no spacers. |
|
|
JNE, I saw that, but I want to know if I can avoid doing the plywood sheeting since I don't have the tools to rip long pieces myself (and it sounds like a lot of work!). I suppose I could have them ripped at the store. I have a few questions for you, if you don't mind (and I'd love a picture of the back). What's the purpose of the angled yellow bits at the bottom and the two rectangular white pieces on top? Is that all just for stability? Did you end up adding any T-nuts to the plywood face? I'm torn on whether I want to go through the trouble of plywood, T-nuts and proper holds, or just tack on some DIY campus rungs. I was thinking of a structure like yours (probably worth the effort to use bolts for disassemble-ability) but with a simpler crack design like this: 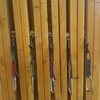 I'm just worried that I'd get more flex since this photo is of a crackboard and not a proper wall. |
|
|
David Deville wrote: If you do go the plywood route, and I very much recommend that, get the plywood cut more or less to size but make it slightly oversized, then after attaching it use a router with a cut-off bit to cut off the excess so it is an exact fit.
I wanted the supports to be away from the wall itself, so the base was wider than the wall. The two yellow triangles are my way to aesthetically integrate the wall to the base.
They cover the bolts which attach the pillars to the top piece.
Yes. The faces of the pillars are the 2x6, so I drilled a line of holes on each pillar about 1/2 way through the faces and screwed in threaded inserts to act as t-nuts. The only thing which sucks is the bolts used to attach any given hold need to be a pretty exact size to not bottom out and to get enough thread attached to be sturdy.
That build with a 3/4" plywood backing, and with a piece of 3/4" plywood on the face of the wall (using a router and cut-off bit to cut out the cracks), and with the 2x12s glued and screwed together, would likely be pretty comparable to the stiffness of my wall considering no spacers were used. One thing that makes my cracks so stiff is the 2x6 are the faces of the pillars, so one would have to flex a 2x6 edgewise to get the crack to flex. Also, wood putty/filler is your friend. |
|
|
Wow, that helps a lot JNE. I think I originally misunderstood your design. From what I'm reading, it sounds like each pillar is a 2x6 frame with a sheet of plywood on either side that is completely flush with the outside of the frame (so each pillar is a little under 7 1/2" wide when viewed from the front). This way you were able to pick your crack depth with the frame design and plywood face (and probably save a few bucks by not having to buy 2x12s). Now I'm thinking I should just copy your pillar design, but I imagine one could use 2x4s for the frame, fit in a few more cracks, and it would still probably be rigid enough (I can't imagine it would be easy to flex a 2x4 edgewise, especially with 3/4" plywood tacked on either side). |
|
|
David Deville wrote: Exactly. For depth the four outermost pillars are all 5.5" deep, while the middle two are 11.5" deep. The cracks are big cups/twists on the left, then horrible tight hands, then baggy hand/hand stacks, then perfect fingers, then perfect first knuckle fingers. Those depths were adequate, and really cool for the OW and big hands crack.
I imagine this would work just fine and be strong enough. I wanted the extra width and robustness of the 2x6's because I wanted to put holds between the cracks, and I wanted enough room for the holds as well as to have enough wood there post hole drilling for said holds to be structurally over-built. Plus I was extra confident pillars made from 2x6's would not flex. |


