Mountain Project Logo

Hang 45deg woody off engineered i joists?

Original Post
mbb · · Unknown Hometown · Joined Dec 2010 · Points: 0

I'm building a woody in the basement and am looking for advice.  The floor joists above are engineered I joists.  The wall will be 10' wide, 10' long, 45 degrees.  It will run perpendicular to the joists so I could attach the header to 6 joists.  I've read a lot of conflicting info online as to whether or not:

1. I can suspend the wall off the joists?2. If yes, the best manner to connect the header to the joists?
I'm hoping to use the basic design shown in the Metolius instructions for home walls.  Thoughts?  Anyone have experience with this?
Cheerio, Mike

climbing coastie · · Wasilla, AK · Joined Feb 2011 · Points: 95

I cut 2x10 to fit tightly between the joists and screwed them in from the sides. Placed them in every other gap, then bolted a 2x10 the length of my wall to them as a header. Seems pretty stable and I’m a pretty big guy. 

John Byrnes · · Fort Collins, CO · Joined Dec 2007 · Points: 392

My main woody is 43 degrees and 20' wide, and I hung it directly from Engineered joists; no header.  

In my case, the floor above is light-weight concrete, so the joists are on 12" centers.  I secured the frame to every-other one, except in one spot, where I used adjacent joists on one end to support the edge.   I used 2x6's screwed in from both sides, and attached to both top and bottom rails of the joists.   Pilot holes, of course.  

I also crenelated the top of the wall: it gives you one more move.  For each crenelation, I used a short 2x4 screwed to the joists to support it.  So the plywood is secured to the joists along the entire top edge.

It's totally bomber, doesn't move at all.    I built shelves behind it for storage, FYI.

mbb · · Unknown Hometown · Joined Dec 2010 · Points: 0

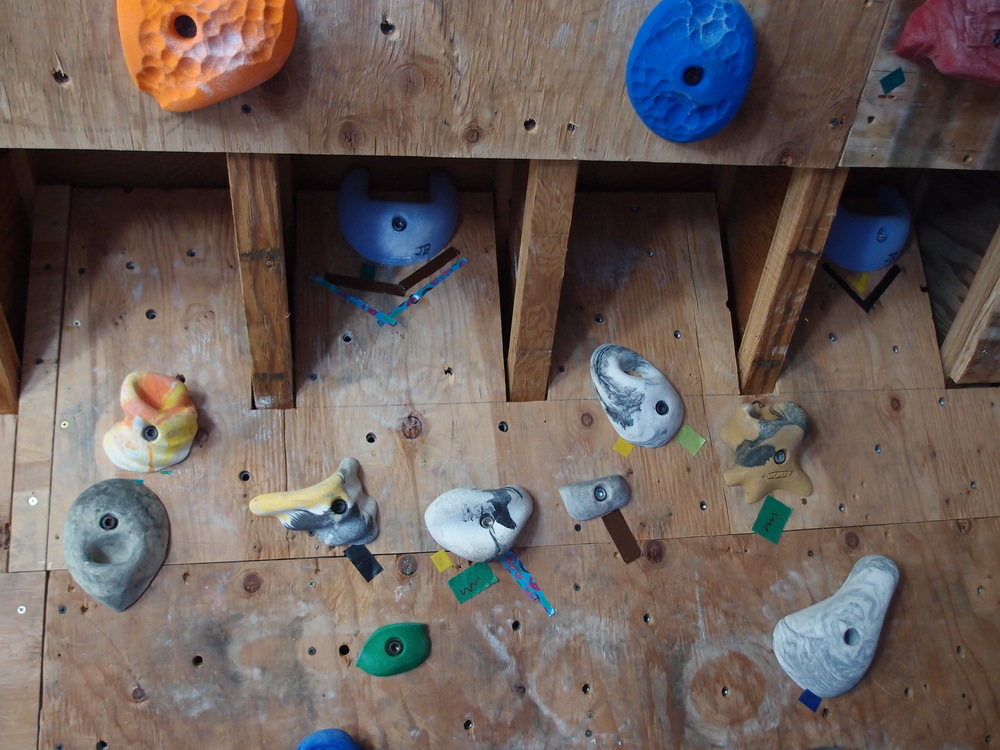
Awesome, thanks for the replies, gents.  Much appreciated.  

Mike

Kevin Stricker · · Evergreen, CO · Joined Oct 2002 · Points: 1,242

It’s best to screw into the face (bottom) of the TJI, it has better holding strength then screwing into the sides. Use a 2x12 header with 3 #10x3” screws per joist and you will be fine. 

Caveman Y · · NO VA · Joined Nov 2017 · Points: 915

I used a 2x8 header on mine with 4 deck screws into the bottom of each beam. I also went into the top plates of the adjoining walls on each side. That being said, I do tend to over engineer things. 

John Byrnes · · Fort Collins, CO · Joined Dec 2007 · Points: 392
Kevin Stricker wrote: It’s best to screw into the face (bottom) of the TJI, it has better holding strength then screwing into the sides. Use a 2x12 header with 3 #10x3” screws per joist and you will be fine. 

Hi Kevin,

I would normally agree but if you screw into the sides of BOTH rails (top and bottom), I think it's stronger than just screwing into the bottom.  It creates a very strong box-triangle structure which distributes the forces.   And adds a few more moves per problem.  I will emphasize that properly sized pilot holes are important for the TJI so you don't damage the laminate.  
Crossing · · Breinigsville, PA · Joined Apr 2010 · Points: 1,621

Mike,
Check out TB-808 from Weyerhaeuser (link below) this speaks to bottom flange attachment design considerations.  The biggest takeaway from that bulletin was "Maximum allowable bottom flange load is 500 lbs every 5 feet (250 lbs on each side of flange)."  My climbing wall's header was parallel to the run of the joists, and I was forced to essentially make a freestanding wall.

https://www.weyerhaeuser.com/woodproducts/document-library/document_library_detail/tb-808/

Mike Lane · · AnCapistan · Joined Jan 2006 · Points: 880

Just to put this out for anyone lurking, engineered joists have very strict limitations on putting holes through the middle matrix, and by no means should you ever consider cutting one of the top or bottom cords

Kevin Stricker · · Evergreen, CO · Joined Oct 2002 · Points: 1,242
Crossing wrote: Mike,
Check out TB-808 from Weyerhaeuser (link below) this speaks to bottom flange attachment design considerations.  The biggest takeaway from that bulletin was "Maximum allowable bottom flange load is 500 lbs every 5 feet (250 lbs on each side of flange)."  My climbing wall's header was parallel to the run of the joists, and I was forced to essentially make a freestanding wall.

https://www.weyerhaeuser.com/woodproducts/document-library/document_library_detail/tb-808/

Mike,

  Standard practice in this case is to use 2x4 sleepers across 3-4 joists every 4’. In this way you can distribute the load over more joists. It’s also important to consider that even a 45 degree wall will have a large shear component to the load. It is not a direct downward load, and at least 1/2 of the dead load is being transferred to the wall below. 

John, incorporating the upper chord can add to the allowable load but it does compromise the strength of the TJI. Your screws are stronger in shear than pull-out but the endgrain of the plywood caps have much lower strength. Can’t argue with the extra wall space though and if your joists are running full height it’s sure to be a bomber connection once the plywood is installed. 
John Byrnes · · Fort Collins, CO · Joined Dec 2007 · Points: 392
Kevin Stricker wrote: John, incorporating the upper chord can add to the allowable load but it does compromise the strength of the TJI. Your screws are stronger in shear than pull-out but the endgrain of the plywood caps have much lower strength. Can’t argue with the extra wall space though and if your joists are running full height it’s sure to be a bomber connection once the plywood is installed. 

Yes, thanks.  I don't remember the exact sizes, but... the pilot holes are sized so that the screw lags (pulls tight) the 2x6 without "exploding" the laminate.   I would drill a pilot hole through the laminate and into the 2x6, then using a slightly larger size, re-drill the hole just through the laminate.    It's quite strong this way.     Also, the plywood is attached to every joist along the top edge.

mbb · · Unknown Hometown · Joined Dec 2010 · Points: 0

Thanks again for the help!  John - I really like your idea of running the frame of the climbing wall up to the top flange of the i-joists, both to maximize climbing height and also increase the strength by including the top flange of the i-joist.  If I do this I'll get nearly 9' of vertical height which would be rad.

My only concern at this point how to fasten the 2x6 framing for the climbing wall to the upper and lower flanges of the i-joist.  It seems like I'll have to put screws through the side of the flanges and from what I've read, this is not ideal as it can potentially split the laminate and/or weaken the joist.  John - it sounds like this is what you did and haven't run into any problems.  With pilot holes and good spacing of screws (min 3" spacing) maybe this isn't such a big problem and I'm stressing over nothing?  Thoughts?

Otherwise, if I wanted to avoid screwing sideways through a flange, but still get maximum height for the wall, the next best solution I can think of is to fasten 2x material to the web of the i-joist with glue and screws, which is permitted according to tech docs, and then fasten the climbing framework to this 2x material.  In this case all the load would be on the web and lower flange.  

Maybe I'm overthinking this...

Mike

John Byrnes · · Fort Collins, CO · Joined Dec 2007 · Points: 392
mbb wrote: Thanks again for the help!  John - I really like your idea of running the frame of the climbing wall up to the top flange of the i-joists, both to maximize climbing height and also increase the strength by including the top flange of the i-joist.  If I do this I'll get nearly 9' of vertical height which would be rad.

My only concern at this point how to fasten the 2x6 framing for the climbing wall to the upper and lower flanges of the i-joist.  It seems like I'll have to put screws through the side of the flanges and from what I've read, this is not ideal as it can potentially split the laminate and/or weaken the joist.  John - it sounds like this is what you did and haven't run into any problems.  With pilot holes and good spacing of screws (min 3" spacing) maybe this isn't such a big problem and I'm stressing over nothing?  Thoughts?

Otherwise, if I wanted to avoid screwing sideways through a flange, but still get maximum height for the wall, the next best solution I can think of is to fasten 2x material to the web of the i-joist with glue and screws, which is permitted according to tech docs, and then fasten the climbing framework to this 2x material.  In this case all the load would be on the web and lower flange.  

Maybe I'm overthinking this...

Mike

I just used heavy gauge "drywall" screws.  Yes, you have to screw into the sides, but with a properly chosen pilot hole diameter, you won't split the laminate.  Use screws that have a smooth shaft near the head (no threads) so they lag.  (see above)  I don't think I damaged the laminate at all.  Oh, I didn't center the screws in the flange, but put it two-thirds up from the bottom.  You might get some scrap and experiment.

If you're still worried, cut a triangular piece (3ft on short edges) of plywood and mount it behind the wall.  One edge to the wall-joists (2x6) and the other along the TJI's to distribute the load.  As I said, my TJI's are on 12" centers, rather close, YMMV.

Oh, you can "get away" with a 12" kick panel, instead of 18", at the bottom to maximize your overhanging area.
Rich Farnham · · Nederland, CO · Joined Aug 2002 · Points: 297
mbb wrote: Thanks again for the help!  John - I really like your idea of running the frame of the climbing wall up to the top flange of the i-joists, both to maximize climbing height and also increase the strength by including the top flange of the i-joist.  If I do this I'll get nearly 9' of vertical height which would be rad.

My only concern at this point how to fasten the 2x6 framing for the climbing wall to the upper and lower flanges of the i-joist.  It seems like I'll have to put screws through the side of the flanges and from what I've read, this is not ideal as it can potentially split the laminate and/or weaken the joist.  John - it sounds like this is what you did and haven't run into any problems.  With pilot holes and good spacing of screws (min 3" spacing) maybe this isn't such a big problem and I'm stressing over nothing?  Thoughts?

Otherwise, if I wanted to avoid screwing sideways through a flange, but still get maximum height for the wall, the next best solution I can think of is to fasten 2x material to the web of the i-joist with glue and screws, which is permitted according to tech docs, and then fasten the climbing framework to this 2x material.  In this case all the load would be on the web and lower flange.  

Maybe I'm overthinking this...

Mike

Mike,

As Kevin mentioned above, I would not recommend fastening to the side of the flanges.  It's a weak connection and risks compromising your floor.  See Trus Joist bulletin TB-206 here to see that the largest fastener they recommend into the side of a flange is 0.148" diameter.  That's about the same as a #9 or #10 screw.  And the minimum spacing is 6" o.c.  They also don't provide a value for that connection.  Technical bulletin TB-203 (here) gives guidance on hanging sprinkler systems from TJI joists, and it says "Connections into the side of TJI joist flanges are not recommended".  They provide a design for connecting to the bottom of the flange.

Kevin gave you a good connection into the bottom of the bottom flange: (3) #10x3" screws.  Run a 2x12 header along the bottom of all the joists with that connection at each joist.  Then hang your studs from that header.  Don't use drywall screws - get the good ones.  I like the GRK screws, which I think Home Depot is carrying now.

You can still extend the plywood up between the joists.  If you have a full sheet of plywood that is mostly secured to the main wall framing below, and notched to extend up into the joist bays, then the load to any blocking you have up in the joist bays will be minimal.  I'd probably just put some 2x4 blocking between the webs of the joists to connect the plywood extensions to.  You can nail or screw this blocking in place from the other side of the web.  If there is already blocking in that bay, just angle the connectors a little.  This blocking will not be doing much work.
Doug S · · W Pa · Joined Apr 2012 · Points: 55

Another carpenter/construction guy here basically confirming that all points that Rich said above are 100% spot-on, including choice of fasteners. In this application the choice of fasteners matters somewhat.

John Byrnes · · Fort Collins, CO · Joined Dec 2007 · Points: 392

Okay, so I did it wrong.  I'm not too worried as the wall has been there and used for 8 or 9 years, and there are no creaks, cracks, movement or other indications of weakness.  However, since some of you seem to know what you're doing, can you answer some questions?  I've looked through the links and can't find a relevant section that talks about a similar installation.

So, the fire sprinkler example talks about suspending it from the lower flange only, so I don't think that's a good comparison.   My main question is this: By fastening a 2x6 to the side of both flanges and anchoring it on the other end, you create a very strong structure (By comparison, hanging sprinkler pipes does not create structure.) and doesn't this structure compensate for any weakening of the TJI?

For example, downward forces on the floor above, or a person bouldering, will not only be applied to the span of the TJI, but some of it will be transferred down the 2x6 to its foundation (mine have a solid footer anchored to concrete).   In addition, the extra force is distributed across all of the TJIs by 3/4" plywood that is attached to every 2x6 and every TJI.  

So I'm wondering... is fastening to the side of a TJI really something we need to worry about?   As long as you take some care and not destroy the laminate?

Rich Farnham · · Nederland, CO · Joined Aug 2002 · Points: 297

John,

The answer is complicated, and would take a long time and a few diagrams to explain.  I don't have time in the next few days to get into it (deadline at work).  But I'll give it some thought and try to come up with a good way to answer your questions.

The short version is that, done carefully, your approach is obviously fine for your condition.  It's been there for years without any apparent problems.  But there are significant risks in doing it that way, particularly if you aren't careful when installing the fasteners into the side of the flanges.  I wouldn't suggest to others, without knowing a lot more about the installation (joist spans, loads from above, etc) that they do the same thing.  The connection that Kevin suggested is much more forgiving, and works better in more situations.  

mbb · · Unknown Hometown · Joined Dec 2010 · Points: 0

Awesome, thanks all!  I mounted the header to the bottom flange as per recommendations above and the tech docs.  Header runs across 6 joists and seems mega solid. Wall ended up being 35 degrees, better compromise between my training wants and what the kids will be able to climb on.  For now I'm not extending the wall above the bottom of the joists but good to know this is still an option with a bit of blocking up higher attached to the web.  

Framework is done, ply is drilled with 144 holes/sheet.  Waiting now on t-nuts to arrive in the mail.  Time to start making some dry-tool holds with the scrap wood :).  

Thanks again all for taking the time to provide your advice, much appreciated.

Doug S · · W Pa · Joined Apr 2012 · Points: 55

The easy answer is that TJI's are designed to carry loads a certain way and along a certain axis, and they are more susceptible to 1) problems associated with delamination and 2) secondary stress forces (such as moment stress which is basically "potato chipping") than wood joists. Carpenters add secondary blocking when necessary in floor construction to mitigate these forces. These applications are always intended to deal with loads from above, obviously.
Hanging something from below is a little different, especially when it is going to bear dynamic loads. The optimum answer that Rich described is the best because it deals with all the above issues in one easy installation of a heavy top plate screwed from below with structural screws. Why this matters is because you are using the plate to spread the load out over the largest surface area possible, you are fastening through the laminated layers of the bottom cord instead of between them, and you are eliminating any potential moment stress in the process. A lot of bang for the buck there.
Most other methods are probably going to be fine and cause no damage. However, Rich's method is the fast, easy, right way.

climbing coastie · · Wasilla, AK · Joined Feb 2011 · Points: 95

mbb,  I use door hinge halves as my dry tool holds. Works great!

Guideline #1: Don't be a jerk.

General Climbing
Post a Reply to "Hang 45deg woody off engineered i joists?"

Log In to Reply
Welcome

Join the Community! It's FREE

Already have an account? Login to close this notice.