|
Luis Collazo
·
May 30, 2018
·
Somerville, NJ
· Joined Sep 2017
· Points: 0
I want to start taking photos at my local crag. How you do it? What gear did you use? What's your workflow? Any advice, ethics? Thanks!
|
|
Matt Himmelstein
·
May 31, 2018
·
Orange, CA
· Joined Jun 2014
· Points: 194
Do you have any photography experience? The main thing is to shoot from above when you can so you need to get yourself rigged to be on the wall at the level of or above the climber at a good spot. Digital cameras make the "spray and pray" method way easier and cheaper - take way more photos than you think you need to get the best image, unless you know exactly what you are doing and can plan out the exact image you want. Beyond that, all the regular rules of photography still apply, including when to break them. Think about the rule of 1/3s; have motion move into, not out of, the frame; think about leading lines; get the exposure right, which may require fill flash...
Equipment selection depends on what you own and what you want the shot to look like. If you are relatively low on the wall and close to the climber, use a wide angle lens to get everything in the frame and exaggerate the elevation. If you are shooting somewhere high up with pretty backgrounds (like Yosemite) get a bit (or even a lot) further away with a longer lens and shoot a high f/stop to get greater depth of field to capture the surrounding area. The gear you use is totally dependent on what you have and what you want the final product to look like. A full frame dSLR with expensive glass is a great choice, but it is heavy and expensive. High end mirrorless cameras or entry level dSLRs are good, but there is a magnification effect, so wide angle lenses are less wide and you can't control DOF as well. Even relatively cheap P&S cameras can take great images, if you understand how to use them and how to get the best performance out of them. Look at it this way, nearly every great, historical photo was shot with a camera less advanced than what is in your smartphone today; knowing how to get the most of your equipment is more important than the actual equipment. Polarizing filters can really add to the drama of the shot, if you want that kind of thing.
Shoot RAW or RAW+JPEG and do whatever workflow is required to get the image you want. If you don't understand the terms I used here, just remember the first two tips and then work on basic photography skills. If you want to get better, be ruthless when you self critique. Look for errors in all your images so you can start recognizing those issues in the viewfinder before you hit the shutter release.
Ethics? Don't set up on a popular climb and monopolize the route. Don't interfere with other climbers. Make sure that everything you are using is on a leash; you certainly don't want to drop your camera and break it, but you also don't want to drop anything and risk the folks on the ground. Are you looking to sell the images, shoot friends, or just give them away to anyone? If you want to make this a business, there may or may not be licensing requirements. If you want to sell images to 3rd party sites, magazine, microstock..., you need releases of anyone recognizable in the image. If you are just posting them on line, you should probably offer the image free to anyone who is in the shot. If you are going to camp out in a popular area with a big crew, go mid-week, not on the weekend.
|
|
NegativeK
·
May 31, 2018
·
Nevada
· Joined Jul 2016
· Points: 40
Matt Himmelstein wrote: If you want to get better, be ruthless when you self critique. And if you want feedback from other people, don't ask friends and family or the internet unless they're someone with experience and can ruthlessly critique. Generic praise is useful for keeping you from losing hope, but useless for improving. If you find someone who can critique, buy them beer or soda or do a favor for them. They're the equivalent of a climbing mentor to a beginner.
|
|
FosterK
·
May 31, 2018
·
Edmonton, AB
· Joined Nov 2012
· Points: 67
|
|
Andrew Child
·
May 31, 2018
·
Corvallis, Or
· Joined Sep 2015
· Points: 1,552
I shoot on a sony a6000. I think its pretty much an ideal hobby camera for climbers since its very small, (relatively) cheap, and it takes great pictures. If I'm on the ground I use either a 35mm MF prime lens, or a 200mm MF prime lens. The 35 is good for getting the climber and scenery from fairly close up, and the 200 is good for getting just the climber (you have to stand pretty far away though). For multis I put the camera in a fanny pack with the 18-55mm kit lens that it came with. Before I start belaying I put the camera around my neck and then I can shoot one handed (easy since the camera is so light) while I keep my other hand on the break strand.
|
|
Isaac Gray
·
May 31, 2018
·
Unknown Hometown
· Joined Jul 2016
· Points: 8
Everett wrote: And if you want feedback from other people, don't ask friends and family or the internet unless they're someone with experience and can ruthlessly critique. Generic praise is useful for keeping you from losing hope, but useless for improving. If you find someone who can critique, buy them beer or soda or do a favor for them. They're the equivalent of a climbing mentor to a beginner. Awesome advice. I've had good experience with getting valuable critique from the Fred Miranda forum.
|
|
Joe V
·
May 31, 2018
·
NC
· Joined May 2010
· Points: 241
Matt gave a great primer on camera gear and technique, so I'll focus on getting in position.
When I set up to shoot, the way I get into position rougly falls into three categories: - I've climbed the route first and fixed a line.
- I've rapped in from the top of the cliff either off a tree or an anchor.
- I am shooting from an accessible vantage point on an adjacent cliff, ledge, down the trail etc.
For #1 on a single pitch route, you'll climb the route, reach the anchors, go in direct, then pull the rope up through the gear and fix it. Depending on the angle I want, I might traverse to an adjacent anchor and fix there. After fixing the rope, I ask my buddies to attach my camera gear, gri gri and ascender to the rope and I pull those up. Then I lower into position and we're good to go. For #2, I lower in from an anchor or tree, attach my line to a bolt below the lip so it doesn't rub too bad, and then move around as needed. Ascender and gri gri make it a breeze. #3 is more rare for me, Southeastern cliffs mostly have too many trees around to make this easy. Editing workflow-wise, I shoot in RAW and edit with Lightroom and Photoshop. That's pretty standard for most. Having a CF card in a DSLR means you can shoot a ton of frames and pick the best ones. Climbing is fast-paced and half the time people's eyes are closed or whatever in really good spots, so don't limit your options.
|
|
Luis Collazo
·
May 31, 2018
·
Somerville, NJ
· Joined Sep 2017
· Points: 0
Thank you, guys! Super helpful information.
|
|
Ben Turcotte
·
May 31, 2018
·
Lynchburg, VA
· Joined Apr 2018
· Points: 0
I'm new to shooting photos on a rope, but I'll throw in my 2 cents from what I did last weekend. It was super fun and I really want to do it again.
Similar to Joe, I fixed a line on an adjacent anchor. I climbed up on a dynamic, set up an anchor off bolts using lockers and cordalette, and then set a fixed static line (doubled overhand on a bight into lockers). Then I was lowered off the dynamic line and ascended the fixed, static line.
I used the Petzl RAD system to ascend the fixed line. I used a double length sling as a foot loop and shoulder length to tether from the ascender to my belay loop. Grigri configured as normal but running the rope through a pulley creates a 3:1 which makes taking up slack more efficient. The system as a whole worked fantastically and I really hope to do it again. Ascending on the static is more efficient than the bounce in a dynamic line, but the rope I had was 7/16 / 11mm and was just at the outside limits of the grigri.
I tied off "catastrophy knots" every 10 ft or so as a backup because there isn't a good way to attach a safety prusik when rapping with the grigri.
Wear a harness that has wide, comfy leg loops. Your thighs will thank you after a few minutes of hanging.
I'll also echo the Lightroom / Photoshop workflow. You can sync the edits in LR for speed and spend time in PS on the money shots.

|
|
Joe V
·
Jun 2, 2018
·
NC
· Joined May 2010
· Points: 241
Forgot to mention an important item! If you're going to be in one position hanging around a lot, buy a bosun's chair. They're amazing for long shoots, and have some use in video rigging too.
|
|
Jon Nelson
·
Jun 2, 2018
·
Redmond, WA
· Joined Sep 2011
· Points: 8,611
Luis Collazo wrote: I want to start taking photos at my local crag. How you do it? What gear did you use? What's your workflow? Any advice, ethics? Thanks! A fellow I know who took great shots at Index would hang from a rope but use stilts to push away from the rock. By pushing away, he could get more of the climber's body into the picture, plus capture features of the rock face.
|
|
Suburban Roadside
·
Jun 3, 2018
·
Abovetraffic on Hudson
· Joined Apr 2014
· Points: 2,419
Jon Nelson wrote: A fellow I know who took great shots at Index would hang from a rope but use stilts to push away from the rock. By pushing away, he could get more of the climber's body into the picture, plus capture features of the rock face The Stilts that are used to put up sheet rock ceilings? they seem to cluncky & heavy, plus they need to be secure? 
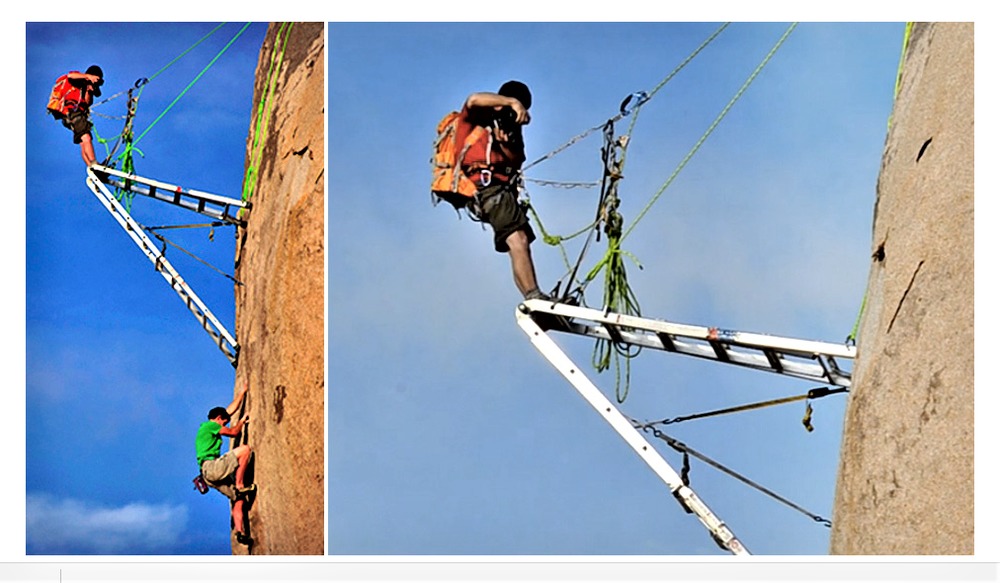
I,ve used 3 re-enforced PVC pipes as poles to push out from the wall.You can thread cord thru them to an anchor, then the fun is getting the three legs to balance with you at the flexing end. . . ymmv There is a very serious debilitating condition that occurs from hanging in a harness (with out regular/constant movement) Harness Hang Syndrome, also check out Compartment Syndrome
|
|
Tyler Newcomb
·
Jun 5, 2018
·
New York, New York | Boston
· Joined Dec 2012
· Points: 81
Static line at the top, gri-gri backed up by catastrophe knots, an ascender with a footloop. Camera on harness.
Beyond that, it's really just perfecting your style.
|