Continue with onX Maps
 Sign in with Facebook


Gear Review - Climbing Pulleys and Hauling

|
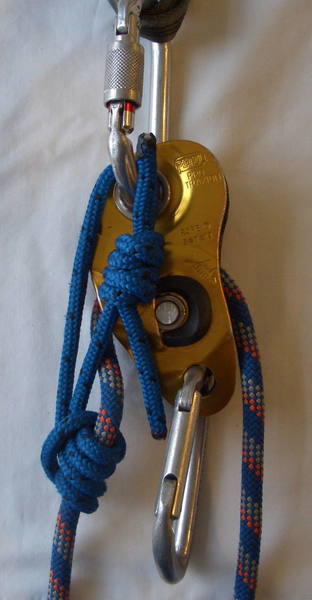
Climbing Pulleys and HaulingPulleys come in all shapes and sizes and deciding on the right one can make or break any big wall trip. In this review I'm going to look at some of the most common pulleys out there for hauling and climbing applications. Then, I'll take a look at how to haul and finally break down some of the processes when when soloing.Types of Pulleys If you have never used a pulley before and have no idea when people start talking about a 2:1 or 3:1 then a good place to start is wikipedia. This will help you to get up to speed and make sense of what I'm going to rave about. Also check out this java applet that lets you put add weight and the number of pulleys to see how much effort is required to raise a given weight. Pulley's for climbing activities are generally made out of Plastic, Nylon or a type of metal depending on their size, price and purpose. They range from less than five dollars to several hundred, so it's important to buy and match the pulley to the right job. Pulleys fall into two broad categories, which I'll refer as either simple and auto locking (self-jamming): Simple Pulleys Simple Pulleys are just that, simple. The Petzl Ultra Light Pulley retails for less than 4 dollars and although simple, it is a godsend for mountaineers. I've used this type of pulley extensively in the past, especially when I used to guide in the Mount Cook area in New Zealand, and teach crevasse rescue. They are cheap and light and with a bit of care, work extremely well. If I got off the couch and decided to go to Alaska (highly unlikely) I would take a couple of these and a few prussik loops and I'd be set for glacier travel. Petzl Ultra Light Pulley (4 dollars) The next step up and a fine general purpose climbing pulley is the Black Diamond Pulley. Unlike the Ultra Light Pulley, this pulley is made from heat treated aluminum and has a nylon pulley wheel that rotates on an oil filled bronze bearing. The bearing makes a huge difference and greatly improves the rolling of the pulley compared using a biner. The sides of the pulley swing away so it is easy to insert the rope. A good choice for wall in the day type of hauling and as part of system with heavier loads. I use this pulley with my far end hauling system Any pulley with a oil filled bearing should have a very smooth action. If it doesn't, then send it back. Black Diamond Pulley (20 dollars) Another type of pulley in this category is the Petzl Minding Pulley This pulley is similar to the Black Diamond Pulley, but it also has squared off edges. The purpose of the edges is to help prevent prussiks from getting pulled through the pulley. The sides of the pulley are also larger, thereby covering the entire strand of rope and preventing any wear and tear or increased friction if rope is rubbing against other hardware. Also worth noting is that as a pulley becomes more specialized they become more expensive. If you can't find the right pulley locally, try On Rope 1 which is a specialized rope and hardware supplier for cavers, rescue folks and climbers.  Petzl Minder Pulley (50 - 60 dollars) All of the examples so far are relatively small pulleys with a pulley wheel one to one and a half inches in diameter. If you are hauling light loads, these pulleys will do the job, but if you start to haul larger loads, then a larger pulley makes life considerably easier. One company that makes great large pulleys is CMI. The one shown below has a three inch pulley wheel and a breaking strain of 16,000 lbs. However, as the pulley wheel size increases so does the weight and this one weights just under 1.4 pounds. This is a good pulley for hauling heavy loads on El Cap. CMI RP105 Pulley (60 dollars) Hauling with a simple pulley Hauling is hard work and physically challenging. It gets easier with practice but it never gets easy. I've rapped off more climbs because of being wasted from hauling than any other reason. It can also be really soul destroying to put so much effort into hauling to realize you've moved the bags 10 feet in 30 minutes. Fortunately, it does get easier with practice and having your systems dialed in makes a tremendous difference. As one of my managers says at work: Work smarter rather than harder! Practice hauling at your local crag with a very heavy haul bag so you can enjoy your big wall experience. Back to hauling ... I like to have my pulley pre-rigged with the haul line before leading the pitch, otherwise the steps are: 1. Attach the pulley to your hauling anchor power point 2. Thread the haul line through the pulley. 3. Attach a clamp upside down with a sling to the powerpoint on the weighted side. 4. Attach another clamp on the hauling side. You're now set up a 1:1 hauling system and depending on the weight of the haul bag: 1. Haul using both hands, pulling up with one clamp and down with the other. 2. Attach an aider to the clamp on the hauling side and use your leg to haul (leg haul). 3. Attach a daisy (adjustable works well) to the clamp on the hauling side and use your body weight to haul. Like doing swats. Make sure you tied in so you are covered when resetting the clamp. 4. Full on body hauling is next which is an effective but has more risks involved. Untie from the the lead line and then tie into the end of haul line. Then use your full body weight to counter the weight of the haul bag. Only do this with very heavy bags and good quality haul lines. Another way people do it is too tie the slack off a the anchor and then lower down and jumar back up... This is a safer way of doing it. 5. If none of this works then you have too much stuff. When hauling always be backed up to the anchor. Don't rely on just your hauling teether. There are some great diagrams and pictures of hauling shown in the Big Wall climbing book by Jarod Ogden It also covers how to improve mechanical advantage by using more pulleys, etc. Once you have a good understanding of hauling with a simple pulley then you might wish to check out auto-locking pulleys. The reason why I suggest learning to use a standard pulley first, is that you need to understand the mechanics and processes. Also, if you drop your auto locking pulley then you're be forced to use your backup standard pulley. You do carry a backup don't you? Auto-Locking Pulleys This category refers to the pulleys with built in auto locking features such as the Petzl mini and Protraxion and the Kong Roll Block. These pulleys are specifically designed for hauling and are more expensive than simple pulleys starting at about 70 dollars for the mini, the pro about 110 dollars and the Kong Roll Block, if you can find one, about 140 dollars. So why use a auto locking pulley? I like them as they make hauling easier on a wall by simplifying the hauling set up process due to fewer parts involved. However, this is just my viewpoint and many people will point out the following reasons why not to use a auto locker: 1. A simple pulley provides more flexibility and options 2. A specialized piece of gear is not required 3. Allows you to specifically match your pulley to the type of loads you are going to be hauling. For example a 2 inch pulley for light loads, a 4 inch for massive loads. 4. Spending the same amount of money for one auto locking pulley you could buy several pulleys. Petzl Mini Traxion The Mini Traxion is a popular all purpose pulley. It has a cam with inclined teeth attached to a spring loaded catch that locks on the rope when weighted. To feed the rope into the Pulley, lock the cam into the open position and swing the side plate away. However, due the the pulley wheel being only 3/4 inches in dimension it is best suited for light loads. The breaking strain in self locking mode is 4kN. 1kN = 224 pounds so about 900 pounds when loaded. Breaking strain as a pulley is considerably higher Other popular uses of this device is solo top roping, tryolean traversing as well as part of jugging systems. At 165 grams it is very light and compact. One of the keys of using his pulley is having the right biner to thread through the hole. I recommend using an oval locker such as the OK Locking biner by Petzl. The radius of the biner fits the pulley well. Attach the locking biner to a short sling and then to another biner into the hauling power point. This ensures that the pulley is able to move about freely. Technical specifications Pulley Wheel: Approximately 3/4 inch. Working load as pulley only: 2.5 kN x 2 = 5 kN Breaking strength as pulley only: 10 kN x 2 = 20 kN Working load as self-jamming pulley: 2.5 kN Breaking strength as self-jamming pulley: 4 kN For use with ropes from 8 to 13mm Mini Traxion PDF Protraxion The pro is the big brother of the mini and more suited as a pulley for big walls. Like the Mini the Pro has the same requirements when using it; a good fitting oval biner and a sling to ensure the pulley has enough freedom to realign itself to the direction of the haul line. If you search hauling or protraxion over on supertopo, you will no doubt find posts from people having problems with the Protraxion. In many of these cases I believe that the problems described are due to the pulley being clipped directly to anchor chains and bolts and therefore limiting it's range of movement. However, if you are looking at buying one I recommend you check the forums so you make an informed decision. Another cravet with the Protraxion is that you must ALWAYS have a biner in the lower hole to ensure the pulley side walls stay in place. The caming mechanism is at the top of the biner and not the bottom as some books and videos show.  Petzl Protraxion The protraxion is efficient hauling of reasonably heavy loads, although not massive loads. If you have massive loads and want a autolocker than it may be worthwhile checking out the Kong Block Roll or using a simple 4 inch pulley. My experience with the Protraxion has been great, however I haven't hauled really heavy loads on it yet, like over 100 pounds. Technical specifications Pulley Wheel: Approximately 1 and 3/4 inches. Working load as pulley only: 3 kN x 2 = 6 kN Breaking strength as pulley only: 11 kN x 2 = 22 kN Working load as self-jamming pulley: 2.5 kN Breaking strength as self-jamming pulley: 4 kN For use with ropes from 8 to 13 mm in diameter 265 g At first look you might be concerned about the relatively low braking strain of the protraxion as a big wall pulley when using the auto locking feature. Especially, if you are soloing and rapping off it. However, it really isn't good practice to rappel off a tooth cam and there are better ways to work around this limitation and improve safety considerably. See the section below on hauling solo. Petzl Protraxion PDF Protraxion and Mini Traxion Protraxion and Mini Traxion with open cams Kong Block Roll This is the King of auto locking pulley, but I've yet to see one in real life. I've read a lot about them and have tried to purchase one in the past. If you can find one, they are only 20 or 30 dollars more expensive than a Protraxion. However, they are considerably stronger and have a larger pulley wheel. They're also twice the weight. The Kong Block Roll is a pulley attachment that fits onto the Kong-Bonaiti Modular Ascender. The Block Roll consists of a single pulley riveted between a stamped aluminum frame and a stamped side plate. It is rated for 15 kN (3300 lbs) when used as a pulley, and can handle ropes up to 16-mm in that mode. With the Modular Ascender attached to form a hauling pulley, the rope size is limited to the range from 8 to 12-mm, and the strength rating is reduced to 5 kN (1100 lbs). This rating is about 200 pounds more than the protraxion  Kong Block Roll (About 140 dollars if you can find one) To locate one of these monsters check the link below: supertopo.com/climbing/thre… Soloing and hauling If you are soloing, one of tricks of the trade is how do you preset your haul bag and anchor so that when you undock your pig at the lower anchor it is already engaged and ready to be hauled. This is something that you might not really comprehend until you are on the sharp end and on a wall as it is easy to fake when the bag isn't heavy. Like many things it sounds a lot more difficult than it really is and once you have done it a few times you'll have it down and be pretty efficient in your steps. Lower anchor prep I use the haul bag as a counterbalance to the anchors and it is tied to the anchor powerpoint with its docking tether. I usually tie a munter mule hitch and then back it up with the haul line. The docking tether is a piece of 7 or 8mm cord about 16 feet long that is doubled. The Top anchor I have my protraxion all preset up with sling, locking biner, prussik cord and safety biner, so its quick to deploy. The sling is a must for the protraxion. It allows the device complete freedom to move to it's natural position and free of any twists and turns. (By the way I think having a swivel on the bag helps as well.) Step by step the progress goes a like this: 1. Connect the sling to the highest set of anchors. 2. Thread the haul line through it. 3. Put a prussik knot to it on the loading side and then clip this to the locking biner. 4. Pull a little slack through the device so the haul line is loaded on the Prussik rather than the cams 5. Tie off the haul line for safety 6. Attach Grigri to haul line and rapp At the bottom anchor When you reach the bottom anchor you need to take out the slack in the system and release the bag. To do this: 1. Tie off the haul line to the haul bag powerpoint and stuff the excess rope in the haul bag. (This will reduce the amount of rope to haul and give you some line for lowering out the bag if necessary) 2. Untie haul line backup knot and release pig on the docking tether. The bag is now free hanging and will be ready to hauled once you get to the top anchor. Now, clean the pitch by jumaring up the lead line. I use a Grigri for safety backup. It works very well and comes in handy if you have to rapp or pendu at all. For the first 10 or 20 feet you will have to move the grigri up manually, but once you get going it won't be an issue. If it is windy I'll coil the rope as I go so that it doesn't get caught on any flakes etc. Back at the top anchor Once you get back up to the top anchor, you are ready to haul: 1. Pull up enough haul line to release the prussik knot and remove it. 2. Start hauling. 3. When the bag gets to the anchor repeat the setup as described above for the lower anchor. By the time you have led the pitch, set up the anchor, rapped down to the lower anchor, broken down the anchor, released the pig, cleaned the pitch and hauled, a fair bit of time has passed. I plan on three hours a pitch. For me that is a steady pace with no rushing. Conclusion I think the Petzl Protraxion is a good device for hauling moderate loads when you'll out for several days. Once you get into the week plus arena then a 3 or 4 inch pulley or the Kong might be a better match. As with any piece of gear you need to fully understand how it is supposed to work and practice with it to ensure that you are using it correctly. Also, reading the instructions probably helps as well. Thanks for taking the time to read this and if you have any questions post up here or shoot me an email. |
|
|
|

|
John, I really enjoyed that review. I can tell you put a lot of time into this. I especially liked your format, in that you covered the entire gamut of types of pulleys and provided a lot of general education to accompany the format. |
|
|
It is quite a nice review, John. Well done. |
|
|
Thanks for this review. I will print this one to use for future reference. |
|
|
Have you seen the DMM Revolver? They now make both a locking and non-locking. I've been using them as top anchors for TR's as well as part of a quick draw if the rope angle is high. I've talked with others that have used them as pulleys, though I've never used them myself. |
|
|
Erik Tullberg wrote:Have you seen the DMM Revolver? They now make both a locking and non-locking. I've been using them as top anchors for TR's as well as part of a quick draw if the rope angle is high. I've talked with others that have used them as pulleys, though I've never used them myself.The DMM Revolvers are not designed for toproping. From the documentation on DMM's website: The Revolver Karabiner is NOT designed for use on zip wires Tyrolean traverse top roping or other situations where prolonged use could cause damaging build up of heat dmmclimbing.com/uploads/ins… I use my locking Revolver for a few select applications: reducing rope drag on a wandering route and setting up an emergency 3:1 hauling system with a prussik. If you use the Revolver in a high-speed, high-load situation the bearings will likely fail. |
|
|
Does anyone else read into how bizarre the warnings are for the revolver? |
|
|
Mark Nelson wrote:Does anyone else read into how bizarre the warnings are for the revolver?The carabiner won't fail catastrophically, just the "revolving" part. It looks like the pulley on the carabiner will seize up, turning it into a plain 24kN carabiner. I think this is because the pulley is so small that it simply cannot dissipate the heat fast enough. The manual is amusing, though. I like this one in particular: "You must stare at the carabiner in order for it to work correctly, DO NOT LOOK AWAY!" |
|
|
Very interesting. I haven't had any problem with heat and I've been using the non-locking since last fall (and the heat is much less than a rope against aluminum). I probably won't change since this doesn't effect safety. I remember reading the handout with that biner, and I guess I missed the part about not actually using it in any way that is useful ;) |
|
|
Erik Tullberg wrote:Very interesting. I haven't had any problem with heat and I've been using the non-locking since last fall (and the heat is much less than a rope against aluminum). I probably won't change since this doesn't effect safety. I remember reading the handout with that biner, and I guess I missed the part about not actually using it in any way that is useful ;)Why is it necessary to set up a toprope with a Revolver in the first place? What's wrong with two opposed locking carabiners? Weight differences between the belayer and the climber can be managed more effectively with a little additional friction in the system. I think the Revolver is a great tool, not to replace a full-strength full-function pulley like the ones reviewed above by John. The application for the Revolver is to reduce rope drag on wandering pitches by using it as part of a draw, limited hauling and self rescue scenarios like 3:1 hauls. You are mistaking it as a full-strength pulley, which it is not. |
|
|
Erik Tullberg wrote:Also, please note that it is not designed for "Tyrolean traverse top roping". This is not the same as normal top-roping.You're kidding, right? There is no such thing as "Tyrolean traverse top roping". They forgot commas in their documentation. An edited version should read: The Revolver Karabiner is NOT designed for use on zip wires, Tyrolean traverses, top roping, or other situations where prolonged use could cause damaging build up of heat Don't you think lowering a person on toprope could cause some heat build-up? There is more force applied to the carabiner on a toprope when lowering than if you were doing a tyrolean traverse. |
|
|
I guess we disagree. I know folks that use it very effectively as a lightweight pulley. They love the convenience and weight. |
|
|
Thanks John. I had a great time going through this site. Really interesting that I got a good idea about pulleys. You taught us so easily. |
|
|
Thanks John, things are starting to make sense. |
|
|
Evan1984 wrote:However, why is the prussik superior than just clipping into the carabiner with an 8 on a bite on the load side of the protrax? It seems like that is more secure and avoids rapping on a teeth. I'm sure there's a real world explanation, but I'm still trying to understand the theory. Thanks, EvanAfter you release the haul bag from the bottom anchor, then the prusik is loaded. If you tied a knot on the load side of the protraxion then IT would be loaded and when you got to the anchor to haul you would have a loaded knot in front of the protraxion holding the haulbag. So the prusik allows you to simply start hauling after lowering out the bag. |
|
|
Ahh. Makes total sense. I would of kicked myself for not thinking about that. |