
 Continue with onX Maps
 Sign in with Facebook


Hauling systems, free body diagrams, forces--help!


|
|
curt86iroc wrote: This doesn't add any mechanical advantage, increases the load on the anchor, and reduces effective hauling strength due to added friction; in a typical crevasse rescue scenario, this would be an odd choice, especially if you have concerns about anchor strength. A redirect like this might be more common when hauling on a big wall, where the anchor strength is higher (and loads potentially lower). |
|
|
Hey Curt--I ran the numbers out of curiosity. With or without friction, the JTP still holds: when hauling from above the force on the anchor = the load - the hauling force. How is this possible? When you add a redirect that is attached to the main anchor, the forces on the anchor do inccrease, but the sign of the hauling force changes, so the math works out. Hauling toward the load would have to be a negative force, and hauling away from the load would have to be a positive force. I"m a beginner with these things, so perhaps I confused the signs or the terminology, but the numbers work out for me. |
|
|
Bruno Schull wrote: If the load force and the hauling force are in the same direction (e.g. the load is hanging from the anchor, and the hauling line is being pulled "down" towards the load), the load on the anchor is the sum of these two loads. If you're getting different results, I suspect you simply have your signs inconsistent by accident. Per my previous comment, this would be an uncommon arrangement for crevasse rescue. |
|
|
@ Kyle, I beleive Curt was considering the truth of JTP (the idea that when hauling from above the force on the anchor is always the load minus the hauling force). I think Curt was trying to imagine a situation with a simple redirect where this would not apply. He was not suggesting a re-direct as a useful system for crevasse rescue. (Curt, if I'm misscharacterizing your views here, my apologies). When I first think about Curt's proposal, it seemed as if he had a point: if you add a pulley redirect to the main anchor, the force on the anchor will increase. However, the math still works out, because the sign of the hauling force changes from positive to negative. Here are some numbers (no friction, rope stretch, etc.) (Original) Drop C with added Z drag MA = 6:1, force to hold 100 kg = positive 16.67 kg, force on anchor = 5 times 16.67 or 83.35 kg Force on the anchor = load - hauling force (Proposal) Drop C with added Z drag and redirect MA = 6:1, force to hold 100 kg = negative 16.67 kg, force on anchor = 7 times 16.67 or 116.69 kg Force on the anchor = load - hauling force |
|
|
Kyle Tarry wrote: Exactly. Adding a redirect to an existing anchor in a mechanical advantage system does not change the mechanical advantage, but it does increase the load on the anchor. As you described above, adding a full 180° redirect increases the load on the anchor by +1 of the haul load hence, Jim’s previous statement is inaccurate.
Agreed. It is uncommon in crevasse rescue, but very common in rigging and technical rescue. |
|
|
diepj wrote: Ignoring friction at each pulley and at each point where hardware contacts the rope and at any edges the rope goes over, the mechanical advantage is 6:1. I can show you the calcs but they are pretty simple high school physics. At any rate, the calcs are pretty much pointless since the friction losses can't be estimated accurately and without a lot of assumptions. Just a WAG but I'd say you would be lucky to get much more than 3:1 in a real world situation. Rather than doing calculations, it would be more accurate to do a test. They say one test is worth a thousand expert opinions. |


|
Kyle Tarry wrote: That is what Curt was saying…. (At least how I interpreted it). He wasn’t suggesting to do it. He and Jim were essentially saying the same thing, just pulling from different directions, and Curt acknowledged that. And to Dan’s post above, I agree that in general practice, a theoretical 6:1 is pretty much a 3:1 in reality per tests that I have done. A general “rule” is to use a 6:1 to get a 3:1. |
|
|
Have been a bit late to this party, but I’d just add for consideration that it’s easier and more efficient to add the 2:1 to the Z up on top rather than add the Z to a 2:1 below the lip in the typical “drop loop”. Less friction, less rope, quicker to implement in my experience, and no need for the “load” to be conscious or functional. (Sorry for the bad sketch) 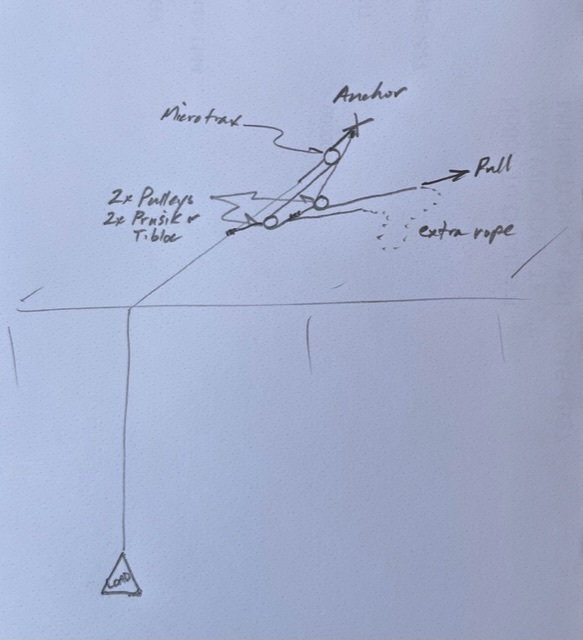 |
|
|
Totally get what you're saying Mark, but I've pretty much moved entirely over to using knots on the main line for saftey on summer glaciers in the alps. Hence the drop loop. That said, one could drop a single line, make the Z drag and add the C as you suggest. I'd don't doubt your assertion that it's more efficient, but I'll probably run the numbers because I'm curious and it's fun :) Another possible advantage of this approach (drop line, build Z, add C) is that it might use less rope, which is always a concern with a two man team. With a "drop C first" approach, a team of two is basically commited to taking a 60 m rope if they want to maintain adequate distance with knots on the main line, and stiff have enough rope to haul. Thanks for the input. |
|
|
Just to add, some other ways to "save" rope with a "drop C first" approach is to leave the anchor where it is and make a new master point closer to lip of the crevasse. You can also add slings and such to the bottom of the C. |
|
|
Bruno Schull wrote: They both have the same theoretical mechanical advantage, so there's unlikely any meaningful difference in efficiency. Both are ~2.6:1 with 50% efficient carabiners, or a bit higher with one 80% efficient pulley in the typical progress capture location. Drop loop does provide an easy way for a conscious partner to use their pulley in the system, which can help boost mechanical advantage a little bit, but is probably not critical. The drop loop is also discussed in Chauvin-Coppolillo (see page 216). I won't copy-paste the whole text here, but they discuss the pros and cons of both systems and assert that "the drop loop adds efficiency by reducing the friction in the overall system" and "the drop loop is efficient because half the friction stays on the anchor side of the equation, meaning not only less force to overcome by the hauler, but also less force on the anchor..." Any system where you need to haul after a partner falls and entrenches a rope with brake knots is going to be best if you haul on a fresh line (be it a single or a drop loop), so you will need to get a fresh line to them in most scenarios. I doubt there is good data out there, but I suspect that most crevasse falls with positive outcomes have a conscious climber in the hole. If they aren't conscious, you probably need to go down there and administer first aid, which requires a fresh rope anyway (and is covered in the AMGA/OR videos). In any case, the drop loop is a good tool to have in your toolkit, you just need to be aware of the pros and cons and also have other tools available for scenarios where the drop loop might not be the best choice. Based on your comments it seems like you're aware of these so I think you'll well on the right track. |
|
|
Hey Kyle, Thanks for the input. The Drop C is definiteloy my go to system, my plan, what I practice with partners, and so forth, but I'm intrigued by the drop line and z drag with the C added later, as it's not always certain one will have enough rope to make the drop C (2 man team, 60 meter rope minimum, stopper knots, etc). You could used a drop line and made the C part with cord or sling which would save rope. Running the numbers, I get a 4.39:1 MA assuming 80% efficiency in all devices (for example, microtraxion + two partner pulley, each climber carries one pulley). That's of course a high MA. Your numbers sound reasonable for lower efficiency--I plan to make an alternate model where you can play with the efficiency of all the parts, and see how everthing changes. When I do that I'll report back. |
|
|
Kyle Tarry wrote: Not much difference, but the C to Z requires 5-7% less pull force than the Z to C drop loop using the very same equipment, and vs just gravity (No edge friction)
While mostly splitting hairs, using a couple light weight Petzl pulleys in the system vs round stock oval biners is an actual ~4:1 vs a ~3:1 respectively in above system (no edge friction). Drops below 3 if using lightweight biners
Interesting. I was always thinking from the perspective of a skier with no knots in rope (minimal rope and gear and quickest for 1-2 people to immediately rig and haul with above data in mind…(if I was walking, I’d use knots) But I can see that in the Z to C rig, having the load over the lip halved on the pulling side (with ~1/2 hanging on the static side reduces edge friction —as we both know, friction is proportional to the normal force ;) — and is probably helping more than the 5% better efficiency of the C to Z But, as you said, both have pro and cons, both will work, choose based on the real situation at hand. If I had plenty of rope, and a helpful “victim” I’d probably use the Z to C (drop C) myself |
|
|
Mark Pilate wrote: Mark, can you please explain how you have arrived at this conclusion? These two systems should have the same theoretical mechanical advantage, so I'd like to understand where this claim of 5-7% less force is coming from.
4.4:1 is correct at 80% efficiency. For a 6:1 in the drop loop configuration, the formula for theoretical MA is [1+2E+2E^2+E^3], where E=efficiency (0.5, 0.8, etc.). So plugging in 0.8 gets you 4.39, 0.5 gets you 2.6, etc. |
|
|
Kyle Tarry wrote: It’s empirical data. Agree that Theoretically, they should be the same. But every time I rig it on my own “drop tower” or basement “lab” using same microtrax, same pulleys, same rope, same force gauges, etc….all hanging from same master point. the C on top of the Z always uses a few less pounds of force to haul up the same weight vs stacking a Z onto a C. Try it. I verified it by repeating it just now. A 100 lb load needed an avg of 26 lbs of pull vs an avg of 28.5 lbs of pull (5x pulls each). About 9% difference I haven’t really tried to micro analyze where the Delta is coming from. |
|
|
if you are going to carry all this stuff and spend the time faffing around, setting it up, re-gripping, etc, you might as well just carry a little 1 ton hoist and be done with it. |
|
|
slim wrote: nah. 1/2 ton is good enough.. https://www.harkenindustrial.com/en/harkenindustrialcom/riggers-winches/riggers-winch-500/ |
|
|
shit dawg, you need (2) 6 ton hoists, (1) 3 ton hoist, and a 3000 pound slug on a 3 to 1 wheel. then you can get that fella out of the crevasse. helps to have frank the tank and big matt yanking on them things though.  |
|
|
slim wrote: ???? Have you been on a glacier with crevasses? Have you ever singled handed pulled someone up and out? (Practice or for real) ? A rope, a few biners, and a microtrax is not a lot of gear. Are you saying you can just grab an 8mm rope and hand over hand someone up? Your post doesn’t really make sense. You’re likely confusing the analysis of simple systems here with what’s needed to be carried. But if you’re traveling as just a rope team of two, a microtrax is worth it’s weight. Makes a simple Z workable. |
|
|
Mark Pilate wrote: 5-10% differences in a home measurement probably aren't significant. I just did the same test and I got the same results within 3%, the populations overlap within one standard deviation, and the data doesn't pass a t-test (p=0.24). I think that all we can say based on this type of testing is that they are "about the same."
A few carabiners and a microtraxion is standard crevasse rescue gear, across various texts, countries, and guiding organizations. Aside from just crossing crevassed glaciers unroped, this is about as simple as it gets... |


