
 Continue with onX Maps
 Sign in with Facebook


Core drilling tools for bolt replacement


|
Blake M wrote: Not sure- I'll ask Alex. We tag teamed the job such that Jerry and I removed all the bolts and Alex and Elizabeth finished the job by adding the glue-ins. They finished at 8:30 just after dark. We started out just deepening the holes with a 1/2" bit since a staggered hole doesn't matter to a glue-in. I don't think they were using the 16mm twisted leg bolts. 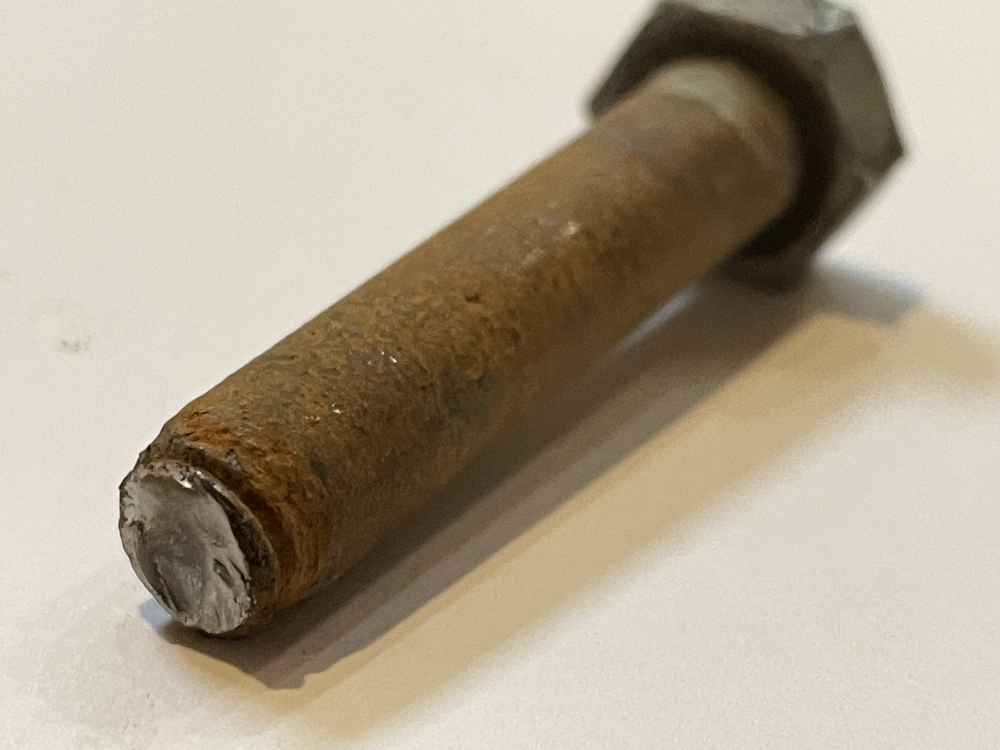 The very first lead bolt did this to us- which usually means chop 'n patch. With this core bit it was NBD. Didn't take any longer than the other bolts. The one wedge bolt on the route was just as easy to remove. In doing this since 2012, this is the most exciting development yet. We didn't even get the Doodad out of the tool bag yesterday. It will make the time estimates for these jobs so much more reliable. Observations:
|
|
|
i'm wondering if the squeeze bulb could be replaced with a gravity system that doesn't require a hand to operate? |
|
|
old5ten wrote: It could- but you would waste water, and the weight penalty is worse than the effort penalty for squeezing the bulb. By the end we figured out we could use a lot less water than in that video. |
|
|
Gregger Man wrote: just watched the vid again, looks like you've got one drill and one water operator (which makes more sense) - i initially thought it was one person drilling and bulb squeezing (which requires more dexterity than i would have to keep the bit aligned ;-) |
|
|
old5ten wrote: I did several by myself due to the off-plumb fixed line. It's not that difficult. Even if it were, the water requirements aren't that stringent. In a perfect world, it would be connected to a faucet, but in reality you can alternate between drilling and flushing. The bits may not cut as fast or last as long with less water, but that's not something I'll lose sleep over. Greg Barnes- Missed your question earlier: That is worth trying. An old Leeper hanger wouldn't put up much resistance. The rounded head would work as a pilot (I think). Let's try it. I think you gave me a few fresh 5/16" button heads at one point. I'll try to find them and place/drill them. |
|
|
Gregger Man wrote: In that video are you using an sds-chuck adapter on the drill to connect it to the non-sds core drilling adapter? Have you found a similarly inexpensive adapter that's SDS instead of a traditional chuck? |

|
Gregger Man wrote: Did I give you Rawl buttonheads, or were those the Fixe knock-offs? The Fixe are way softer metal, but I only have a handful of Rawls, it was hard to find anyone who would hand unplaced ones over for bolt removal practice - people treated those like they were solid gold (they were...until we realized that even 5/16" or 3/8" buttonheads just snap off sometimes). Anyway, it's not uncommon to find a mix of 5/16" buttonheads (dicy stances) and 3/8" bolts (better stances), it would be awesome to have a method that worked on 5/16" buttonheads, 3/8" wedge bolts, and 3/8" 5-pieces without having a different set of tools! Especially with older rusty 5-piece or studs that snap off in the hole as you unscrew them (or the occasional buttonhead which snaps off as you pull it). |
|
|
Gregger Man, could you share a photo showing the interface between the tapered core drill bit and the holder, and either scale or caliper dimensions of the narrowest portion and the diameters of the cored drill bit taper where it goes into the holder? I'll dig around in the scrap bin and work and try to make up a little tuning fork style bit remover for you. It looks like if I make the middle of the tuning fork just a little too narrow, you can grind/file it to fit the narrowest part of the bit's taper, and also match taper as best as you can. Unless I can find dimensions for the taper online, then I'll just machine all that in there for you! It looks like a shallow taper on the bit, so I may add a little rounded fulcrum so you can kinda lever out the bit. Edit: I saw on the website for the core drill bits that it's a Morse taper on the end of the bits. If you could measure the smallest diameter of the taper, the biggest diameter of the taper, and the overall length of the taper I can figure out which Morse taper is on the bit. Alternately, something like this would work for you, but it would take three hands to use 'em, and is probably hard to do while hanging in your harness! McMaster-Carr - drill chuck wedges |
|
|
Max- the water adapter has a straight shaft, and I haven't seen an SDS option. I think the primary usage for these core bits is installation of kitchen faucets, so SDS drills aren't the norm. Duncan- There is no need for a special tool to change bits. If you have vise grip pliers and a hammer the job is simple, and you won't be changing bits that often. The interface between the bit and the adapter has no shoulder or groove for a tuning fork to work. The geometry of this particular taper goes from 0.462 to 0.512 over 1" by my measurement (and the entire tapered portion is inside the adapter when the bit is inserted). The OD of the body of the bit is about ~0.5 mm smaller than the cutting portion. 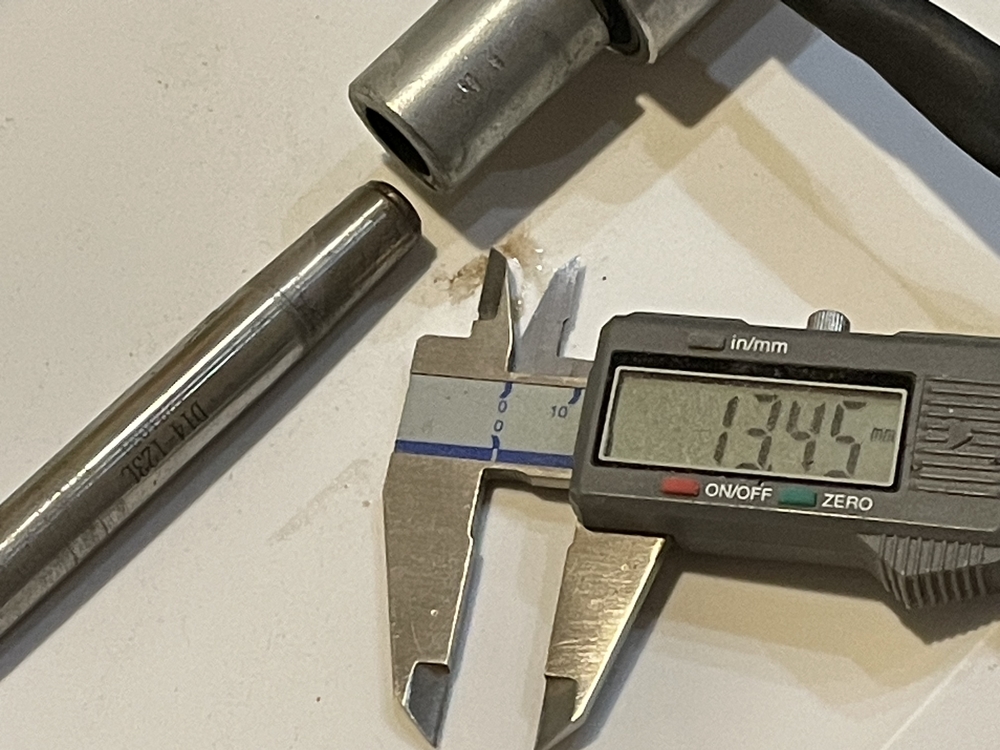 |
|
|
Gregger Man wrote: Shoot, I was hoping there was a small portion of the taper left sticking out that I could make a tool to pry against. Oh well! Also, it sounds like it's a stubby #1 Morse taper; it's a little fat on the big end, and has about half the length chopped off the small end, if you're curious. |
|
|
Blake M wrote: We did not enlarge holes after. For two of the holes on overhanging terrain we used Wave bolts, which fit with just a bit of resistance until they reached the back of the hole (drilled further at 1/2") and required extra effort. For the rest we used 6mm twisted leg bolts. Given the 1-4mm negative space recommendation these fit really nicely, and still had a bit of an interference fit near the eye on some even with the bigger hole. Take extra care if you're dry fitting in 14mm holes. It was impossible to get some of these to stay snugly in the hole and I'm afraid a gusty day would see some of these out of their holes. I always carry a couple of extra bolts in case I drop one when glueing but carried a couple more this time. |
|
|
Next weekend I'm going to give the 12mm version a try on both wedges and 3/8" sleeves so that 1/2" 5-piece bolts can be an option for the replacement bolts. We used the 14mm on Curvaceous because it was convenient and easy to get the bit started. This time I plan to bring along a piece of 5/16" All-thread to act as a pilot for the 12mm core bit since the 3/8" sleeves align with the cutter a little too exactly to get the hole started. |
|
|
Buttonhead update: no go. Unfortunately the geometry of the split shaft is very effective at grabbing the inside wall of the core bit. I destroyed a 12mm bit doing a test trying to core a 1/4" buttonhead. It cut thru the rounded head of the bolt and an SMC hanger in about 3.5 minutes. It jammed hard when I got to the wide portion of the bolt. I struggled to free the bit and tried again, and the cutter snapped off the end. Edit to add- if you could do a glue-in as the next replacement bolt, I think the larger 14mm version would have worked just fine. |
|
|
Gregger Man wrote: Mark Wagner showed me a great video on the technique he uses to core drill button heads. Not sure if you may have seen it before or not... They get their coring bits on Amazon for all it's worth. Seems like you might be able to get closer to imperial sizes that way, and wouldn't have to mess with glue ins. |
|
|
All of the core bits I have seen on Amazon have had a pretty thick wall or a pretty short length of cut. That wouldn't be an issue with a buttonhead, but for me the holy grail of bolt removal would be a single tool for any type of <= 3/8" bolt. Lighter tool bag, less changeover from bolt to bolt, better efficiency. The process of drilling thru the center of a bolt certainly works, but I would like to avoid several aspects of that if possible: the oil, the metal shavings, the re-sharpening, the drill press sort of pressure while dangling on a rope. All in all, I think that method requires more skill and discretion, and I want to train many volunteers to do this work. The core bit (when cutting just rock) is very intuitive and simple to operate by comparison, and that's a major plus. Luckily, buttonheads are rare at many of the crags I'm working on locally. |
|
|
I took the 12mm bit out today to test on some rusted wedge bolt stumps that previously sheared off when I tried to spin them. No dice. The diamond head broke off even with a clutched drill. Furthermore the ultra fine abrasive was really slow to cut through metal in the bolt. Took about 30min to get an inch and a half down before the tip cracked off. I used about 1.5L of water for this test and a low clutch setting but still failed catastrophically. 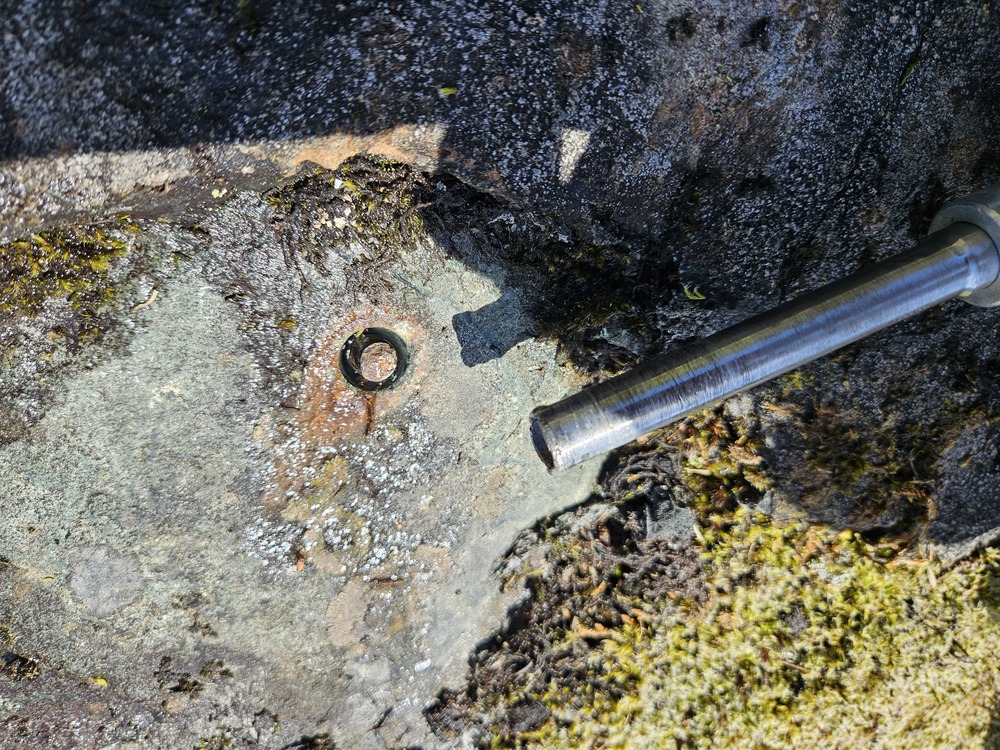 |
|
|
Hmm. That is very different than the experience I have had so far. I ordered 2 each of the 12, 13, and 14mm bits and plan to do some more replacements soon. 30 minutes? Are you sure they were wedge bolts and not threaded split shafts? If they were, it would explain the broken core bit. |
|
|
 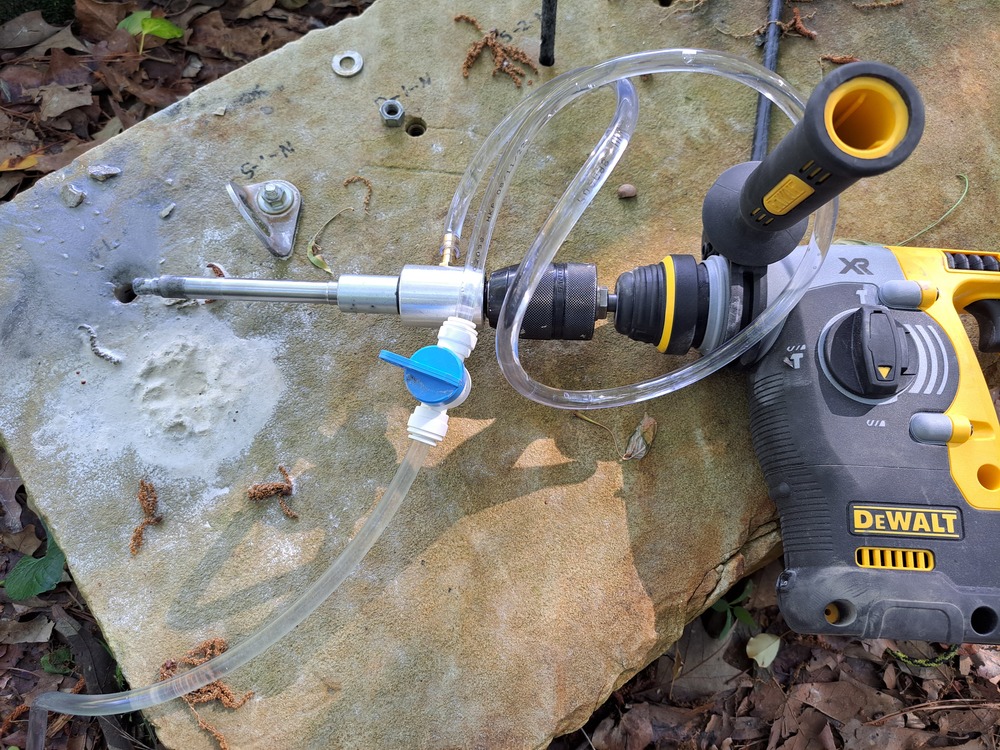 I tried the rig out today on my test block of sandstone and it worked great! I drilled out a 3" bolt in about 2 minutes. I went slow with the drilling. Using a Platypus hydration bag (not in the picture) with a cheap Home Depot valve in-line to regulate the water flow. I am excited about trying this out in the field! |
|
|
Gregger Man wrote: For folks who aren't familiar with 3/8" threaded split-shafts, here's one compared to a 3/8" wedge bolt. No way to tell them apart on the rock, except that the split-shafts often have some cratering/spalling at the rock surface (only visible after removing the hanger). This wedge bolt is stainless, there'd be no color difference with a plated wedge bolt: 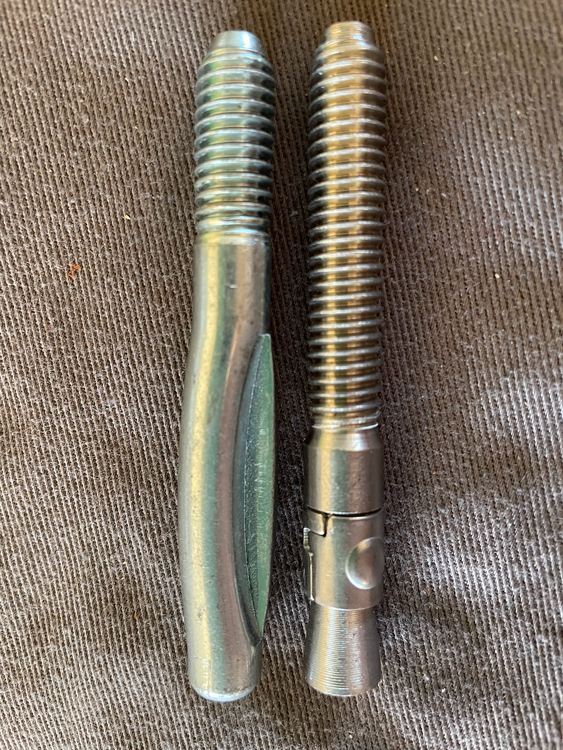 |
|
|
Definitely wedge bolts. Do we have confirmed success with the 12mm bit? Maybe I got a dud. Like I said before, my bit had very little diamond grit on it, even when compared to Harbor freight diamond cutting wheels. If you all report successes I'll happily order another. I'm just concerned that it only really works with the larger diameters. |


