The Tower Wall Rock Climbing
| Elevation: | 555 ft | 169 m |
| GPS: |
41.145, -74.1653 Google Map · Climbing Area Map |
|
| Page Views: | 38,735 total · 269/month | |
| Shared By: | burboeck on Jun 10, 2013 · Updates | |
| Admins: | Morgan Patterson, SMarsh |
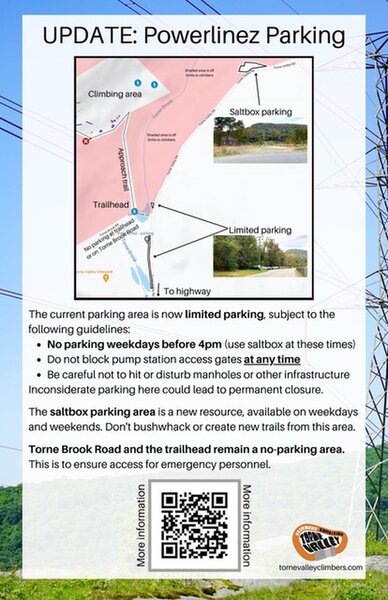
 Access Issue: As of November 2021, there are new parking arrangements. Please follow this guidance.
Details
No parking weekdays before 4pm. (Use Saltbox Parking Area at these times).
Do not block pump station access gates at any time.
Be careful not to hit or disturb manholes or other infrastructure.
The Saltbox Parking Area is a new resource, available on weekdays and weekends. Don't bushwhack or create new trails from this area.
Torne Brook Road and the trailhead remain a no-parking area. This is to ensure access for emergency personnel.
Inconsiderate or illegal parking here could lead to permanent closure.
Description

The Tower Wall is the most obvious, visible and possibly tallest wall at the Powerlinez. As you exit the tree line along the main Swath trail (service road), the Tower Wall looms behind a pylon. It is a great wall to use as reference point for the rest of your climbing.
The rock on the Tower Wall is like the rest of the Powerlinez, sharp and gritty and in some areas, prone to breaking apart. Many of the popular lines are solid though, and far from being polished. Keep climbing them! Top outs are infamous at the Powerlinez - full of rounded, sloping tops that only someone with gecko hands will benefit from. Great for colder days.
The Tower Wall is a great area for trad practice. All of the lines are close together and are close to each other, which means you can run a bunch of laps with relative ease.
To the East (climber's right) of the Tower Wall is the Enclosure, Devonshire Pillar, Puzzle Palace and more. To the West (climber's left) of the Tower Wall is Three Bears Wall and just beyond that Dave's Wall. Just below and to the climber's right is the Stockade Wall.
Thanks to kenr for the following TR info:
Top-Roping:
Natural anchors near tops of routes on the right half of this sector are usually available close to top. For several it helps to have a static line (not more than 50 ft) to rappel or down-climb to place the carabiners for the belay rope down well below the top, to avoid dragging or abrasion of the belay rope.
For many of routes (especially Back to the Wall through TWD Tower Wall Direct) on the left side of this sector, it's more convenient to have a very long static line to reach some tree set way back from the top of the cliff, and to be able to rappel or down-climb to place the carabiners below the top. Or with a normal trad protection rack, it's possible to construct a multi-piece anchor about 20 feet back from the top, so then a shorter static line would be sufficient to set the carabiners for the belay rope down lower on the cliff.
Access to the top: One simple (but not short) way is to hike Left (W) along the base of the cliff 300 feet, past the sectors Three Bears and Dave's Wall, to the intersection of the Tower Wall tier trail with The Good Book access trail. Turn Right (NE) and follow The Good Book trail 150 feet, up a steep slope, then after it gets gentle, find a way off it Right (E) and gentle upward toward the mini-summit view at the top of the Tower Wall cliff.
Classic Climbing Routes at The Tower Wall
Weather Averages
|
High
|
Low
|
|
Precip
|
Days w Precip
|
| J | F | M | A | M | J | J | A | S | O | N | D |
| J | F | M | A | M | J | J | A | S | O | N | D |
Photos
All Photos Within The Tower Wall
Most Popular · Newest · RandomMore About The Tower Wall
Printer-FriendlyWhat's New
Guidebooks (3)

 Continue with onX Maps
 Sign in with Facebook


2 Comments