Continue with onX Maps
 Sign in with Facebook


The Better Way to Clean an Aid Pitch


|
|
The BETTER WAY to Clean an Aid Pitch
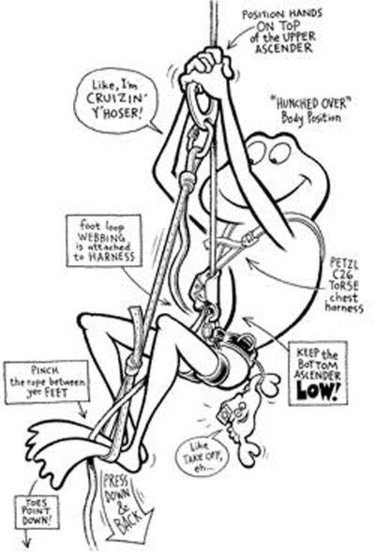
Try using a Grigri and Jug INTRODUCTION If you've ever tried to clean a steep aid pitch using just a pair of jugs, you know what a struggle it can be, especially on overhanging rock. It seems you're always fighting that bottom ascender, trying to unweight it in order to clean gear, and worrying about whether or not you're going to die in the process while you are momentarily attached to the rope by only one toothed cam. Slings are hanging everywhere, your rope is blowing in the wind, and before you know it your wank factor has spiraled out of control. Fortunately, there is a Better Way to clean aid pitches, and that is by using a Grigri and a ascender. Beneath you will first read how to set up the system, followed by detailed step-by-step instructions on how to perform each operation. Feel free to print off this post, and stick it in your 3-ring binder along with all your other Dr. Piton Stuff so you can take it up on the wall with you. Just don't forget to add a clip-in loop, eh? When it comes to learning the Better Way to clean an aid pitch, don't take my word for it - check out Cybele as she shows us how on North America Wall, which is on the Southeast Face of El Cap.  STUFF YOU NEED By now you should be familiar with the Better Way of ascending a free-hanging fixed rope, which is the Petzl Frog System. Most wall climbers use the Yosemite System of ascending, which works well on less-than-vertical terrain, like on the fixed ropes up to the base of The Heart on El Cap. But the Yosemite System is a real bicep burner on the steep stuff, so if you are as wiener-armed [and as lazy] as the Doc, then you might want to make up a Frog rig for the next time you're hangin' in space. Besides, it's a compact rig that you can adapt to use for cleaning aid pitches, which is the subject of this post. Note: The Doc is known to blow away the big o' bicep on free-hanging jugs, so there just might be more merit to this Frog System than you would first imagine. So don't knock it til ya try it, eh? If you want further information on the Petzl Frog System, you can find plenty of info on the Petzl website. The Frog System uses two ascenders - a you do not need for this method of cleaning an aid pitch, and a regular handled ascender, which you do need. Typically this ascender is the you can substitute most any handled ascender. While frogging underground, the Doc favours using the Petzl Basic ascender because it is so much more compact, which is important while caving. Although you could rig your handled ascender using your adjustable daisy and aider, Dr. Piton highly recommends you instead set up a dedicated sling tied from tubular webbing and attach it to your handled ascender as shown in the illustration below. Froggy illustrates the correct lengths for your dedicated jugging and cleaning slings - Illustration by Mike Clelland By using this webbing instead of an aider, and by connecting it to your jug with a quick link instead of a crab, you will substantially reduce the clusterfuckage in both your jugging and cleaning systems. And you won't be tripping over your aiders all the time. It's true that your quick link is nowhere near as strong as a locker, but it's certainly stronger than your ascender, which is only rated for about 5 kN. {wink} Wee-Wee hitches a ride with Froggy who shows us the Better Way to jug - Illustration by Mike Clelland Above you see the correct lengths to use on your dedicated jugging and cleaning sling. I recommend you attach the sling to the jug with a quick link as already mentioned - this will give you an extra Degree Of Freedom,such as if you need to scarf this jug and use it as the inverted ascender on your 2:1 Hauling Ratchet. Besides your handled ascender with dedicated sling, you also need a Grigri. I use an autolocker to attach my Grigri to the belay doughnut when cleaning aid pitches. My dedicated Grigri autolocker has nice smooth curves to allow easy rotation of the Grigri. Note that your Grigri is not merely a backup device - in this system of cleaning aid, you will actually be using it as an ascender. This may appear counter-intuitive at first, but since I first published this method of cleaning aid pitches on the internet, it has pretty much become universally accepted.  Aw shoot, it's the Horse Chute! Holly Cleaning the bottom of the beauty dihedral Also note that when cleaning with this system, you don't need the Croll and the C26 Torse chest harness as shown above - that half of the rig is used exclusively for jugging. About the only place you might choose to clean on jugs would be a more or less plumb pitch where you could move faster on two jugs since the lead rope isn't zig-zagging through a bunch of crabs. But since most aid pitches overhang and many traverse, you will use this system more often than not while on the wall. By this time, you should be completely familiar with Stuff You Need and How To Rig It - Your Aid Climbing System. This post will teach you how to set up your wall climbing harness, including your adjustable daisies and your Kong adjustable fifi, which is also known as a Kong Resting Fifi. Formerly difficult to find, adjustable fifis have really caught on [thanks to Dr. Piton promoting the things so much!] and they are now available from various U.S. gear suppliers. Yates Adjustable Daisy Presumably you already have your adjustable daisy rigged with a keylock Lead Carabiner as described in the Dr. Piton post linked above. You will need to use this as a tether while you are cleaning. Clip this tether into the piece you are about to clean - this way you can''t drop anything. You must be tethered to the jug with a locker [or quick link, as I prefer] for a second point of attachment - your Grigri is your primary point of attachment. You already have your]adjustable fifi hook attached to your harness which you have rigged on your slippery 6mm cord, as shown below. I would suggest you wrap the pull cord on top of the fifi in coloured duct tape to make it easier to locate and grab. Note that there are belay doughnuts on this harness to reduce crowding - highly recommended by Dr. Piton! When leading, I have one adjustable daisy on one doughnut, and one adjustable daisy on the other doughnut. Correctly rigged adjustable fifi hook on Yates Big Wall Harness Use the slipperiest 6mm cord you can find, not 7mm. When cleaning, I put my Grigri and autolocker on the right doughnut [the same side as my "weak" hand since I am left-handed] and I put my short sewn sling and backup autolocker on the left doughnut, as described below. You need to back yourself up as you clean, so dangle a wide-gate autolockersuch as a DMM Boa Locksafe from a short sewn sling girth-hitched to your doughnut. Put this on the doughnut on your "strong" hand side, which is the right side if you are right-handed. On the end of this sewn sling, you have a wide-gate autolocker, into which you will be clipping your backup knots as you clean. I use a colour-coded gold sling that is easy to spot among the clusterfuckage, and a gold-coloured wide-gate autolocker. You must always tie a backup knot, otherwise you could end up dead! And ending up dead is emphatically not cool. HOW TO RIG IT It ain't difficult. Clip the safety cord of your dedicated jug sling into your harness with a locker as shown above. Duh. Next, you put the Grigri onto the doughnut of your harness with your smoothly-curved autolocker, and you angle the free end of the rope coming out of the Grigri to point away from you and towards your "weak hand". There are several orientations possible, but only one correct one, so suss it out properly. This setup will become apparent with practice. An optional way to rig the upper handled ascender is to put it on an adjustable daisy]This way, after passing gear as described below you can cinch the ascender down using the daisy instead of the adjustable fifi hook as described below. I have not personally tried it, but it should work OK, and I look forward to someone's feedback on this. I am just so darn happy with my dedicated jug sling and adjustable fifi, I've never bothered trying it. I prefer the super-compact nature of the tied webbing and quick link, and can't be bothered farting around putting the jug onto my adjustable daisy. Which hand operates the Grigri, and which hand operates the jug depends on whether you are right- or left-handed. I am left-handed, so when I clean an aid pitch, I pull the rope through the Grigri with my right hand, which is my "weak" hand. So I'm operating my jug with my left hand, which is my "strong" hand. Accordingly on my rig, the Grigri is on the right doughnut.  Kate shows us how it's done - cleaning one of my pitches on Wyoming Sheep Ranch She like, looks a little tired, eh? Note that when you pull the rope through the Grigri with your "weak" hand, you need to make sure your hand faces palm side up! This offers you a better mechanical advantage. It does not particularly matter whether you use a left-handed or right-handed jug in this system. But I don't think you can go wrong by buying a handled jug for the same side as your weak hand. I am left-handed, and use the blue-handled Petzl Ascension which is designed for the right side when using the Yosemite System. At first this seems backwards, but note that when you jug - even when [especially when!] using a handled ascender - you must turn the handle of the ascender from you. Don't grab the handle for jugging as you end up too far away from the rope - instead wrap your hands over the top of the ascender as Mr. Froggy demonstrates above. This is hugely more efficient as it pulls you closer into the rope! While I prefer the Basic ascender for ascending a free-hanging fixed rope using the Frog System, especially when underground, I prefer the handled ascender for cleaning aid pitches as it gives me a little extra leverage when the rope is pressed tightly against the wall. It can also be removed from the rope more easily than an ascender without a handle. Hell, I don't even] a own a yellow-handled Ascension - I only own a Croll since I am so familiar with the Frog System. And I bet I've jugged over twenty vertical miles using it.  Holly Beck cruises on up the Horse Chute! To summarize, the Doc uses an Ascension and a Grigri when cleaning a typically overhanging aid pitch. On the odd chance the pitch hangs plumb, he might clean it on a pair of jugs. When he is jugging a free-hanging rope, he uses his Basic and Croll to frog while underground, but uses his Ascension and Croll to frog while on the wall. And yeah, it's true - the Doc doesn't even know to properly set up a Yosemite System for jugging! Sheesh. He probably should, however, especially for the next time he jugs something low-angle like the fixed ropes up to the base of The Heart. When acquiring wall climbing gear, the Doc recommends you do not buy a pair of Ascensions - instead buy one Ascension for your "weak" hand side, and a Croll - this is pretty much all you need. Do not fret if you already own two handled ascenders - you can convert ]any ascender to the lower jug in the Frog System by using a Torse C-26 chest harness.  Cybele Cleaning Dihedral Wall TIE A FRICKIN' BACKUP KNOT! You must always tie a backup knot when cleaning aid pitches, otherwise you could end up dead. Ascenders can and do pop off the rope, especially on diagonaling and traversing pitches, so beware! The tragic death of the climber on Tangerine Trip on September 8, 2004 could have been prevented had he been tied into the rope, or had he been using a Grigri. When to tie backup knots, and when not to tie them, was a long-running thread debated by BWTs on rec.climbing, and was one of the posts that got me started here because nobody really knew the answer! If you don't know the answer, then you can click here to find out when to tie backup knots. The basics are that you must be attached to your rope or your anchor by at least TWO points of contact at all times, hence you would not tie backup knots when ascending a fixed line. When crossing knots or rebelays while jugging or rapping, you would need two points of contact, which is any combination of ascenders, tethers [known as cows' tails in caver parlance] and backup knots. Two points of contact is especially important when you remove your rappel device! The reason I know this stuff is because I am a caver, and for the most part cavers have nothing better to do with their time than to perfect their jugging systems. In fact, you would be well advised to never challenge a caver to a jugging race. Some old fart with a pot belly and no hair could likely kick your Young Bull ass, and would fly up the rope on his super-charged fine-tuned jugging rig before you could even leave the ground. Fortunately, you can save yourself no small amount of embarrassment [and a huge serving of whoop-ass] by knowing when you are up against a caver - just look for the mud. Cavers can't hide it - it's everywhere. You can always tell a caver because he's squinting, about as comfortable in the sunlight as your generic Transylvanian vampire. Carefully inspect his ascenders looking for those tell-tale bits of sand grinding against all the moving parts, and those worn teeth on his cams are a dead giveaway. If his helmet is scratched and dented, and his dedicated jugging slings are abraded and dirty, you had best git while the gittin's good! A closer inspection of this most likely vile-smelling creature would reveal bits of mud embedded in his hair and ears [you can never get rid of it all] but getting so close to a caver is not for the faint of heart.  Yvette looks a little gripped her first day on a big wall, already nearly a thousand feet off the deck! I've got her on toprope as she approaches the subloads which dangle beneath our pig on Catch Lines When you are cleaning an aid pitch the Better Way, technically speaking you do not need a backup knot because your Grigri is a "running backup." You could simply leave the rope to dangle, like you do when jugging using the Frog system, but this will create unnecessary clusterfuckage, especially if it's windy. In fact, it's downright dangerous, though the danger comes not as risk to you - the danger is what could happen to the rope! There are three problems with letting the rope dangle. Firstly, it could be blown sideways and hang up in a flake a hundred feet to the side. If you read of Matt Maddaloni's bitchin' big wall solo of Against the Grain in Pakistan, found in Gripped Magazine, you will understand that it is fundamental you keep your rope tails under control. Matt had to waste an entire day drilling sideways around blank corners to retrieve his hung-up rope! Sheesh. I bet he doesn't let that happen again, eh? Don't you let it happen, either! Secondly, if you don't tie backup knots, the weight of the rope makes it hard to pull the free end of the rope through the Grigri. Thirdly, it takes longer to re-stack the lead rope in the rope bag when you get to the top of the pitch. Tie your backup knots every twenty to thirty feet, and stick the backup knot through the dedicated wide-gate autolocker that dangles on the colour-coded short sling girth-hitched to your doughnut. If it's really windy, tie backup knots more frequently. A figure-of-8 on a bight as a backup knot is definitely overkill - a simple overhand loop is more than ample. If you're feeling guilty, then tie an alpine butterfly, which is stronger than the 8 and superior in every respect. Figures-of-8 on a bight have no place anywhere in climbing - use a butterfly. The Better Way to stack a rope in a rope bag - get those hands right INSIDE the bag. You'll perform this operation repeatedly, so get it right.  Photo by Richard Heinrich - "Spike’ Tying these backup knots every twenty to thirty feet will keep the free end of your rope under control, and you can easily stack the rope back in the rope bag when you finish cleaning the pitch, untying each backup knot in order. Remember when you are stacking your rope to run it through a carabiner a foot or two above the mouth of the bag, as shown in the illustration above. This will greatly increase your speed - especially when it's windy - since you can pull the rope straight down instead of up and around. Be sure to stick your hands right inside the bag as you do this, and stack the rope quickly with a smooth hand-over-hand motion. You should be able to stack sixty metres of rope in about a minute, and it pays to know the Better Way to do this as it will save you much time in the long run, since you repeat this process many times during the course of a wall. THE 2:1 BODY HOIST On very steep ground, or when you find yourself hanging free in space, construct yourself a 2:1 Body Hoist [also known as the "Yvette Ratchet" - see below] by passing the free end of the lead rope through a carabiner on your jug to set up a "zed-pulley". While this is nowhere near as fast as simply pulling the lead rope through the Grigri with your "weak" hand, it is much less strenuous when the going gets steep. To operate, pull the free end of the rope downwards through the crab on the jug while at the same time thrusting your hips upwards. It's an almost effortless way to ascend the rope! Some people - especially women - prefer to use the 2:1 Body Hoist all of the time, even when the rock is not so steep. See what works best for you, and know when to switch back to 1:1. An additional application for the 2:1 Body Hoist is Lead Fall Recovery. Imagine that you have just taken a huge whipper, and you find yourself hanging out in space either on the end of your rope [when using an assisted belay or else dangling by your Grigri. You are concerned about jugging back up the lead rope to reach your high point, because you are afraid the piece you are jugging on could rip, and you could end up taking another leader fall - this time being caught by the toothed cams of your ascenders! Jugs are only rated to about 5kN, and have extraordinarily sharp teeth that mouth your lead rope with all the affection of an underfed Great White Shark. A fall in this instance could prove fatal. The first thing you need to do is to attach yourself to the lead rope with your Grigri, if you are not already self-belayed by it. Next you clip your ascender to the lead rope above you, and set up the 2:1 Body Hoist. Now you can safely inch your way gently back up the lead rope, knowing that if the piece you are jugging on fails and you fall again, your second leader fall will be caught on your Grigri, and not on the toothed cams of your ascenders. This is a hugely safer way to regain your high point. If you are really nervous about your piece blowing, substitute a Prusik [really a Klemheist!] for the ascender, and crawl up that way. Note that in a pinch, you can make a Klemheist from a standard shoulder-length sling. If your sling is made from Spectra, remember that the stuff is pretty slippery, so you will have to make sure that when tying your Klemheist you make a few extra wraps around the rope.  Yvette demonstrates the 2:1 Body Hoist - Nice adjustable fifi hook! HOW TO DO IT In keeping with my mandate to personally test all of the systems I describe here, the instructions you read beneath were taken from notes I made while on the wall when I soloed El Capitan's The Shortest Straw, I completely rewrote and updated the post when I moved it here to drpiton.com. Let's assume the worst case scenario when cleaning an aid pitch - you are approaching a carabiner that is clipped directly into a pin or bolt, therefore missing that Degree Of Freedom that an extra crab or sling would have provided. The pitch is both traversing and overhanging, and so the rope passes through the carabiner at a wicked and awkward angle. It seems virtually impossible to unclip the rope from the crab. Fortunately, you know the Better Way to clean gear on an aid pitch. If you follow these directions, you will be able to clean anything, and you will never drop it. NOT DROPPING STUFF is fundamental to]your worth as a wall climber. There is never an excuse for dropping stuff! [Don't do as I do, do as I say....]
Since you are cleaning this pitch the Better Way, you are using only one jug for this operation. You have also tied yourself up a piece of webbing to use as a designated sling on your jug, and have attached your jug to this sling with a quick link. You therefore have an adjustable daisy free and available as a tether
If the pitch is traversing and there was no place to leave a piece of gear directly above this one [or your leader was an inconsiderate wanker and didn't leave a piece for you directly above!] then you may have to "time your swing" into the piece to put slack into your daisy. This isn't too bad with a cam you can pull out with one hand, but is really tough with something that requires more persuasion  Cybele Cleaning on NA Wall CAUTION: Do not be tempted to unclip your tether in this situation - you could swing out of reach from your piece and have no way to get back to it, therefore leaving it as booty for Someone Like Me [who is very bitchin' at cleaning aid pitches!]
NOTE: You will never be unattached to your piece. It is impossible to drop gear when you clean it this way! Do not take shortcuts with this method, like I often do, unless you are prepared to risk dropping stuff. I only start taking shortcuts after I have been on the wall for several days, have my systems and concentration completely dialled, and have dispensed with the usual "first day butterfingers syndrome" CONCLUSION Still not convinced? Then I think you should ask the shagadelic ClimbChick. Not only does she know the Better Way, but she is far more bitchin' than me! I taught Yvette this method of cleaning aid pitches in only a couple days on the rock, and she spent a lot of time practising in the gym. A few weeks later I met her in Yosemite, and we sent a big wall together. You can find all our stories on her website by clicking the photo below. At the time, Yvette had only a bit of experience in trad climbing, but by learning this system, she was able to safely climb a big wall with her Wall Doctor  Looking more relaxed now and oh-so-determined as Yvette cruises on up past Dr. Piton's Crab-O-Ledge The weiner-armed Doc is envious of her burly biceps This is one of the most useful Dr. Piton Big Wall Tips of the Day you will EVER read! In fact, the Doc is certain that once you try it, you'll never go back to cleaning with two jugs. Most likely, it\'ll only take you about thirty or forty feet to realize conclusively that this is indeed the Better Way to clean an aid pitch! Learn this stuff, and with any luck, one day you will stand on the summit - you and all of your gear. Cheers, The Doc Petzl Ascension, Basic and Croll Ascenders |

|
Great Post Pete ... Nice Pictures too! |

|
Great info Pete--muchos gracias! |
|
|
Pete: Good reading. Items from me: |
|
|
Mark: |
|
|
Mark, |
|
|
Moof wrote:If you are on a big wall with <10mm ropes, then you need to get your head examined.Russian and Polish climbers. Granted, they are crazy. |
|
|
It's common in caving to use thin static "push ropes" of 9mm or so in exploration, because they are so much lighter than 11mm ropes. Cavers, however, are usually much better than climbers in rigging rebelays around edges, and in using rope pads. You CANNOT let a 9mm rope touch the rock when you are jugging it! |
|
|
I guess I'm girl... i love the Yvette ratchet, especially on free hanging ropes! Thanks for the tip! |
|
|
Thanks Pete for the illustrations and photo's. |
|
|
cleaning a traverse ... good footage showing use of grigri as backup |
|
|
Nice info, thanks John. |
|
|
I have a hard time getting beyond the pictures... |
|
|
Sam Lightner, Jr. wrote:I have a hard time getting beyond the pictures... Thats Kate, Cybele, Yvette, and Holly as big wall partners. Pete, it suggests your talents go far beyond the 27/1 hauling system.Excellent point Sam. Pete must be an exceptionally talented partner! |
|
|
bump (for cleaning / jugging questions/comments) |
|
|
Really appreciate the info Pete. Thanks. |
|
|
I don't get it. |
|
|
Pretty much. The trick is that you don't have to unweight an ascender on your harness, instead you pull the lever on the Grigri to unweight the rope. |
|
|
Excellent. I'm looking forward to practicing the Better Way on my miniscule local crags. Might have to go up about 3 routes to get the required 40ft of convincing though. |
|
|
Welcome aboard, Jane! Perhaps you can bring the luck o' the Eye-rish over to Yosemite sometime soon, eh? |
|
|
I'm over in June. |