
 Continue with onX Maps
 Continue with Facebook


Less Than or Equal To

5.9 YDS 5c French 17 Ewbanks VI UIAA 17 ZA HVS 5a British A2+

 Avg: 2.4 from 5
votes
Avg: 2.4 from 5
votes
Routes in Triangle Wall
|
|
A Day in Scotland T WI4 M5+ Steep Snow PG13 |
|
|
Broken Rhombuses T 5.12c 7b+ 27 IX- 27 E6 6b |
|
|
Cocoa Puffs WI3 |
|
|
Code Blue T 5.11 6c+ 23 VIII- 23 E4 5c A2+ |
|
|
Less Than or Equal To T 5.9 5c 17 VI 17 HVS 5a A2+ |
|
|
Stratosphere T 5.10c/d 6b+ 21 VII+ 21 E3 5b C2- |
| Type: | Trad, Aid, 300 ft (91 m), 4 pitches, Grade III |
| FA: | James Garret, Kennan Harvey 1988 |
| Page Views: | 2,189 total · 11/month |
| Shared By: | Craig Martin on Nov 17, 2007 · Updates |
| Admins: | Andrew Gram, Nathan Fisher, Perin Blanchard, GRK, D C |

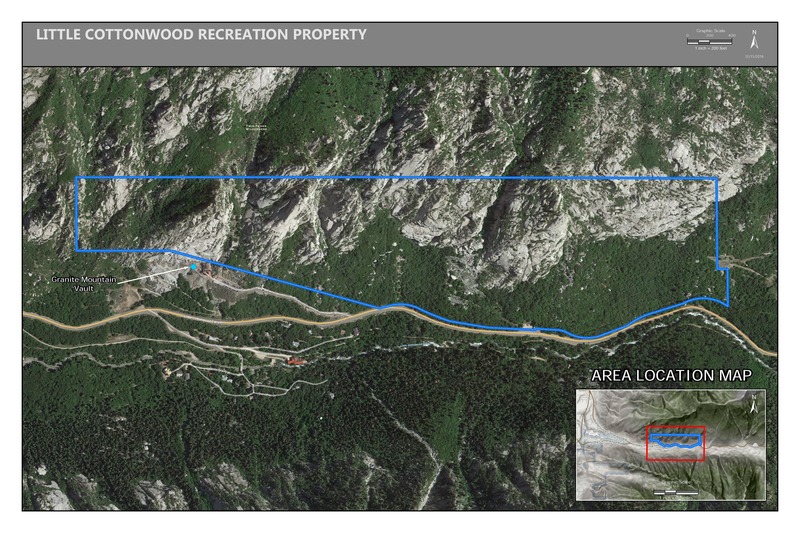
 Access Issue: Gate Buttress Area Recreational Lease: Climbs on Church Buttress above vault remain closed
Details
Access Issue: Gate Buttress Area Recreational Lease: Climbs on Church Buttress above vault remain closed
Details
June 1st, 2017:The Salt Lake Climbers Alliance (SLCA), the Church of Jesus Christ of Latter-day Saints (LDS Church), and Access Fund announce the signing of an unprecedented lease for 140 acres in Little Cottonwood Canyon (LCC). The parcel, known as the Gate Buttress, is about one mile up LCC canyon and has been popular with generations of climbers because of its world-class granite.
The agreement secures legitimate access to approximately 588 routes and 138 boulder problems at the Gate Buttress for rock climbers, who will be active stewards of the property. The recreational lease is the result of several years of negotiations between LDS Church leaders and the local climbing community.
Access Note: The climbs on the Church Buttress above the vault as well as the Glen boulders that have been traditionally closed will remain closed.
Please help us steward this area and leave no trace.
Read More:
saltlakeclimbers.org/climbe…
Description
Fun mixed aid and free climb up the right side of the Triangle Wall. This is a good Yosemite warm up route.
This route now boasts tons of glue-ins, likely by someone attempting to free it. You can approach it via the route with glue-ins starting at the very toe of the Triangle wall (free at 5.6, to bolt ladder aid, to mild hooking), the line of expansion bolts just right and up from the toe (likely goes free, didn't confirm), glue in bolts even more right (looks harder than the expansion bolts), or by yarding on the fixed line and scrambling up 4th class terrain. Any way you go, you're heading for the clean roof that's been cleaved off. The right starts just left of this.
Pitch 1: Start below a small bulge. There's a fixed bashie, but you'll probably want to clip the bolt. Follow bolts up and then up/left until you arrive at the hollow flake. Gingerly hook on top of it, clip the next glue-in, then situate yourself at the anchors with a tree to improve the stance. C1
Pitch 2: Aid out right, starting with a bolt. Place a mix of cams (everything from BD 0 z4 to #3). Clip the fixed knife blade and reach for the bolts. Go down a bit to the hanging belay with glue-ins. 60' C2.
Pitch 3: Head up the steep bolted section, then make awkward moves to establish yourself on the upper slab. The crack eats thin gear (0-0.3), but bring a 2 or 3 for the final section after the bolt (which can also be freed). A fall on this section will leave you hanging in space on a core-shot rope (don't ask me how I know). 60' C2
Pitch 4: Move straight up off the belay, aiming for the bolt line. There's a hidden bolt just off the belay and above the roof. Trend left in a flaring crack that takes a range of gear. Belay at two bolts. 80' C1+
Descent: 4 single rope raps with a 70m.
R1: summit to top of p3
R2: p3 to p1
R3: p1 to bolted station on plumbline OR head to the fixed line
R4: unencountered bolted station to ground OR rap the fixed line
Location
1. Scramble up the fern gully to the right of the toe of the buttress. This is dirty, wet and loose and you may want to rope up. Belay on a sloping stance below a bulge/roof.
2. Original start goes up slabs and cracks to the left of the fern gully.
3. Do the sweet first pitch of Stratosphere and traverse to the sloping belay stance. This may be the best way, but not the way I went.


5 Comments