
 Continue with onX Maps
 Continue with Facebook


Routes in 6. The Tower Wall


|
Any Which Way But Down/Ex-traction T,TR 5.8 5b 16 VI- 15 HVS 4c PG13 |
|
|
Arrowhead T,TR 5.10a 6a 18 VI+ 18 E1 5a |
|
|
Back to the Gym T,TR 5.7 5a 15 V+ 13 MVS 4b |
|
|
Back to the Wall T,TR 5.8 5b 16 VI- 15 HVS 4c PG13 |
|
|
Bleed Between the Lines T 5.9 5c 17 VI 17 HVS 5a PG13 |
|
|
Crefeld Crank TR 5.11a 6c 22 VII+ 22 E3 5c |
|
|
Dead Tree Dihedral T,TR 5.7 5a 15 V+ 13 MVS 4b |
|
|
Ex-traction Slab TR 5.7+ 5a 15 V+ 13 MVS 4b |
|
|
In & Out T,TR 5.4 4a 12 IV 10 VD 3c |
|
|
Johnson Route T,TR 5.7+ 5a 15 V+ 13 MVS 4b |
|
|
Manticore Dihedral T,TR 5.8- 5b 16 VI- 14 VS 4c |
|
|
Manticore Face T 5.9 5c 17 VI 17 HVS 5a |
|
|
Manticore Upper Arete T,TR 5.3 3+ 10 III 9 VD 3a |
|
|
No Rest for the Wicked T,TR 5.9+ 5c 17 VI 17 E1 5a |
|
|
Ogre Arete T,TR 5.9 5c 17 VI 17 HVS 5a |
|
|
Rachel's Crack T,TR 5.8- 5b 16 VI- 14 VS 4c |
|
|
Red Knob, The T,TR 5.7+ 5a 15 V+ 13 MVS 4b |
|
|
Rock Romancer TR 5.11b 6c 23 VIII- 23 E3 5c |
|
|
Rossinator, The TR 5.11a 6c 22 VII+ 22 E3 5c |
|
|
Tower Wall Direct T,TR 5.9+ 5c 17 VI 17 E1 5a PG13 |
|
|
Unrest of the Witches TR 5.10d 6b+ 21 VII+ 21 E3 5b |
Order Wrong?
Sort Routes
| Type: | Trad, TR, 90 ft (27 m), 2 pitches |
| FA: | Marty Molotoris + Ken Roberts |
| Page Views: | 1,620 total · 16/month |
| Shared By: | kenr on Nov 20, 2015 |
| Admins: | Morgan Patterson, SMarsh |
Your To-Do List:
Add To-Do ·
Your Star Rating:


Use onX Backcountry to explore the terrain in 3D, view recent satellite imagery, and more. Now available in onX Backcountry Mobile apps! For more information see this post.
 Access Issue: As of November 2021, there are new parking arrangements. Please follow this guidance.
Details
Access Issue: As of November 2021, there are new parking arrangements. Please follow this guidance.
Details
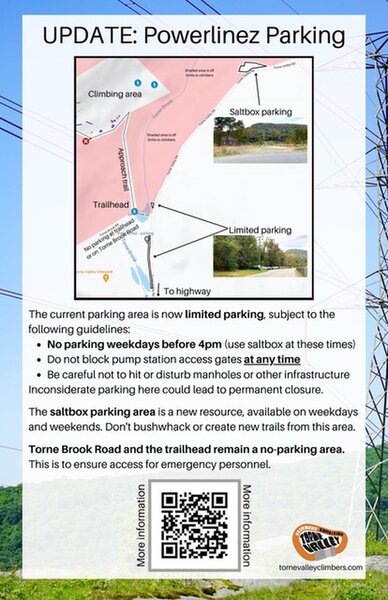
The current parking area is now limited parking, subject to the following guidelines:
No parking weekdays before 4pm. (Use Saltbox Parking Area at these times).
Do not block pump station access gates at any time.
Be careful not to hit or disturb manholes or other infrastructure.
The Saltbox Parking Area is a new resource, available on weekdays and weekends. Don't bushwhack or create new trails from this area.
Torne Brook Road and the trailhead remain a no-parking area. This is to ensure access for emergency personnel.
Inconsiderate or illegal parking here could lead to permanent closure.
Description

First inside an enclosed space, then outside on the crest of an arete. Variety of different climbing moves and rock situations.
Easiest bottom-to-top climb on the Tower Wall. Variation has more sustained difficulty.
Start straight up the dihedral / open book / gully (freely use holds on both sides). Below the dead tree stump, make a balancy traverse across right wall and diagonal up onto a grassy ledge. Walk right horizontally about twenty feet or so to rock with a short vertical crack and set up belay.
. . (Variation: Instead of traversing on the grassy ledge, diagonal up right on right-facing flakes and across right to reach the arete at a two-block platform 15-20 feet above the grassy ledge. Optional hanging belay on left side of arete, or continue to the top in a single pitch).
Climb up the arete at the right edge of the Tower Wall. Soon diagonal right off the crest of the arete a few feet to avoid a section with smaller slopier holds. Up a little, then back Left across the crest to an interesting crack by means of a tricky step on sloping rock. Up that crack, then slab footwork to a tree anchor (nice for top-roping other routes), or finish to the top of the cliff.
. Variation: Staying directly on the crest the whole way includes a sequence around 5.6+
warning: The rock on and around this route has not been climbed much yet, and much of the rock is still breakable and loose -- so the belayer and other people should stand far away from underneath the climber.
. . . (Lots of vegetation on this rock as of 2015. Be prepared when climbing to navigate around protruding trees and branches, and dealing with holds slippery with grass, lichen, moss, dirt).
Location
Start at the obvious open book or dihedral about 22 feet right from Rachel's Crack, just Right behind the arete of the Ogre. About 25 feet up in the open book is a nine-inch-wide tree stump sticking out three feet.
Protection
Leading: Standard Trad rack. In the initial dihedral, look for small placements in the right wall. Double-rope technique might be useful - (or perhaps break into two pitches).
Top-Roping: Could perhaps try this with a top anchor at or near the Manticore Face tree (about twenty-five feet below top of cliff, a few feet west in from the east edge of the upper Tower Wall -- need static line to rappel or down-climb in to tree anchor).
The rock is high-friction, so think about how to minimize rope drag for Top-Roping. If belaying from the bottom, standing anywhere near Dead Tree Dihedral might produce lots of friction. Instead having the belayer stand below right from the Manticore Dihedral helps reduce rope friction.


1 Comment