Continue with onX Maps
 Continue with Facebook


How to build a belay using remote (about 9 feet) anchors?
|
|
I just started to learn how to aid climb, solo. |


|
Use your lead line for the anchor. Figure eight (or any other looped knot for that matter) the end of the line to the bottom bolt and then tie a butterfly just above the next bolt. Adjust the length of the butterfly loop until the rope going up from the two bolts is equalized. |
|
|
How about just a cordolette with a master point or sliding x with limiter knots? Btw, what do most solo leaders prefer to use for the ground anchor... rope or cordolette/slings? Pros and cons? Don't mean to hijack, but this seems relevant to the OP too. Thx! |
|
|
What Kevin said. Super-easy to equalize with the butterfly knot, no cordelette or anything else needed. |
|
|
I mention the cordolette because OP's requirement was for something "pre-made" which I assume is to allow him to set it up quickly over multiple sessions. Would still appreciate thoughts on pros/cons of cordolette vs rope, if OP doesn't mind the hijack :) |
|
|
I think it's just as quick either way—might even be quicker without the cordelette. I don't think there's anything *wrong* with using the cordelette, it's just an entirely unnecessary extra step. |
|
|
Legion wrote:Btw, what do most solo leaders prefer to use for the ground anchor... rope or cordolette/slings? Pros and cons? Don't mean to hijack, but this seems relevant to the OP too. Thx!For soloing without a haul bag on a route, lead line ties directly to bolts (or equalized pieces) with a screamer tied into the lead line. For soloing with a haul bag, use a cordalette and clip the haul bag into the master point and clip the lead line into the same master point with no screamer needed. |
|
|
Legion wrote:I mention the cordolette because OP's requirement was for something "pre-made" which I assume is to allow him to set it up quickly over multiple sessions.This. But also and most important I have the feeling that a pre-made item is going to be less prone to error, if I just have to clip two 'biners rather than tying and checking knots. I will check out the butterfly knot solution though, it sounds like a neat alternative. Many thanks to everybody for the feedback! |
|
|
Uhm, I just checked the PDF and it actually don't look more equalized than my solution (which looks indeed pretty similar). If I'm not getting it totally wrong, with mr. Hudon approach only the bolt closest to the climber is really loaded and the subsequent ones back it up in case of failure. The load does not look distributed among the bolts. Am I missing out something big? |
|
|
Febs wrote:The load does not look distributed among the bolts. Am I missing out something big?Why does the load need to be distributed between the bolts? Most bolts are rated to ridiculously high forces—are these ones so suspect that you're worried about both of them failing, one after the other? (you definitely can equalize the force on the two bolts with a butterfly knot, I'm just questioning whether it really matters that much) |
|
|
You want to solo aid climb and learn building anchors from stuff like that? |
|
|
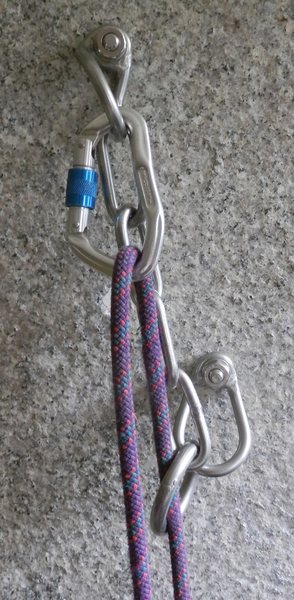
Febs wrote:Uhm, I just checked the PDF and it actually don't look more equalized than my solution (which looks indeed pretty similar). If I'm not getting it totally wrong, with mr. Hudon approach only the bolt closest to the climber is really loaded and the subsequent ones back it up in case of failure. The load does not look distributed among the bolts. Am I missing out something big? Thanks again!Yes, you are missing something. I'm assuming you're focusing on the pictures that show knots to bolts set up in series. Those are not what I described and I had hoped that in Hudon's PDF that had multiple types of anchor photos, you would look at the photos and descriptions that fit that description that sent you there. Use the next two picture to help your understanding. 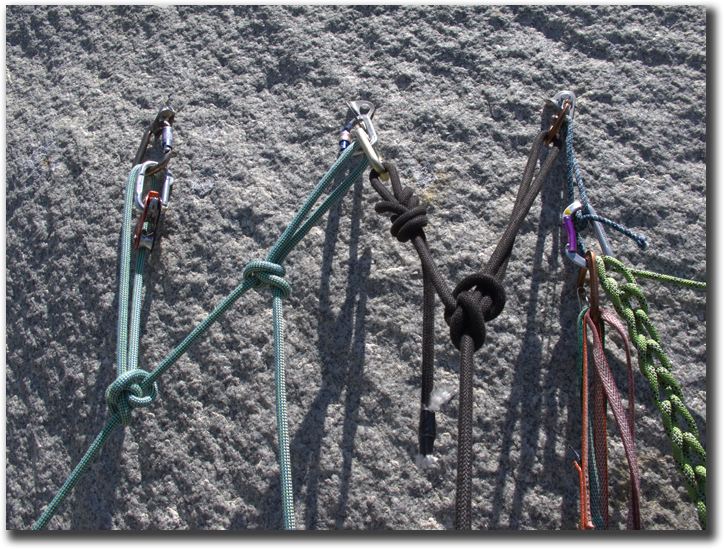 Focus on the black rope. here you have the figure 8 on one bolt and the alpine butterfly on the other. Many will automatically chime in now and say, "yes, but once you pull the rope into a direction of pull in-line with the two bolts, it will only be loading one bolt" correct Mr Person-I-Just-Made-Up, but remember that the loop on the Alpine butterfly (which is very easy to adjust the length of even after everything is clipped in) was set up by the climber for the expected direction of pull. There's no reason that if you're setting up for an in-line with the bolt direction of pull you can't set the length of the alpine butterfly loop to the length that will do this. THis is part of the reason why I said you need to tie the Alpine butterfly after the bolt, not at the bolt. In the following picture, you can see where the angle is approaching in-line with the bolts. 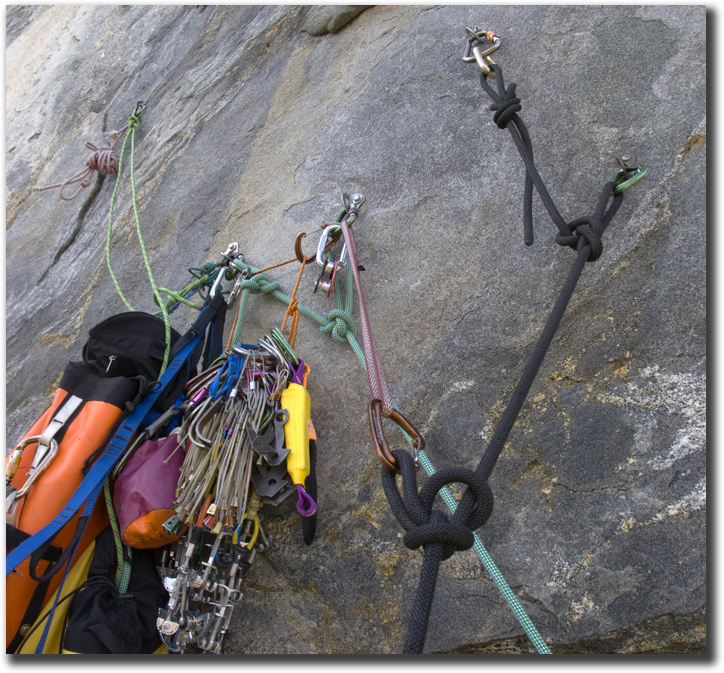 Go out and try it as it's not the most intuitive anchoring system until you see it in play. I know this because I was a bit unclear on all of the aspects of how to redirect angles and adjust lengths until I had the knots in my hand, then it all started to make more sense. Besides, in bigwall, it's not always about getting all the information ahead of time, it's about getting enough information to go out and improvise based upon that information once you're in a 1 in a million situation.
|
|
|
It is now perfectly clear, many thanks! |
|
|
Febs wrote:All belays in Italy (and as far as I know in most of the Alps) are made out of two bolts connected so that the load is spread among those, despite each is ridiculously strong on its own.Really? Most the belays I´m familiar with in Italy are either a) one large bolt b) a selection of junk joined up haphazardly with string, bits of wire and rust c)2 bolts not connected d) 2 bolts joined to be redundant, NOT load sharing. |
|
|
Jim Titt wrote: Really? Most the belays I´m familiar with in Italy are either a) one large bolt b) a selection of junk joined up haphazardly with string, bits of wire and rust c)2 bolts not connected d) 2 bolts joined to be redundant, NOT load sharing.I really don't know where you found a single large bolt, nor "a selection of junk" but I'd love to know it so to be aware of what to expect whereas I would chose to ever climb there. I climbed in several regions in northern Italy anyways and I never seen anything like those two cases above. 2 bolts joined (with a chain) to be redundant is the most common situation, and they are *also* sharing the load being the master point oriented towards the direction from which the climber reaches the belay. There also are some - as we call 'em - "french style belays" with two bolts only, and there you just put your cordelette and they're redundant and sharing - if you put the cordelette properly that is. |
|
|
You don´t go on the trade routes in the Dolomites then? A single huge bolt is de-rigeur there. And on the non-trade routes it´s the selection of junk, pitons, rusty nails and baling wire. |
|
|
Unfortunately I didn't climb the Dolomites yet. |
|
|
Sure, and they aren´t real common these days because there are technical problems associated with finding suitable positions to get both bolts level and neither too close together or too far apart. More used nowadays are these:- |
|
|
Mate, those bolts look scary. |
|
|
Locker wrote:"Mate, those bolts look scary." Referring to the photo above your post? If that's the case, what are you seeing that makes you say, "Scary"? They look AOK to me.Nope, I remember the picture that lead me to that comment, it was of very rusty and old bolts. I guess it was removed. |