Continue with onX Maps
 Continue with Facebook


Building a Hangboard Without Drilling the Wall
|
|
Hey guys, |
|
|
You must drill it into the wall! Or at least you'll have to drill something else into the wall to support it, so you might as well just drill it directly. Make sure you find at least one stud, preferably two. If you miss the second, use a large toggle bolt. Don't worry about the holes. Those are so easy to fix. A little mud and a dab of paint. They'll never know. |

|
They make those pull up bars that mount on door frames sans screws, maybe you could attach the hangboard to that? |
|
|
CCChanceR wrote:They make those pull up bars that mount on door frames sans screws, maybe you could attach the hangboard to that?Yep, look up Blank Slate, it is a board specifically made to mount a hangboard on the door frame like those pull-up bars. Either buy the blank slate, or if you're handy, figure out how it's made and make your own. |
|
|
I stand corrected. If you need it, it's been made. Still cheaper to patch the wall after. |

|
you can also build a free standing frame really easily. nice thing about this is that you can take it with you when you move. |
|
|
what has worked for me in the past was to be build a wooden frame within a door frame and pressure fit it with the floor. I lined the interior surfaces of the upper frame with 1/2 inch sleeping pad foam to prevent scuffing the existing door frame. Foam on the base also helped from scuffing the floor. There are no attachment points at all with the existing walls or framework of the house. |
|
|
Or you mount it on the inside of a closet door so you are facing out into the room when using it because nobody really looks for holes there when they are checking a place and even if they do a patch job doesn't have to be perfect. |
|
|
|
|
|
Ya, John I's is exactly what I was thinking. Now if only I could figure out how to put one in my concrete dorm room with a flush door frame... Now there's a puzzle. |
|
|
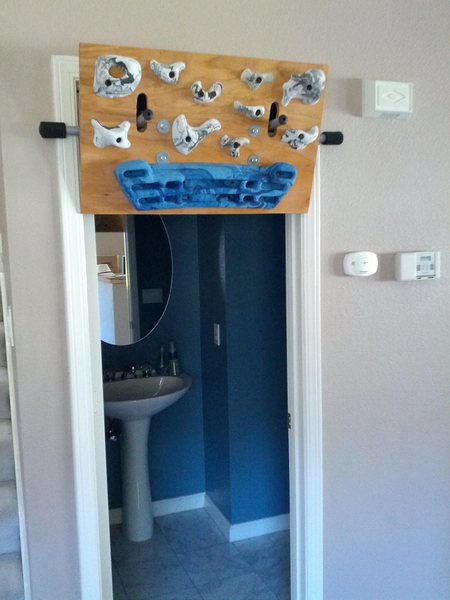
I mounted my board onto a wood backing that has a lip on the back the width of a door frame. A second strip of wood lies on the opposite side of the door frame, and I clamp the whole thing down very securely with 2 8" C Clamps from Home Depot. The whole thing cost maybe $40 and ended up having a lot less flex than the blank slate. The Blank Slate has a large degree of flex you won't notice with some crappy gym jug holds but if you are trying to hold on the the smallest holds of your hangboard the thing is useless. You also don't have much control over the angle of the mounting board with that method, often times it is not 90º to the ground. |
|
|
Jon Rhoderick wrote: I mounted my board onto a wood backing that has a lip on the back the width of a door frame. A second strip of wood lies on the opposite side of the door frame, and I clamp the whole thing down very securely with 2 8" C Clamps from Home Depot. The whole thing cost maybe $40 and ended up having a lot less flex than the blank slate. The Blank Slate has a large degree of flex you won't notice with some crappy gym jug holds but if you are trying to hold on the the smallest holds of your hangboard the thing is useless. You also don't have much control over the angle of the mounting board with that method, often times it is not 90º to the ground. I would love to see a picture or schematic of this design. Can you send to my email or post it to google drive and share? |
|
|
Rui Ferreira wrote: what has worked for me in the past was to be build a wooden frame within a door frame and pressure fit it with the floor. I lined the interior surfaces of the upper frame with 1/2 inch sleeping pad foam to prevent scuffing the existing door frame. Foam on the base also helped from scuffing the floor. There are no attachment points at all with the existing walls or framework of the house. The upper frame assembly consisted of three pieces of wood: a 2"x6" front panel the width on the door frame or wider depending on your need (this is where you attach the hangboard), a 2"x6" back panel that provides bracing to the front panel. These two panels are joined by a third piece of wood that goes inside the full width of the door frame. It is critical the way you connect these three pieces so the whole assembly does not come apart. A side view of this assembly looks like a U with 90-degrees at the joints. The free-standing part is easy to do by using two 2"x 4"s the length of the door, inside the door frame and connected at the floor level with another 2" x 4" across the door way. It goes without saying that you will not be able to close the door with this contraption in place. This will take some time to assemble but is much cheaper than a Slate board. I have a rough schematic as a pdf or Excel file if you're interested in more detail (I could not figure out how to upload it to MP) I would love to see a picture or schematic of this design. Can you send to my email or post it to google drive and share it with us? |
|
|
Clamps |
|
|
Cory Lowery wrote: 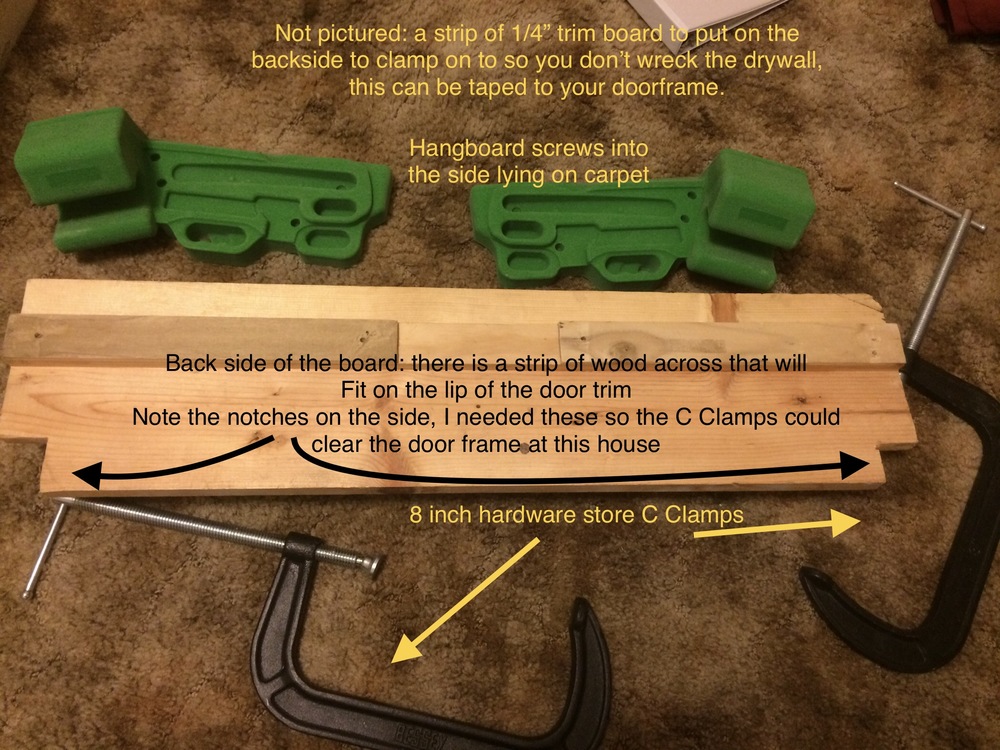 Don‘t hit your head on the C Clamps! |
|
|
https://instagram.com/manuvaclimbing?igshid=1e9li9o5cje98 |
|
|
This required five 2"x4"x8' pieces and a 1"x8"x6' board. The vertical posts are 7' tall. The remaining 1' pieces of the 2x4 were used as spacers for the diagonal supports. The long bottom pieces are 5' and the width of the structure is 3'. The diagonal supports are 4'. Structure is very sturdy. 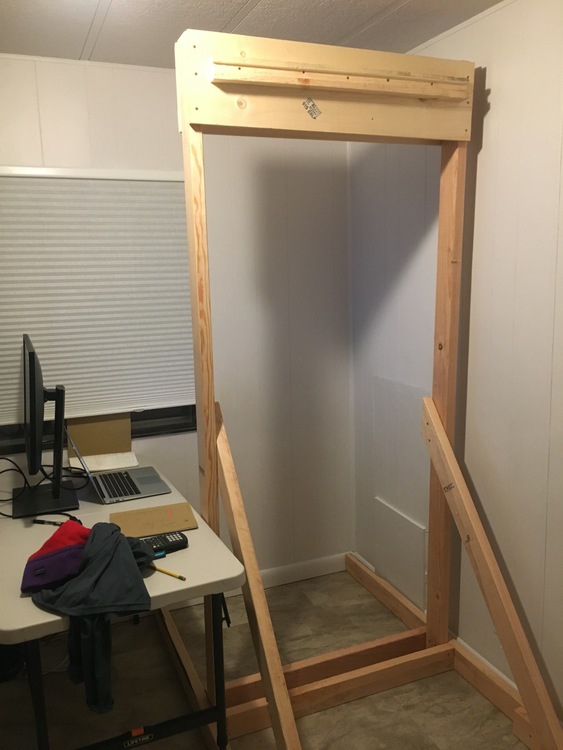  |
|
|
CCChanceR Ronemus wrote: Ya, John I's is exactly what I was thinking. Now if only I could figure out how to put one in my concrete dorm room with a flush door frame... Now there's a puzzle. Hammer drill it and then tapcon the hang board in. Much more secure than a pull up pressure bar |
|
|
you could just drill it in and fill the holes when u move out, its like a 10 minute patch job |
|
|
Tim Shannon wrote: This is, in fact, what happened after I posted this 5 years ago. Was afraid land lord would dock my deposit, but they didn't even notice. A few years later though I did build a freestanding board very similar to those shown above. |
|
|
BJB wrote: Hey guys, I'm trying to set up a hangboard but I am living in a rented place, so I want to do it without drilling the wall. Anyone have a guide on how to do this? 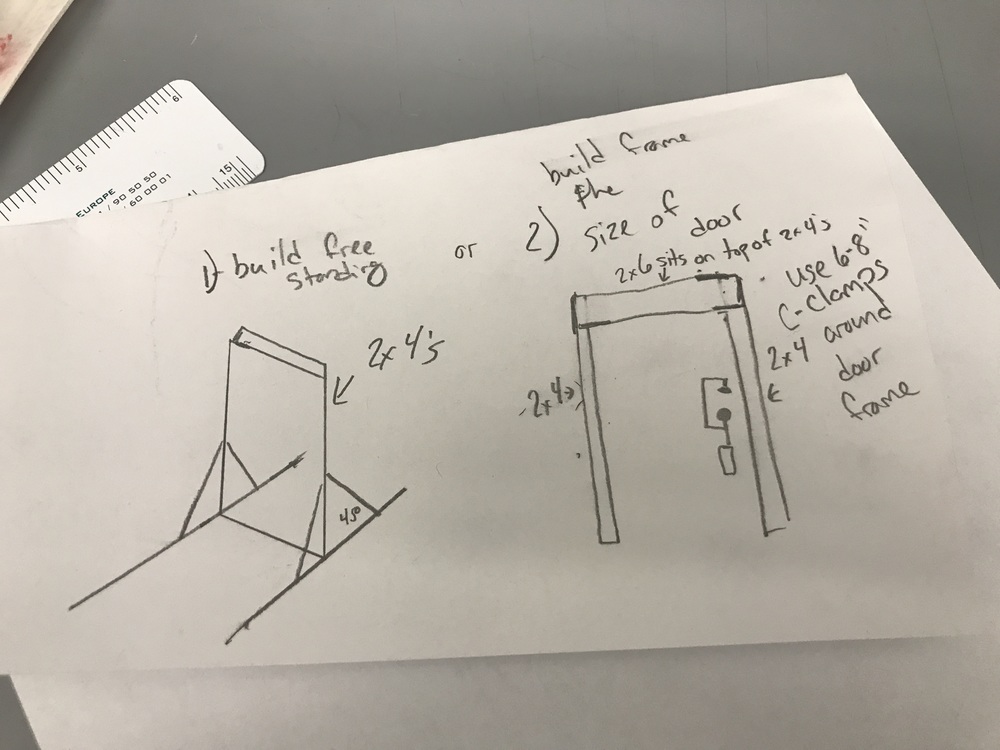 |