|
|
William Kramer
·
Oct 31, 2014
·
Kemmerer, WY
· Joined Jun 2013
· Points: 935
Next noob question, in my mind, the longer the screw, the more secure it will be in a good placement. I read something in a forum a while back that is sticking in my my mind however. Someone had stated that the BD screws had the same number of threads on their 13cm as they do on their 16cm, and that it is number of threads that make them secure, not length.
May have been 16cm and 19 cm, or 10cm and 13cm, can't really remember length stated, was more curious if that was an accurate statement about thread count?
|
|
|
turkbrim9
·
Oct 31, 2014
·
Unknown Hometown
· Joined Dec 2012
· Points: 0
It is the thread count that has the holding power and the 13cm and 16cm screws do have the same amount of threads. The 16 cm screw will be better if you are placing it in ice where the first couple inches are not of good quality. If you have a longer screw the threads will reach the quality ice instead of being in rotten surface ice. However, you should try and scrape off any rotten ice before you place the screw anyway. I hope that made sense.
|
|
|
turkbrim9
·
Oct 31, 2014
·
Unknown Hometown
· Joined Dec 2012
· Points: 0
Also, Here is previous thread on screws if you want info on peoples opinions of preferred lengths and brands. My two sense is below. Cheers.
mountainproject.com/v/ice-s…
I like BD express ice screws. Some people prefer petzl or grivel. 13 and 16 are my work horse screws, that is what I mostly use on route. You'll hear many debates on more 16's vs. more 13's. Some people like more 13's. I have more 16's then 13's (only a few more). I like to use 16's on route, as well as for my anchors on multi pitch routes, that's why I have more 16's. I carry a couple 10's for thin ice and a 22 for v-threads and/or my anchor. I climb in the north east.
|
|
|
Xam
·
Oct 31, 2014
·
Boulder, Co
· Joined Dec 2011
· Points: 76
All the BD screws have the same number of threads except the 10 cms, which are a couple turns shorter. The number of engaged threads is proportional to the pull out strength of the screw in good, solid ice. The idea of longer screw is that the deeper ice is generally denser, colder, and stronger. This may or may not be true. Sometimes you can sink a 19 into an air pocket and it will be worthless. The advice of will gadd from his often quoted blog is to dig for the good ice. In other words, use your tool to clean and uncover your placement and make sure it is good, blue ice before you start your placement. This is excellent advice but is analogous to inspecting cam placements before trusting them...i.e. it is not always done religiously when pumped or climbing at your limit, although it should be.
Most people lead on a couple 10s, a healthy mix of 13s and 16s, and a couple 19s or 21s for belays for a total of 10-12 screws. Second a good, experienced leader to find the mix and brand that is right for you and your area.
|
|
|
Kevin Zagorda
·
Oct 31, 2014
·
Glen Haven, Co
· Joined Jul 2008
· Points: 600
Everything stated above is right on and here's why: Screws tested in solid ice don't fail, the ice around them fractures and the screw pulls out a "dinner plate" attached to it. So in good ice, the deeper the screw, the more solid the placement. That being said, shorter lengths placed in good ice have been shown to be more than capable of holding the forces generated by a fall. It's the ice quality and thickness that would dictate the need for longer screws. Also, a longer screw is useful for building an "A" thread.
|
|
|
FosterK
·
Oct 31, 2014
·
Edmonton, AB
· Joined Nov 2012
· Points: 67
I'll reiterate what everyone has said above:
Ice screw strength is due to threaded length, not total length. This is the same reason a screw is strong in a negative orientation (10 degrees, hanger below teeth) as it aligns to forces along the long axis of the screw and more evenly weights the threads.
Only very short screws (i.e. 10 cm or less) have less threaded length, while 13 through 22 have the same amount. I rack a majority of 13s, a handful of 16s, and 22 for v-threads.
Using length to drill through aerated ice is good way to get a garbage placement. Clean each placement, if necessary, before placing a screw. If you are too pumped to clean a placement you are probably leading to hard a grade.
|
|
|
William Kramer
·
Oct 31, 2014
·
Kemmerer, WY
· Joined Jun 2013
· Points: 935
Kevin Zagorda wrote: Also, a longer screw is useful for building an "A" thread. What is an A thread?
|
|
|
JohnnyG
·
Oct 31, 2014
·
Unknown Hometown
· Joined Nov 2009
· Points: 10
William Kramer wrote: What is an A thread? it's a vertical v-thread. go figure.
|
|
|
doligo
·
Oct 31, 2014
·
Unknown Hometown
· Joined Sep 2008
· Points: 264
^^^ Also known as an "Ablakhov"
|
|
|
Warbonnet
·
Nov 24, 2014
·
Utah, India and Cambodia
· Joined Nov 2013
· Points: 630
No, an "A" thread is not an Abalokov thread....those are called "V" threads (counterintuitively). They are drilled in the horizontal plane with two ice screws (new gadgets available) about 10" to 12" apart (varies according to ice quality) at about a 60 degree angle such that they "meet" (if you're good) to form a "V". Push, jam, twist, shove, cajole one end thru a hole until (with sweat & luck) it appears like a tapeworm out the other hole. I use 6mm cord; others use other diameters. My choice of knots to tie the ends together is a well-dressed, tight overhand with long tails (see photo; isnot mine...stock photo but textbook great "V" thread. Many will cringe at overhand knots (no, it's NOT the badly named European 'death knot') but it's simple & proven strong. Safer to sacrifice a biner thru the tied thread, rather than simply run your rope over the 6mm. Slip one end of your rope thru the carabiner or rappel ring, find the other end and tie them together with an overhand knot (very long tails......16" plus). Beginning with the tied ends, coil the co-joined ropes about half way up (+/-). If ice is steep enough, simply let the first half slither down the ice, otherwise, you'll have to toss them. (Make sure you have a knot (figure eight, butterfly, etc.) clipped to the thread or to an ice screw so you don't end up throwing the entire rope to China, and you with it, wrapped around your new boots. Wait for the first half to stop (wherever) and toss the second half). That way, you don't run the risk of the whole thing being a spaghetti bowl. Too many people throw the whole thing at once; there are better ways.
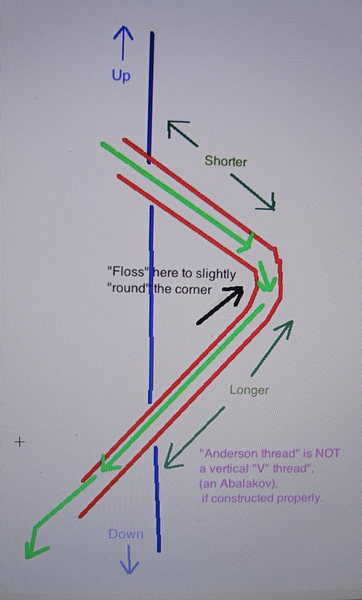
AN "A" THREAD IS AN "ANDERSON THREAD", NOT...NOT A "VERTICAL "V" THREAD". Tempting to call it that (and even construct it like a "V" thread) but if constructed properly, "A" threads are the way to go; you won't use a "V" thread again. Will explain.
Note that "V" and "A" threads have been shown to be stronger than screws but that's a simplified statement. "A" threads have been shown to be stronger than "V" threads; I've yet to read a study that proves otherwise but they may be out there.....I've just not seen it/them.
This photo (it's not mine; stock) is a good one of a very good "V" (Abalakov) thread: good spacing between holes, LONG V-shaped body. If my buddy has a spare carabiner to spare, I'd swipe his and clip the thread, then run the rope thru that instead of rope on rope, esp. if doing multiple rappels. Even if he/she doesn't have a spare, I'll snag it when they aren't looking.
Properly built "V" thread; good spacing, good length (unusually good)
I had to be dragged thru ice screws before I was baptized in Anderson's but once there, I've never looked back. In general, ice fractures horizontally, not vertically, so I had to go to reform school in order to imprint that. (I don't know of a "V" thread (horizontal placement) breaking the ice IF it's constructed properly, so let's say that's moot). Nevertheless, I still thought vertical placement of holes just didn't "feel or look" right. But many tests have shown this alignment to be superior (some climbers slightly offset the vertical alignment). While my drawing is terrible, deciphering it shouldn't be if you stay up for three days straight....then it makes sense. Note that the 'borings' are NOT the same length as they would be in a "V" thread. The top boring is shorter, the lower one longer (actually, the lower one should be much longer than depicted. (This is a scaled drawing; I would make the bottom boring even longer). So what's the advantage to Anderson's? First, they are MUCH easier to thread (even if you have the best Candella in the world); just lace the 6mm down the first boring. Once at the junction with the longer boring, and being somewhat gentle, the cord should easily slide down the longer chute. BEFORE you tie the ends together (with an overhand knot), "floss" the inside "v" just a bit in order to round it; makes it easier to slide the cord in order to tie the knot, place hardware on it, etc.
As per above, tie rope ends, toss half a rope at a time.
Here is the REAL ADVANTAGE of an Anderson, should you accept the challenge (reform school may be required first). Do a "threadless" rappel. No cord. Simply slip the end of your climbing rope, starting with the top boring, through the chute (will now slide like hot butter cuz of flossed junction), out the longer boring. Of course the longer boring is done for a reason and it's this; once you've backed off on rappel and you've gotten over every psychological hangup you've ever had because THIS experience puts it all in perspective, once at the bottom of the rappel, pulling the rope down will be one of the easier rope handling experiences you've had. No jerking, no hanging on it, just an easy pull and it will come home. For the environicks in all of us, there will be no rap material laying about come spring (on some popular climbs, i've seen stacks of it).
Like any rappel system on ice, backups for backups can be as many and as diverse as you like. Just don't put too many holes near each other or you're risking too much.
Blue vertical line is the ice, red are the two borings, green is the rope. How far back you "drill" and which screw length you use depends on ice conditions. I usually use a 22 at the bottom and start with that one; back it out several turns and line up the top boring. (I also find Anderson's easier to line the borings up, more so than horizontal "V" threads.)
As with all ice borings, you don't want to be hanging around longer than necessary or put a lot of unnecessary weight on the threads such as your pack, your hammock, etc. because the threads will start to melt out. Set up rappel and go.
See ya on the way down.
"Anderson thread"
|
|
|
Warbonnet
·
Nov 28, 2014
·
Utah, India and Cambodia
· Joined Nov 2013
· Points: 630
A better drawing than the first one I posted (I think it's the post before this one). That showed the red lines (the boring lines cut by the ice screws) as extending past the face of the ice. Like magic.
I also showed a better ratio of the upper boring to the lower one (if the ice is good, I use 16s and 22s. I like boring the lower one (22cm) first because I can look down on top of it and get a better "line up" perspective when boring the top one. As I said before, I slightly off-set A-threads from a dead-vertical plane (about 1" or so); takes practice to line up the top-most and bottom, longer screw. I do this because I read a few studies several years ago that it makes "A" threads a bit stronger but anyone w/different info, please weigh in here.
I admit it was weird when first using them but I backed them up with something else above the "A" thread until I got used to them. As mentioned before, besides "A"s being stronger, the rope pull is much easier - like greased (if one threads the rope thru the hole instead of using 6mm+ cord.) Another advantage of running the thicker rope (& not the 6mm cord) thru the borings, hopefully one that will not be necessary, is if there is a chance you may end up, for example, on an overhang or some other obstacle that will cause you to hang around for awhile, thus weighting the cord or rope through the borings, they stand a chance of melting out (which they will be doing anyway but slightly....don't worry about it). I wouldn't be overly concerned....but I'd take it into account if the sum total of the rappel(s) was on the dicey side, esp. if you are not familiar with the rappel route.
Final note: if you are using two ropes to rappel, i.e., tied together, make sure you tie them AFTER you have threaded one through the bottom exit hole (i.e. knot at the bottom of the construction site). The reason should be obvious, however, it's one that I learned the hard way. It was a good lesson though because it taught us how strong those threaded holes are (and how long it takes to finally break the ice in order to free the ice. Yes, we thought about re-climbing it but it was on the 6 side so we passed.
A properly constructed "Anderson thread" (looking sideways at it).
|

 Continue with onX Maps
 Continue with Facebook