Continue with onX Maps
 Continue with Facebook


What does your Woody look like???


|
|
I don't have any other pictures, sorry. The pillars are framed 2x6 and plywood. The biggest key though to making the cracks not flex is a rigid, well-secured backing. I used 3/4 plywood supported with 2x4's. |
|
|
Hey guys, |
|
|
would you recommend buying a start set of holds, if so what brand, or just buying individual holds? |
|
|
My long term budget is for the holds to be about half the cost of the wall. Upfront though that feels like a huge commitment so I have been going about it slowly. |
|
|
+1 to Dominic's suggestion to check with your local climbing gym for old holds. Some may be chipped and require some TLC sanding, and most will probably be slick. |
|
|
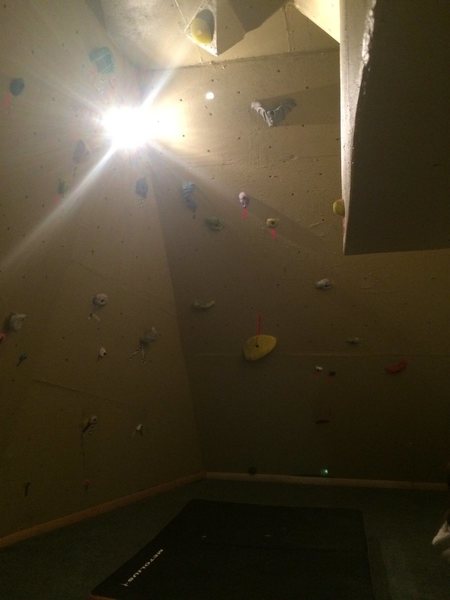
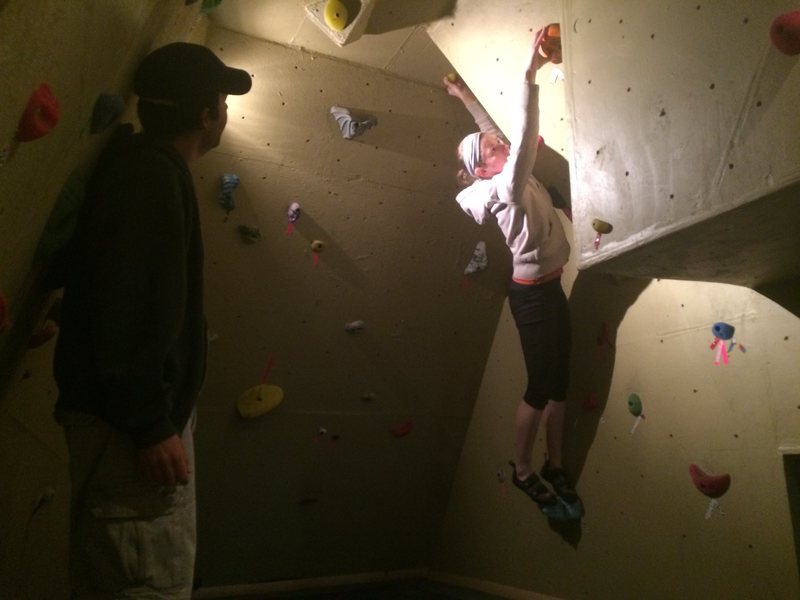
I can finally contribute. I've been perusing this forum for ideas the past few weeks, and finally have my woody climbable. It's only about 1/3 complete, but is already a total blast to play on. Now I need to figure out the ratio of time devoted to route setting, climbing and finishing the rest of the room. This room was what convinced me to buy this house, and I'm glad I did. I haven't really worked with wood since 8th grade shop class 15 years ago, and my geometry skills from that same time period came back too. If the only thing holding you back from building a woody is you don't think you're skilled enough, trust me, you are. |


|
Nice woody, |
|
|
Luke Hollomon wrote: Adjustable Pitch (Is this necessary? I just think it would be good because we are new climbers)Hi, the problem with adjustable with chains and slings is that they move when you do quick moves. In my experience they only work when bouldering straigth up or down or with a slow flow; even a move of one leg (Example: losing grip (and stand) on foot hold) will make the hole plywood sheet move. This happens because the chain gets rigid when in get pulled downward but not in any other direction. A solution that occurs to me is to install chain in the other direction as the one behind the plywood (on the sides of the plywood frame, so it doesn’t get in the way of the climbing area) and when making the adjusted, thigh the chains that make opposite force.  I think it´s a good idea to have an adjustable wall but it takes more time to build (more chances to get disappointed and end prematurely the project) and you have to build the adjusting system easy to handle, other wise you are not going to use it. |
|
|
Sanllan wrote:Nice woody, What are the room dimension? and angles? Also, is there a forum for home made climbing holds?Thanks! It's 8' wide, 8' deep and 9' tall so far. I just started Working on the north wall yesterday, which will be a stair stepped roof. The angles I have in the corner are 30 on the left side, 35 on the back and 40 on the right. As far as climbing holds go, I've made several of my own, of course the silicone mold will be the most expensive part. If you go down that route, make molds that are very versatile, like jugs or simple blocky feet. You will eventually save money if you make enough, just keep it super simple. I use hobbysilicone.com. |
|
|
Metolius' plans call for #8 x 2" screws to attach the ply sheets to the framework.. I have 5lbs. of #8 x 1 3/4" screws, and I plan to use what I have. Anyone think that'll be an issue. |
|
|
Kevin, |
|
|
This is how look my woody, thanks to all of you |
|
|
I'm building a woody, outdoors, on the north facing wall of my garage. It's a gable end, of an old garage. So it's 13' wide up to about the 8' tall mark, then it's a giant triangle up to the peak which is about 16' off the ground. lThe original construction is board and batten, so I've added secondary framing, consisting of 2x2 every 16" on center, then used 2x4 material to build various slopes (one section overhangs 18 degrees, to a mantle move), another section climbs to a horizontal roof, once the roof is cleared, there's a low angle finish. |
|
|
DaveB wrote:How tall is your basement? |
|
|
Javier Larios wrote:This is how look my woody, thanks to all of youNice, What´s the angle of your woody? and how tall is your ceiling? (in meters) |
|
|
Finally got my woody completely finished. I know there's a lot of pictures, but if you are on this forum looking for ideas like I was a while ago, they should help. Now time to develop a training plan for the winter. |
|
|
Apart from craigslist mattresses, which may very well be the best option, has anyone come across a creative/cheap/effective method of ground cover? Looking to have semi-permanent cushion under my wall, protecting from the cement floor. Something more than just a couple crash pads. |
|
|
Finished my woody two weeks ago. Here are the build pics:      |
|
|
Kevin Pula wrote:Apart from craigslist mattresses, which may very well be the best option, has anyone come across a creative/cheap/effective method of ground cover? Looking to have semi-permanent cushion under my wall, protecting from the cement floor. Something more than just a couple crash pads.What is did was lay these ( foamtiles.com/tiles/1-jumbo…) down on the base floor then I carpet glued these ( m.homedepot.com/p/Future-Fo…) on top, all cut to size. I then carpeted on top with the cheapest carpet Home Depot had. Make sure you use lots of carpet glue since there will be a huge amount of flex due to the padding, and I would also recommend you put base trim on the bottom of the wall and run the carpet through the trim screws. This will work up to about 10 ft height. After that, use a crash pad, or thicker padding. |
|
|
Just finished my woody - letting the paint cure before route go up.  More pics here mountainproject.com/v/now-d… |