Mountain Project Logo

Homemade Blank Slate, Part II

Original Post
tim f · · Albuquerque, NM · Joined Sep 2006 · Points: 60

In this other thread I posted a picture of a fingerboard that I mounted to an old pull-up bar I had laying around my house. Not satisfied with the quality, I decided to re-do it and thought I'd post up the steps. The steps are a bit terse, you'll have to fill in the nitty gritty as you go.

Parts needed:

  • Door frame pull-up bar [FREE]. If you don't have one laying around, ask a neighbor, surely someone does.
  • 4 1.5" u-bolts [$3.00]
  • T-nuts and screws [$4.00]
  • Piece of 3/4" wood [FREE]. If you don't have something laying around, take it from a neighbor.
  • Fingerboard, or two [FREE]. If you don't have a fingerboard, you'll have to buy one I suppose.

Tools needed:
  • Hack saw
  • Router
  • Sander
  • Drill


Parts needed for homemade fingerboard mount

Step 1
Cut the 3/4" ply wood to the appropriate size. I planned on mounting two fingerboards, so I made it a little on the big side. Pre-drill holes for fingerboards/holds and install t-nuts.

Step 2
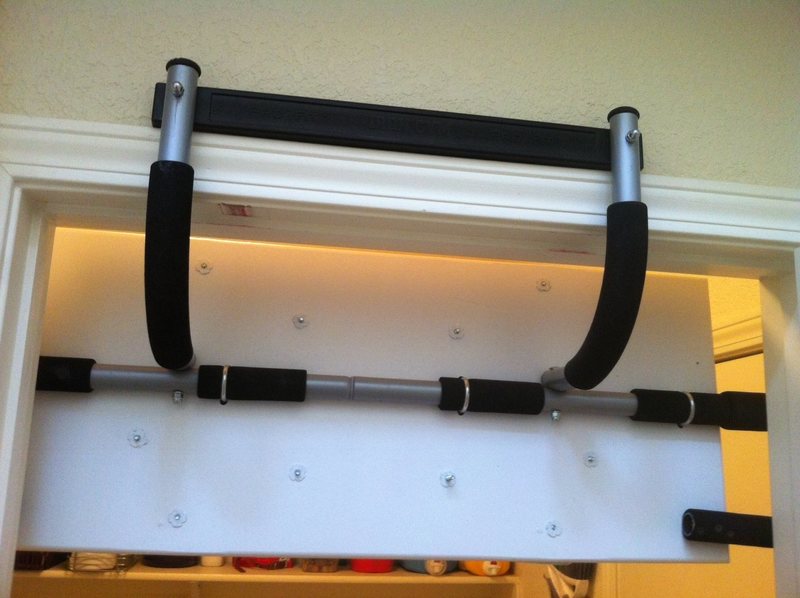
Cut off the horizontal extensions flush with the cross bar that bridges between the sides of the door. The arrows in the first photo indicate where I had already cut off the aforementioned bars. Save the small bars you cut off, you'll need them later.

Step 3
Determine where you will mount the ply wood on the pull up bar, drill holes for u-bolts, mount the ply wood to bar with u-bolts to check for fit.

Step 4
Take it all down, router, sand, and paint the ply wood.

Step 5
Drill and screw the small bars you cut off earlier to the bottom of the back side of the ply wood. This helps stabilize the board in the door frame (otherwise it sways and rotates too much). The next photo shows the cut off bars re-mounted to the backside of the board.

Step 6
Put it all back together and enjoy.

More photos:

Backside showing bottom stabilizer bars installed.

Backside of board

Finished product. I had not yet installed the bottom stabilizer bars.

Finished board

Advantages over store bought systems:

  • Cheap (if you have the necessary parts/tools laying around)
  • Adjustable angle
  • Board sits flush to the door so it is more stable
  • Easily modifiable
  • Homemade is way cooler than store bought
DrProc · · Unknown Hometown · Joined Mar 2013 · Points: 0

Hi Tim,

Would you mind posting a picture or two with the stabilizer bars attached? Can you also talk about how much flex you experience when doing hangs?

Thank you!

tim f · · Albuquerque, NM · Joined Sep 2006 · Points: 60

DrProc, the "stabilizer" bar is shown in the pic of the backside. I just screwed on the excess I had previously cut off. Its only purpose is to prevent the board from rotating under the door header when weighted. You could use anything to serve the purpose, I just used the scrap laying around.

kenr · · Unknown Hometown · Joined Oct 2010 · Points: 16,608

Very nice approach, building on the long-refined design of commercial pull-up bar. And very nicely executed.
Thanks a lot for sharing it.

I agree that exploiting doorways is key for making useful training structures for those of us who live in apartments.

I find that if I can screw metal fittings for an (older design commericial) pull-up bar (or heavy-duty closet rail) into the sides of the doorway -- then I can use that horizontal bar as a "base" for adding other structures.
. (Also a horizontal bar below a fingerboard adds other possibilities, like self-belay for foot-support-assisted hangs on single arm.)

Now seeing this design gives me some more ideas for how to construct other training structures (e.g. short campus ladder inclined, or mini-System-board).

Having one fingerboard below the other like this enables lots of fun + interesting moves: like campusing off holds on the lower board up onto holds on the upper board.

Ken

Anonymous · · Unknown Hometown · Joined unknown · Points: 0

Nice!

I have a Blank Slate myself and love it! I didn't have an old pull up bar around and honestly - I was lucky in-that I could afford the price of the Blank Slate and just buy one already made. I have 2 actually - the larger and the smaller version. Currently tho, I am mainly using the smaller version with just METOLIUS training board on it and no individual handholds.

I like the Blank Slate a lot! It's ROCK SOLID, does NOT flex nor move at all, is adjustable for ANGLE of the board - can it be adjusted easily to lean BACK more than 90 degrees or forward as well - making hanging onto holds even harder! They def make a nice quality product and assembly is quite easy to accomplish as well - tho not cheap in price!

I would not hesitate to buy another one again honestly! It's rock solid, heavy in weight and looks nice too in my home!

Nate Reno · · Highlands Ranch, CO · Joined Oct 2008 · Points: 156

The black foam on the bars can eventually leave marks on white doorframes, consider wrapping them with something to prevent this.

Anonymous · · Unknown Hometown · Joined unknown · Points: 0

Yes that's what happened to me to the on the black foam pads marked up my doorways and kind of stuck to the white paint and pulled it off.

Alex Bury · · Ojai, CA · Joined Jun 2012 · Points: 2,376

That board rocks.

Guideline #1: Don't be a jerk.

Training Forum
Post a Reply to "Homemade Blank Slate, Part II"

Log In to Reply
Welcome

Join the Community

Create your FREE account today!
Already have an account? Login to close this notice.

Get Started