Continue with onX Maps
 Continue with Facebook


Please Critique


|
|
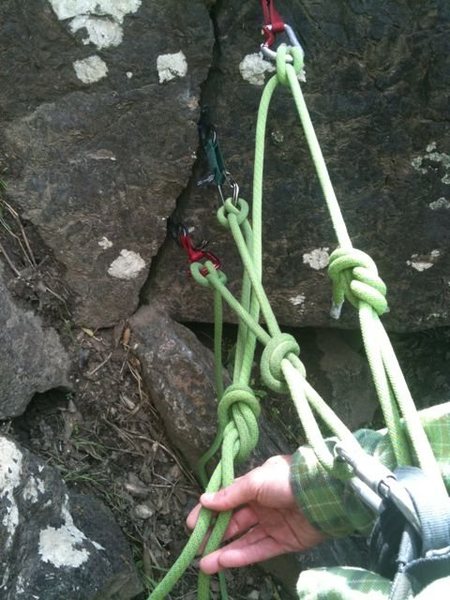
So I've been trad climbing for about a year now and have mainly done single pitch climbs where I have only needed to build anchors focusing on a downward pull, but I have also been on multi-pitch climbs where there were bolted anchors. Within the next few months I have my eyes set on some climbs that require gear anchors, so I have been practicing on the ground and would like to know if you guys could let me know how it's looking. Thanks guys, I usually have a crusty old stonemaster to ask, but he is not around for the moment. |
|
|
On the last photo, is what looks like a flake, well adhered? And are you wrapping a set of C4's around the edge of the flake for 2 out of the three pieces? Is the system tight enough that the upward piece won't allow the top pieces to get shock loaded in an upward pull situation? |
|
|
The only issue I see with any of those anchors is that you used both of the #1's that you brought with you on the climb and you're partner is gonna freak at the 20 ft of thin hands on the next pitch! |
|
|
Leeroy Jenkins wrote:The only issue I see with any of those anchors is that you used both of the #1's that you brought with you on the climb and you're partner is gonna freak at the 20 ft of thin hands on the next pitch! Other than that, all those anchors look text book bomber! I'd climb on any of them.And the .75 too. Those are the pieces I rarely have when I reach the belay stance, so my anchors are much more "creative" |
|
|
If the flake was/is questionable best not put all your expanding eggs in one basket behind it. You could put something in the crack on the right, thus eliminating at least one cam kink factor. |
|
|
I'd be pretty psyched to climb up to any of those anchors, good job! |
|
|
Nice. |
|
|
In your first pic, it appears as though the master point is linked to only two points of the anchor. Is that a fatal, 'you're gonna die' flaw? Eh, maybe not. But, to add a bit more security, you could work that third piece of pro into the master point pretty easily. |
|
|
Nice job, |
|
|
Dito what many others said regarding using cams for the anchor. Try to assess the next pitch for needed gear and use other pieces for the belay if possible. In, addition using the rope for the anchor is ok, but if for some reason your partner cant send the next pitch and you have to take over, you wil have some serious time loss on that transfer. Using a cordalette or long sling( I carry an 8 ft sewn sling from bd). In your pictures your anchors are all pre-equalized which means they will only share a load when pulled in that exact direction(unlikely) for a stronger anchor use a self equalizing system such as a sliding x with limiting knots, this will distribute the load more evenly to each piece and make a stronger anchor. |
|
|
Anchors look solid. I would climb with you any time. |
|
|
They all look good to me so long as that feature is solid. I usually just go for the cordolette unless the anchor really lends itself to tying it together with the rope - I'm usually carrying it anyways if i'm on multipitch. There's alot going on in #1 and if you end up not liking your position it's not possible to extend it. Since every piece you placed in each anchor is a cam, they should be fine for an upward. I usually try and be more creative with the anchor gear though so as to not use all the cams the second is going to want for the next pitch, especially not all the cams of a particular size. |
|
|
There is absolutely nothing wrong with using the rope for the belay and it won't "cost you a bunch of extra time" when you have to switch leads. Rope only anchors only seem complicated to those that don't know how to build them. Just keep doing what you're doing. |
|
|
Great! Thank you guys, this is inspiring some confidence. I do seem to lean towards the cordelette method since I can set it up faster at this juncture of my anchor building. The only thing I'm having a hard time with is how to shorten the cordelette if it's too long for the belay stance I'm at? How do I shorten it? |
|
|
Nathan Stokes wrote: Is the system tight enough that the upward piece won't allow the top pieces to get shock loaded in an upward pull situation?Shock loaded in the upward direction?! I thought the "shock loading" phrase was beat to a pulp before, but you took it to new heights. Congrats. |
|
|
Gilles. First of all the anchors look fine. I have set and been belayed off FAR worse. There are some good comments above that cover most of the opportunities for improvement that I see. |
|
|
crag dweller, thanks for that vid link. that was helpful to me. |
|
|
Gilles wrote:Great! Thank you guys, this is inspiring some confidence. I do seem to lean towards the cordelette method since I can set it up faster at this juncture of my anchor building. The only thing I'm having a hard time with is how to shorten the cordelette if it's too long for the belay stance I'm at? How do I shorten it?A few options for shortening the cordelette: don't pre-tie it in a loop, carry one untied, then you can use an EKD (European Death Knot, aka overhand) or figure eight to make it the length you want for your anchor. If that's not your thing, you can use the "figure 11" at your master point, which is just a figure eight with many extra wraps around the body of the knot before you tuck the last bit of loop through the bottom to form the clipping point, to suck up the excess length you don't want. (It looks like you used this method in one of the anchor pictures already) Optimally, try make your anchors higher than your belay stance. Look for gear placements slightly above head-level. The ideal place for your master point is about chest level, so then you won't have to shorten your cordelette. |
|
|
The only thing I'm having a hard time with is how to shorten the cordelette if it's too long for the belay stance I'm at? How do I shorten it?
A great way to shorten that cordelette is to clip a bight to one piece instead of a strand, then pull the bight through and incorporate it into the masterpoint, effectively doubling the amount of cord used for that piece. That will have the effect of shortening your masterpoint, but the risk is that by doing so, you increase the maximum internal angle of the anchor, potentially exposing your gear to multiplied forces. A good rule of thumb is to always keep that maximum internal angle under 90º - and less is better. The cordelette is definitely my favorite anchor tool, although I'll often just use the rope on the top out pitch. I really like that it allows you a good selection of clip in points (shelf and masterpoint) which keeps the belay organized and efficient. Another advantage is that it doesn't force you to untie in order to have one partner lead 2 pitches in a row. |
|
|
In all seriousness, since you are looking for critique, the top one is the better of the two "rope" anchors. But, to improve without any extra gear would be the sequence in which you tie in giving a slightly different result. I call it the UV because of the shape and sequence. So, in your top photo: |
|
|
Greg D wrote:In all seriousness, since you are looking for critique, the top one is the better of the two "rope" anchors. But, to improve without any extra gear would be the sequence in which you tie in giving a slightly different result. I call it the UV because of the shape and sequence. So, in your top photo: Go from waist to top piece and clove as you did. Then clove to middle piece leaving a "U" between the two pieces. Then to a locker on your belay loop. (don't bother clipping leg and waist loop as you did). Then up to the bottom (third) piece making a "V". Now you can make an overhand at the bottom of the "U" to hang an autoblock from two pieces. You can easily incorporate the third piece if you wish.That´s the way I´d do it as well, and everyone I know. I wouldn´t bother with the locker on the belay loop though, just tie in with a bight of the rope with a round turn and two half-hitches as that´s the way it was always done (the modern trend is with a re-threaded 8 but this strikes me as slow and horrible). |